Azure MySQL Flexible Server 内网 DNS 集成方案

1. 前言

最近一直在和客户聊云上资源迁移的相关事宜,借着客户的需求测试了一下 Azure MySQL Flexible Server ( 后文简称 MySQLFS ) 集成 Custom DNS 的场景,其实官方文档是有一些说明的,不过为了使方案更直观,还是记录下来方便以后查询,包括其中遇到的“坑”。


2. 需求背景介绍

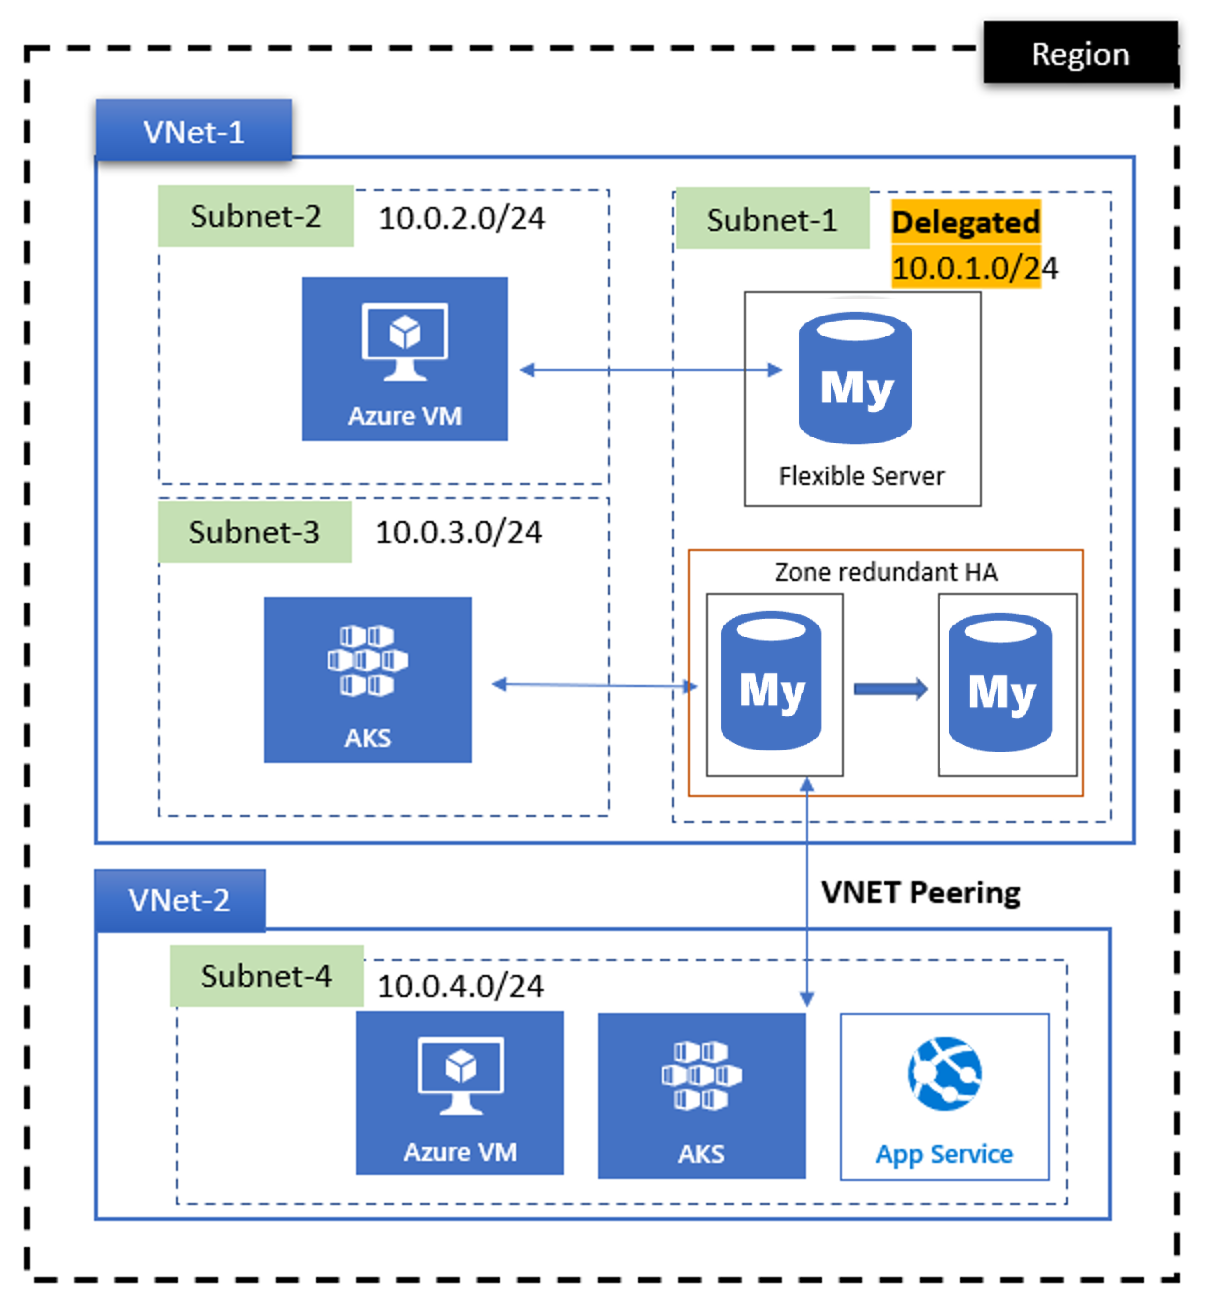
客户原本用的是 Azure MySQL Single Server,现要迁移 MySQLFS,由于 MySQLFS 的网络集成模型和 Single Server 有一些区别,所以在迁移的过程中顺便改造成更安全的内网集成方案。与之前不同的是,MySQLFS 支持 VNet integration 这种 Private access 网络集成方式,这种方式可以让 Azure MySQL 实例只拥有一个 Private IP,以 VNet Injection 的方式集成到 VNet 中,具体的网络部署模型可以参考以下这张图:

需求是在 VNet Peering 互联的前提下,能否在对端 VNet 中的 MySQL Client 使用 Custom DNS 配置来成功访问 VNet Integration MySQLFS,那答案肯定是可以的,不然这篇 Blog 也就没有存在的意义了,好了废话不多说了,直接开搞。


3. Azure MySQL Flexible Server 内网集成 Custom DNS 测试

具体的测试环境如下图所示:

简单介绍下架构: VNet1 和 VNet2 通过 VNet Peering 打通,分别划分两个 Subnet for DNS Server 和 MySQLFS 实例,每个 Subnet 分别挂 NSG,每个 VNet 有 Custom DNS Server,对应 vnet1-vmsn1-dns1 10.11.1.4vnet2-vmsn1-dns1 10.12.1.4,系统使用 CentOS 7.9,Custom Domain 为 example.com,所有资源都部署在 EastUS 进行测试,具体信息如以下几张图所示:

接下来我们来测试两个场景:
1. 启用 Private Access Azure MySQLFS 实例在对端 VNet Peering Client 进行访问;
2. 使用自定义域名访问 Private Access Azure MySQLFS 实例;

3.1 启用 Private Access Azure MySQLFS 实例在对端 VNet Peering Client 进行访问

首先先创建一个 Azure MySQLFS Private 实例,Azure 默认给实例分配的内网地址为 10.12.2.4( DB Subnet 第一个内网地址 ),同样地,Azure 也会给实例分配一个 Private DNS Zone,本实验采用创建实例时 Azure 默认分配的 Zone:vnet2-dbsn1-mysqlfs1.private.mysql.database.azure.com。 其实本质上,Azure 也是通过域名解析来集成 MySQLFS 内网服务的,当创建好实例之后,就会在域名解析服务中增加一条 A Record,如下图所示:

此实例的 Server Name 前缀名为:vnet2-dbsn1-mysqlfs1,部署在 VNet2 DB Subnet 中,也就是说和 vnet2-vmsn1-dns1 所处在一个 VNet 中。再不考虑 NSG 的前提条件下( 也就是说同 VNet 流量出入都放行 ),Client 直接就可以解析 Azure MySQLFS 的域名了。那下一个问题可能又来了,Azure MySQLFS 本身有一个 FQDN,那和这个 Private 域名有什么关系呢?我们来验证一下:

通过 nslookup 的解析结果能看到,默认的 FQDN:vnet2-dbsn1-mysqlfs1.mysql.database.azure.com 是一个 CNAME 指向了 Azure MySQLFS 的内网域名上:vnet2-dbsn1-mysqlfs1.vnet2-dbsn1-mysqlfs1.private.mysql.database.azure.com,然后内网域名在 Azure Private DNS Zone 有一条 A 记录解析到了实际的内网地址 10.12.2.4。那启用了 VNet Peering 的对端 Client 的解析结果又如何呢?在 vnet1-vmsn1-dns1 10.11.1.4 上测试下:

很明显,只做了 VNet Peering 的对端 Client 没法直接解析,究其原因是对端 Client 并不知道 private zone 是什么,所以需要将 VNet1vnet2-dbsn1-mysqlfs1.private.mysql.database.azure.com Link 起来,VNet Peering 对端的 Client 就可以和 VNet2 内一样解析了。

同理,也就明白了为什么 VNet2 默认就可以解析,也是因为 Azure 在创建 Private DNS Zone 的同时加了一条 VNet2 Link,如图标红出所示。

3.2 使用自定义域名访问 Private Access Azure MySQLFS 实例

3.1 我们验证了使用默认的 Azure DNS Domain 来进行 Azure MySQLFS 的内网访问,那如果使用 Custom Domain 比如 example.com 是否可以做集成呢?答案也是可以的,主要验证在对端 Peering VNet 使用 Custom DNS Server 的集成情况。首先在 vnet1-vmsn1-dns1 10.11.1.4 上部署 DNS Server Linux Bind。Bind 就不多做介绍了,很经典的 Linux DNS Server Solution,部署过程不赘述了,不了解的同学们自行 Google 吧。重点主要在 3 个配置文件的配置上:

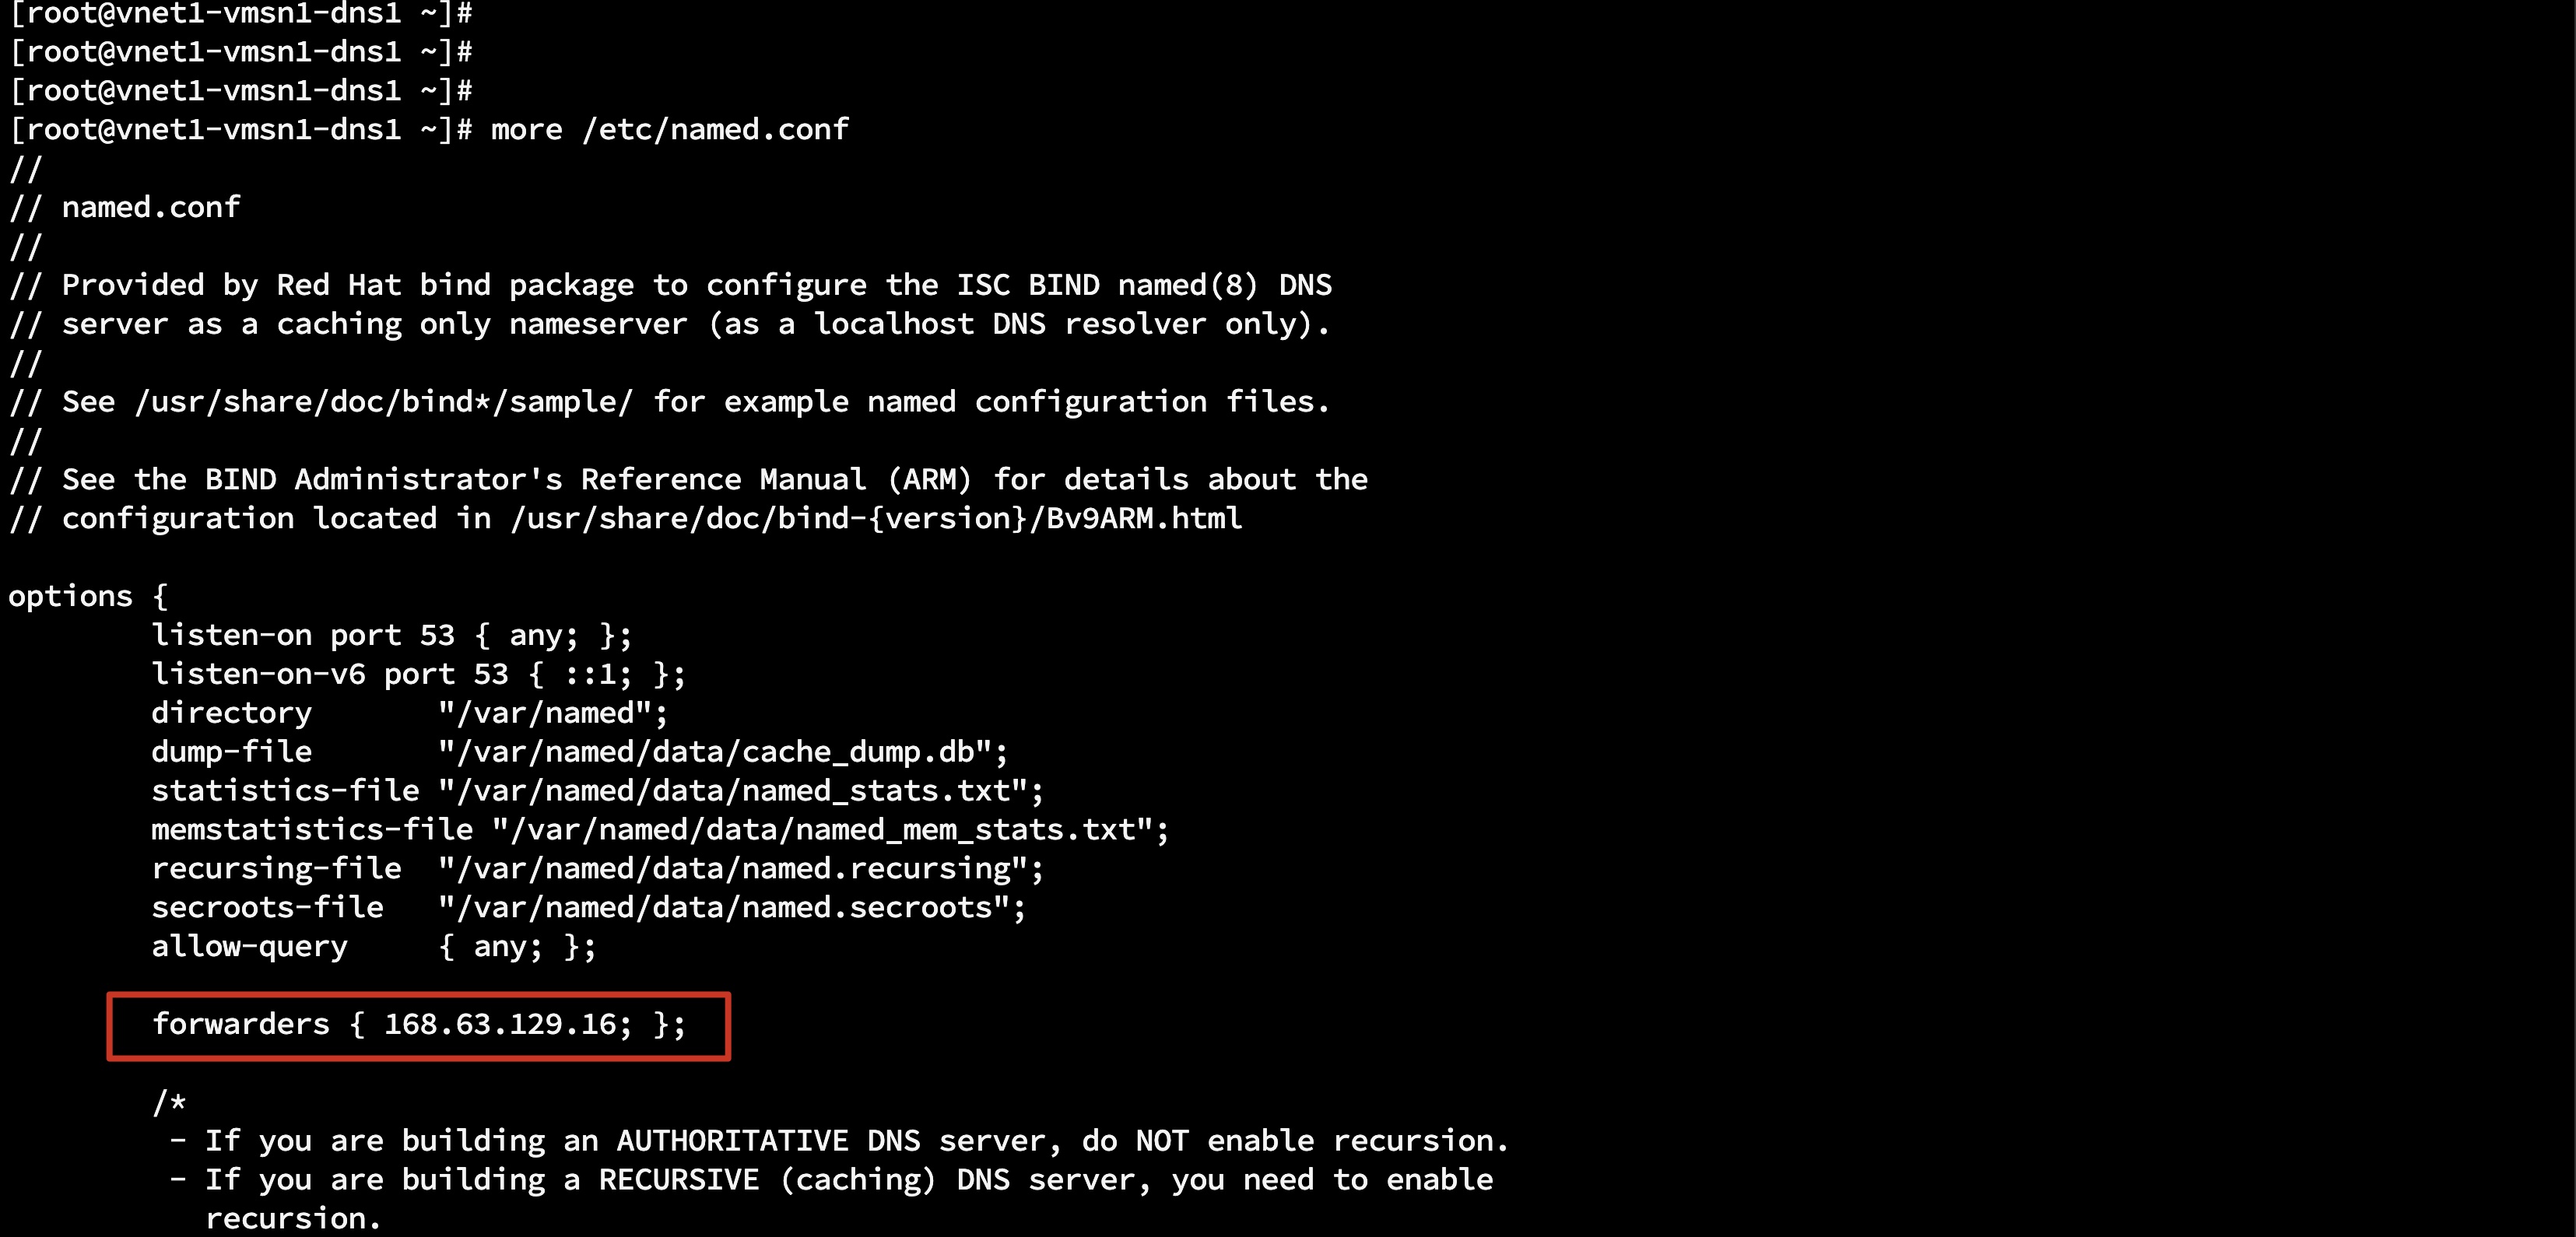
1. /etc/named.conf

DNS Forwarders 需要转发给 Azure Default DNS:168.63.129.16。

2. /etc/resolv.conf

系统 DNS Resolve File 要 search example.com domain 以及修改 nameserver 为 Local DNS Server 地址 10.11.1.4。

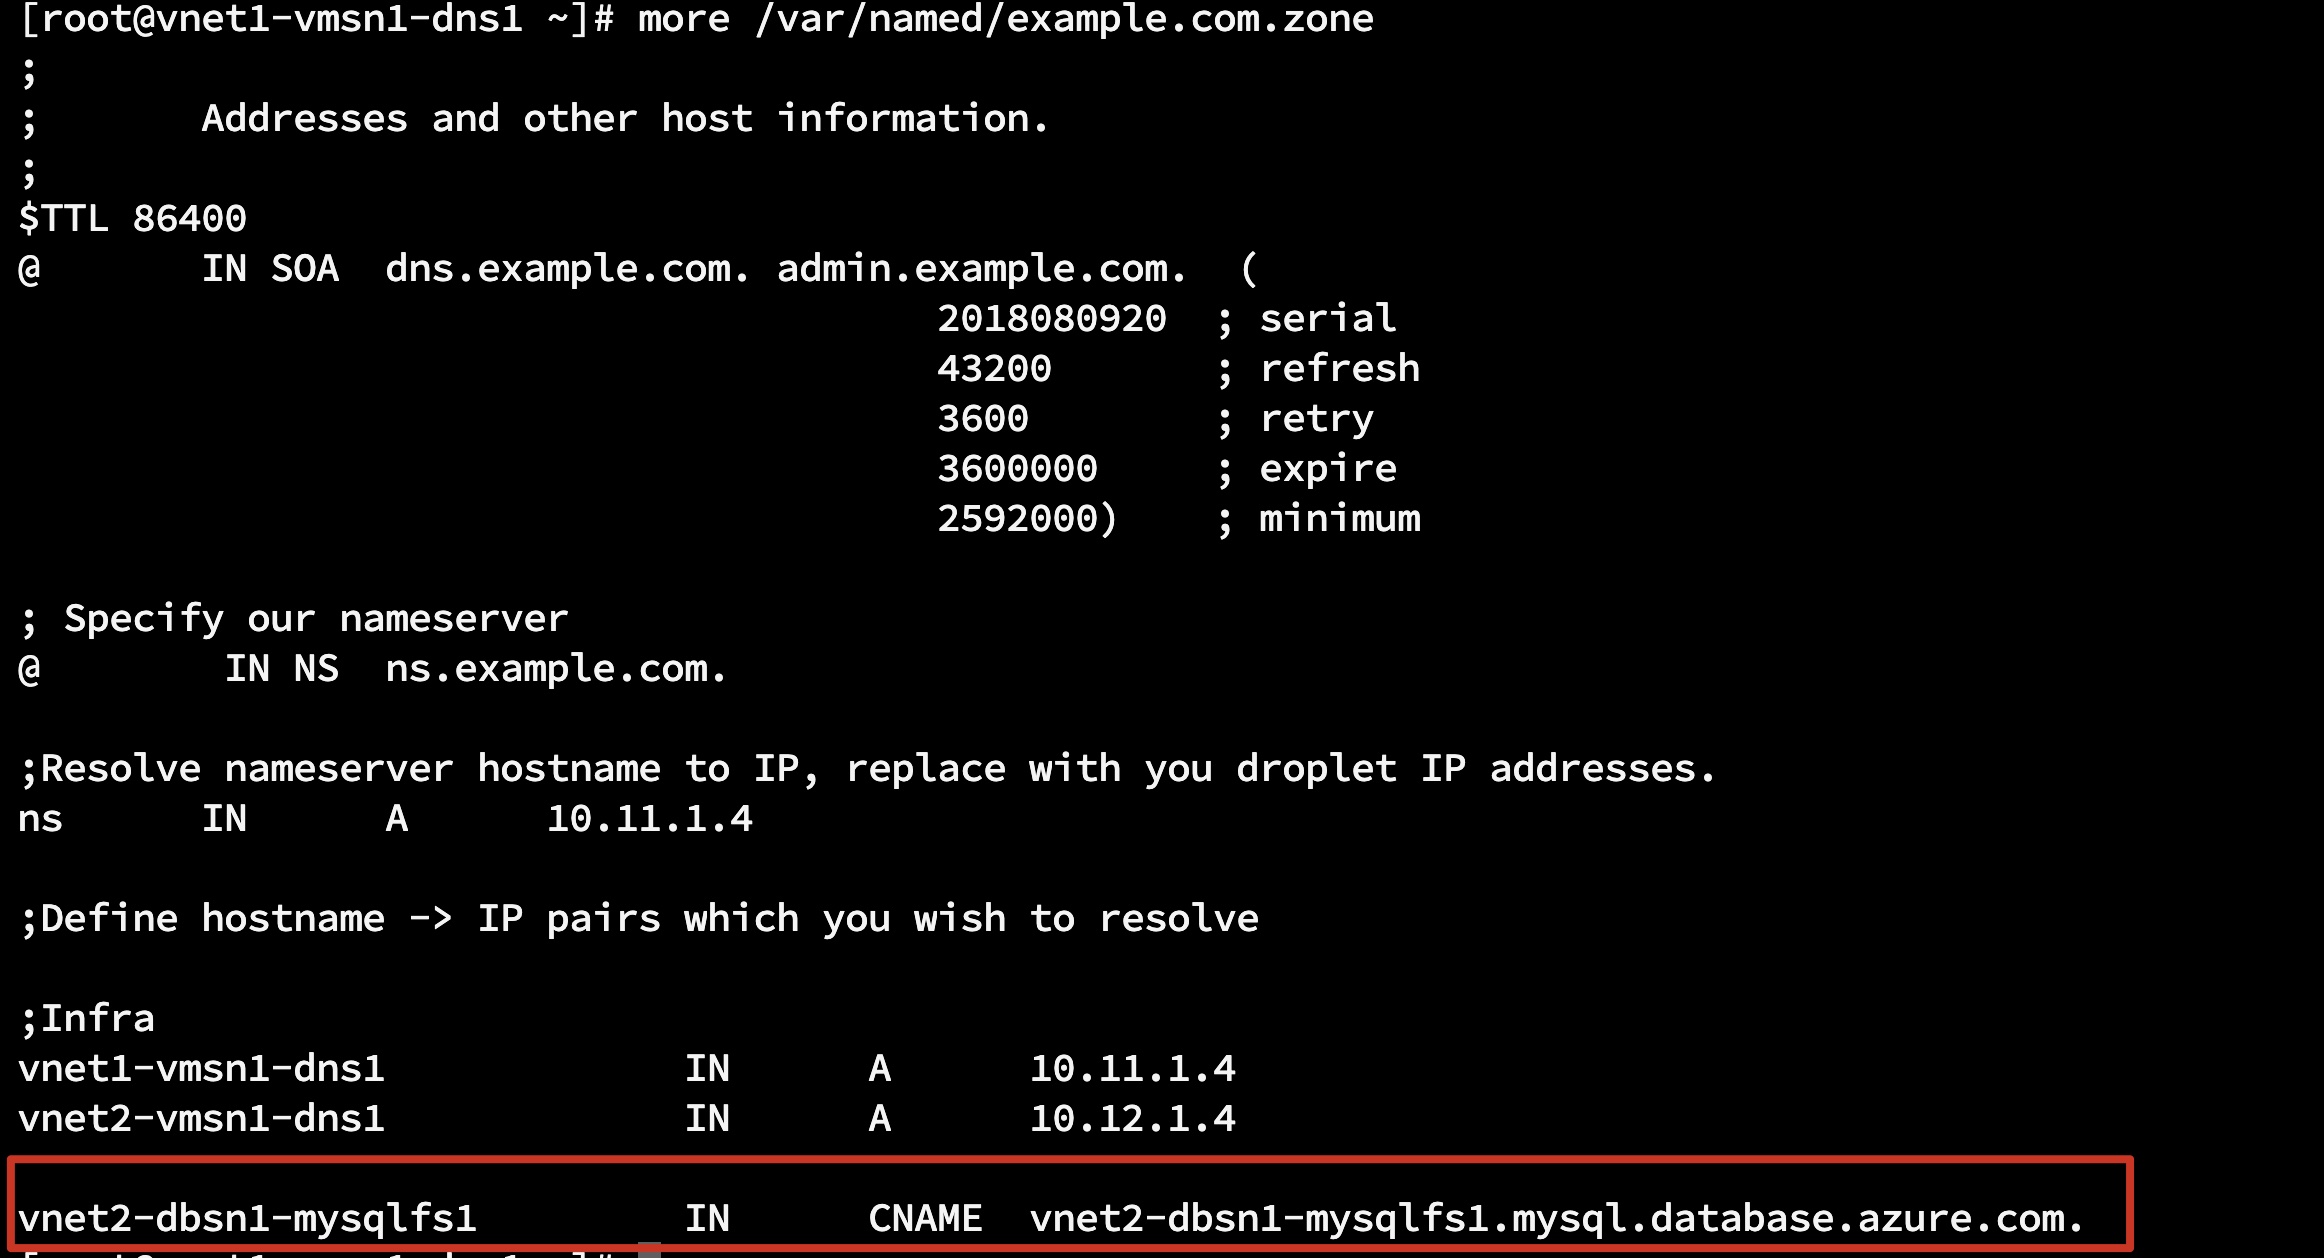
3. /var/named/example.com.zone

正向解析文件 example.com.zone 需要加一条 CNAME Record,如上图标红框所示。在 3.1 的基础上,可以直接通过 Custom Domain 的内网域名来做测试了:

能够看出来,自定义域名 vnet2-dbsn1-mysqlfs1.example.com CNAME 指向了 Azure MySQLFS FQDN,然后 FQDN CNAME 指向了最终的内网域名 vnet2-dbsn1-mysqlfs1.private.mysql.database.azure.com 并最终解析成内网地址 10.12.2.4。


4. 总结

至此,Azure MySQLFS 内网集成的两个场景就测试完毕了,其实大家应该能够感觉到 VNet Injection 这种网络模型其实基本上就是 VNet 里面的 VM,只是封装了一层变成 PaaS 服务暴露给用户,所以这么看的话大家是不是也知道网络层面的管控可以怎么做了?没错,就可以当作 VM 一样,通过 NSG 来限制出入口流量,这个测试下来也是没问题的,不过本篇就不做详细测试了,有需求的同学自己来做测试吧。最后再稍微提几个注意事项给到大家:

1. 关于 Read Replica


创建了两个只读副本,和 Master 一样,Azure 会根据 DHCP 继续向下分配内网地址给到只读副本,然后生成 A Record 解析。

2. 关于访问方式
和研发和后台支持的同学们聊下来,无论是使用 FQDN 亦或 Custom DNS Domain Name,都强烈不建议使用内网 IP 来访问实例,在进行一些平台层面的维护或者启用 HA 的实例,都会发生 IP Floating,所以生产环境一定要用域名。

3. 关于数据迁移
Azure DMS Service 针对 SingleServer - Flexbile Server 又推出了一个 online 的迁移方式,本来 online 这个功能都下线了,可能是为了方便客户做迁移,单独针对 MySQLFS 上线了,这个功能在这里提一句,后面我们也测试看看实际效果怎么样。

4. 域名解析
以 VNet Injection 方式嵌入的 Azure MySQLFS 在域名解析上和其他云厂商有些许不同,经过测试发现非 VNet 环境是无法解析 MySQLFS 的内网域名的,像 AWS RDS 就不一样了,是可以在公网解析的,解析成 Private IP,只是无法访问罢了。

暂时就能想到这些,先写这么多给大家参考吧,后面有啥补充我再查缺补漏,谢谢大家。

Azure Image Builder(二)之自动化构建自定义托管镜像 CentOS 7.7 并集成 Azure Shared Image Gallery 做全球分发

1. 前言

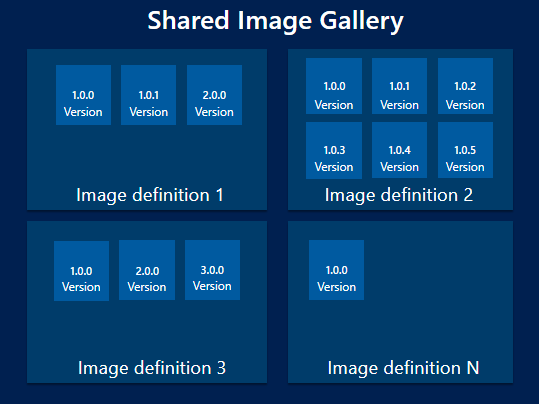
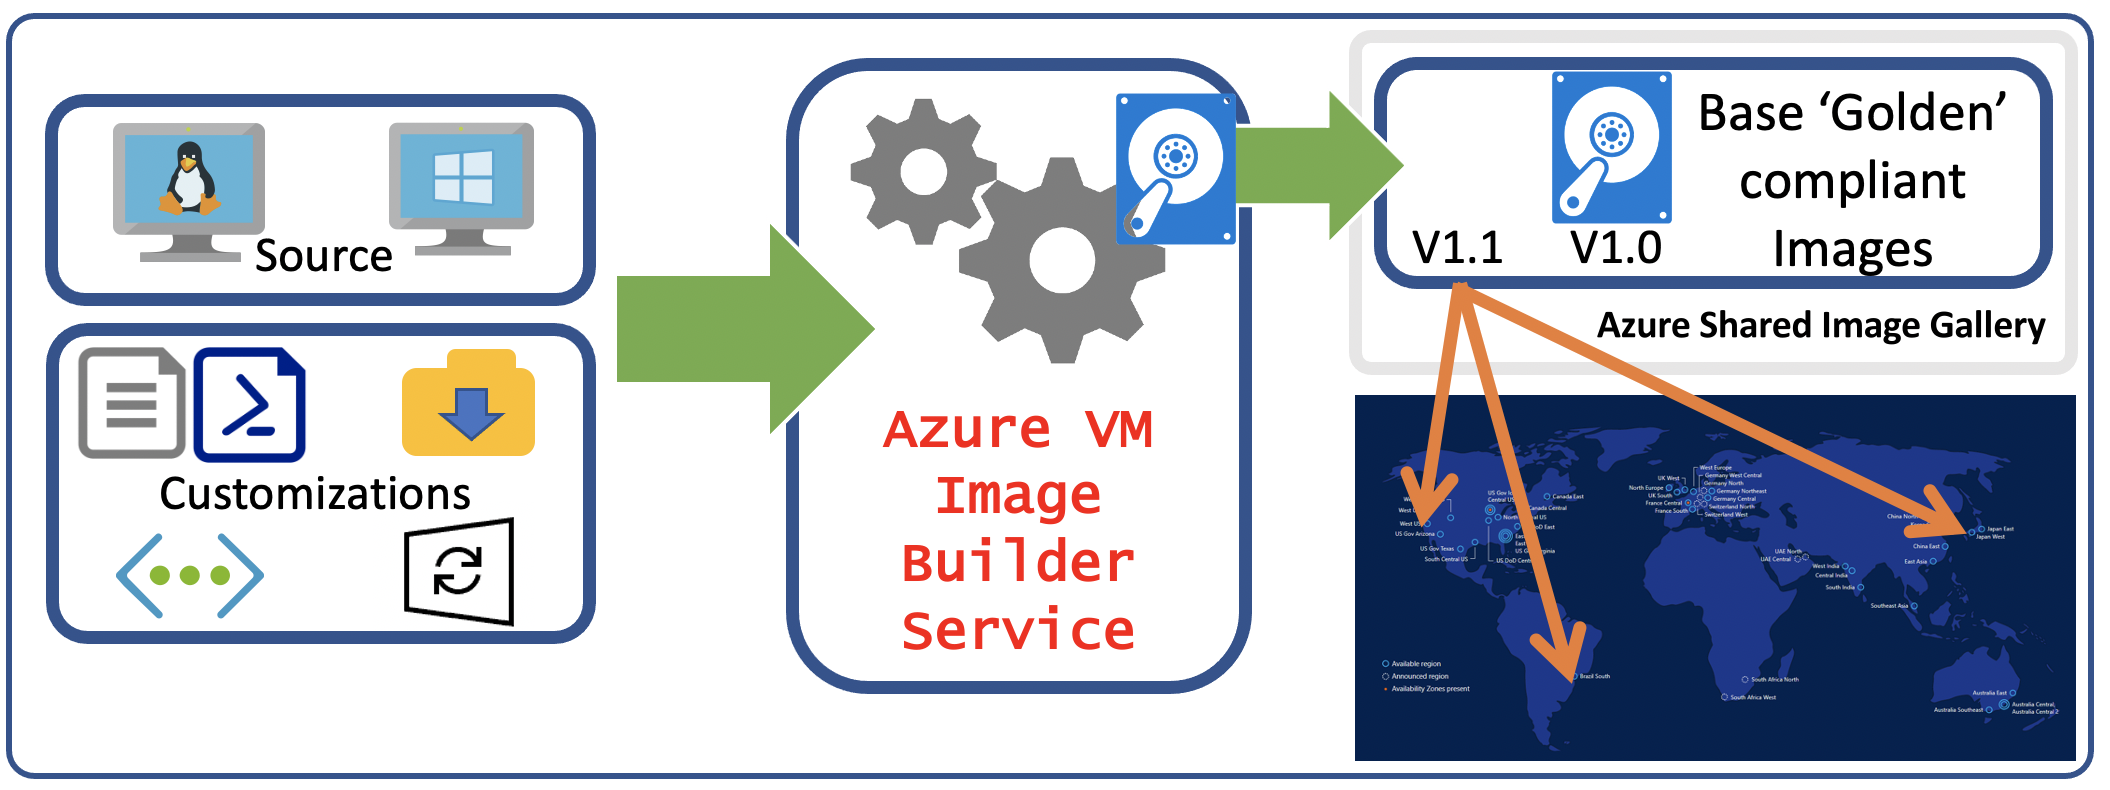
上一篇我们测试了 AIB 自动化构建 CentOS 7.7 自定义镜像,相信大家也体会到了云上原生服务带来的自动化便利度。其实,AIB 能够做到的远远不止这些,除此之外还可以集成 Vnet 以及 RHEL 等 License 等功能,尤其值得一提的是和 Azure Shared Image Gallery(后文简称 SIG )的服务集成。对于 SIG 本文不多做介绍,不了解的同学们通过官方文档自行科普吧,简单来说就是一个可以做到全球管理分发虚拟机镜像的 Azure 云服务,该服务构成可以参考下图:

本文,我们来测试下 AIB 和 SIG 的集成,验证下自动化构建全球虚拟机镜像的功能。


2. 前期准备工作

和第一篇博客相同,需要准备好 Global Azure 账户,配置好 Azure CLI,该测试在 Windows Subsystem v2 Ubuntu 18.04 上运行,需要注意该实验同样需要在一个 Session 内运行,因为要继承所有设置的自定义变量。


3.1 AIB / VM / Storage Feature 注册

1
2
3
4
5
6
7
8
9
10
11
12
13
14
15
16
17
18
19
20
# Feature Registration
az feature register --namespace Microsoft.VirtualMachineImages --name VirtualMachineTemplatePreview
az provider register -n Microsoft.VirtualMachineImages

az feature show --namespace Microsoft.VirtualMachineImages --name VirtualMachineTemplatePreview | grep state
# register and enable for shared image gallery
az feature register --namespace Microsoft.Compute --name GalleryPreview
az provider register -n Microsoft.Compute

az feature show --namespace Microsoft.Compute --name GalleryPreview | grep state
# wait until it says registered

# check you are registered for the providers

az provider show -n Microsoft.VirtualMachineImages | grep registrationState
az provider show -n Microsoft.Storage | grep registrationState
az provider show -n Microsoft.Compute | grep registrationState
az provider show -n Microsoft.KeyVault | grep registrationState

如果命令输出结果显示相关 feature 没注册,则运行以下命令:

1
2
3
4
az provider register -n Microsoft.VirtualMachineImages
az provider register -n Microsoft.Storage
az provider register -n Microsoft.Compute
az provider register -n Microsoft.KeyVault

创建 RG 并设置相关环境变量:

1
2
3
4
5
6
7
8
9
10
11
12
13
14
15
16
17
18
19
20
21
22
23
24
# Create SIG resource group
sigResourceGroup=aibsigrg

# location of SIG (see possible locations in main docs)
location=southeastasia

# additional region to replication image to
additionalregion=eastus

# your subscription
# get the current subID : 'az account show | grep id'
subscriptionID=$(az account show | grep id | tr -d '",' | cut -c7-)

# name of the shared image gallery, e.g. myCorpGallery
sigName=aibsig01

# name of the image definition to be created, e.g. ProdImages
imageDefName=aib01sig01centos77image01def01

# image distribution metadata reference name
runOutputName=aib01sig01centos77image01ro01

# create resource group
az group create -n $sigResourceGroup -l $location

3.2 创建 User-Assigned Managed Identity 并赋权

1
2
3
4
5
6
7
8
9
10
11
12
13
14
15
16
17
18
19
20
21
22
23
24
25
26
27
28
# create user assigned identity for image builder to access the storage account where the script is located
idenityName=aibsig01uami01
az identity create -g $sigResourceGroup -n $idenityName

# get identity id
aibsig01uami01id=$(az identity show -g $sigResourceGroup -n $idenityName | grep "clientId" | cut -c16- | tr -d '",')

# get the user identity URI, needed for the template
aibsig01uami01uri=/subscriptions/$subscriptionID/resourcegroups/$sigResourceGroup/providers/Microsoft.ManagedIdentity/userAssignedIdentities/$idenityName

# download preconfigured role definition example
curl https://raw.githubusercontent.com/TheoDoreW/wxsblog.github.io/master/2021/07/26/2021-07-26-AzureImageBuilderCLSIGI/template/AIBRoleImageCreation.json -o AIBRoleImageCreation.json

imageRoleDefName="Azure Image Builder Image Def01"

# update the definition
sed -i -e "s/<subscriptionID>/$subscriptionID/g" AIBRoleImageCreation.json
sed -i -e "s/<rgName>/$imageResourceGroup/g" AIBRoleImageCreation.json
sed -i -e "s/Azure Image Builder Service Image Creation Role/$imageRoleDefName/g" AIBRoleImageCreation.json

# create role definitions
az role definition create --role-definition ./AIBRoleImageCreation.json

# grant role definition to the user assigned identity
az role assignment create \
--assignee $aibsig01uami01id \
--role "$imageRoleDefName" \
--scope /subscriptions/$subscriptionID/resourceGroups/$sigResourceGroup

创建 Azure Shared Image Gallery:

1
2
3
4
5
6
7
8
9
10
11
12
13
14
# create SIG
az sig create \
-g $sigResourceGroup \
--gallery-name $sigName

# create SIG image definition
az sig image-definition create \
-g $sigResourceGroup \
--gallery-name $sigName \
--gallery-image-definition $imageDefName \
--publisher aibpublisher \
--offer aiboffer \
--sku 7.7 \
--os-type Linux

3.3 修改 AIB SIG CentOS77 模板文件

1
2
3
4
5
6
7
8
9
10
11
12
13
# download the example and configure it with your vars
curl https://raw.githubusercontent.com/TheoDoreW/wxsblog.github.io/master/2021/07/26/2021-07-26-AzureImageBuilderCLSIGI/template/SIGCentOS77AIBTemplate.json -o SIGCentOS77AIBTemplate.json

sed -i -e "s/<subscriptionID>/$subscriptionID/g" SIGCentOS77AIBTemplate.json
sed -i -e "s/<rgName>/$sigResourceGroup/g" SIGCentOS77AIBTemplate.json
sed -i -e "s/<imageDefName>/$imageDefName/g" SIGCentOS77AIBTemplate.json
sed -i -e "s/<sharedImageGalName>/$sigName/g" SIGCentOS77AIBTemplate.json

sed -i -e "s/<region1>/$location/g" SIGCentOS77AIBTemplate.json
sed -i -e "s/<region2>/$additionalregion/g" SIGCentOS77AIBTemplate.json
sed -i -e "s/<runOutputName>/$runOutputName/g" SIGCentOS77AIBTemplate.json

sed -i -e "s%<aibsig01uami01uri>%$aibsig01uami01uri%g" SIGCentOS77AIBTemplate.json

3.4 创建 AIB SIG CentOS 7.7 镜像

1
2
3
4
5
6
7
8
9
10
11
12
13
14
15
16
17
18
19
20
# submit the image confiuration to the VM Image Builder Service

az resource create \
--resource-group $sigResourceGroup \
--properties @SIGCentOS77AIBTemplate.json \
--is-full-object \
--resource-type Microsoft.VirtualMachineImages/imageTemplates \
-n SIG01CentOS77AIB01

# wait approx 1-3mins, depending on external links

# start the image build

az resource invoke-action \
--resource-group $sigResourceGroup \
--resource-type Microsoft.VirtualMachineImages/imageTemplates \
-n SIG01CentOS77AIB01 \
--action Run

# wait approx 15mins

3.5 创建 CentOS 7.7 VM 并登陆验证

1
2
3
4
5
6
7
8
9
10
11
12
13
14
15
16
17
18
19
az vm create \
--resource-group $sigResourceGroup \
--name centos01 \
--admin-username centos \
--location $location \
--image "/subscriptions/$subscriptionID/resourceGroups/$sigResourceGroup/providers/Microsoft.Compute/galleries/$sigName/images/$imageDefName/versions/latest" \
--ssh-key-value @id_rsa.pub

# and login...

ssh centos@<pubIp>

You should see the image was customized with a Message of the Day as soon as your SSH connection is established!

******************************************************************
** This VM was built from the: **
** !! AZURE VM IMAGE BUILDER Custom CentOS 7.7 Image !! **
** You have just been Customized :-) **
******************************************************************

4. 总结

至此,第二篇自动化构建自定义托管镜像 CentOS 7.7 并集成 Azure Shared Image Gallery 做全球分发的示例就完成了,希望能够给大家一些参考。

Azure Image Builder(一)之自动化构建自定义托管镜像 CentOS 7.7

1. 前言

云计算的自动化一直都是一个热门话题,无论 IaaS / PaaS / SaaS 都正在以 Everything As A Code 的方向发展,同时也诞生了很多优秀的云原生或第三方开源自动化工具,HashiCorp Packer 就是其中之一,一个镜像即代码的自动化构建镜像工具。相比开源界,云厂商更没有闲着,我软也不例外,最近在钻研 Azure Kubernetes Service 的同时发现了 Global Azure 目前在 Preview 的一个服务:Azure Image Builder(后文简称AIB)。该服务是构建在 Packer 上的 Azure 云托管服务,用户从基于 Windows 或 Linux 的 Azure 市场映像、现有自定义映像开始,添加自己的自定义项,只需提供一个描述映像的配置,将其提交给该服务,即可生成映像并进行分发,具体 Pipeline 如下图所示。好了,话不多说,第一篇博客我们来测测如何利用这个服务来构建自定义托管的 CentOS 7.7 镜像吧。


2. 前期准备工作

目前 AIB 依然是 Global Azure Preview Service,所以还存在一些限制,包括 Location 以及 OS 版本等,具体在使用 AIB 之前建议充分查看官方文档。本文我们在 Global Azure Region Southeastasia 测试 CentOS 7.7,需要准备好 Global Azure 账户,配置好 Azure CLI,该测试在 Windows Subsystem v2 Ubuntu 18.04 上运行,需要注意该实验需要在一个 Session 内运行,因为要继承所有设置的自定义变量。


3. AIB 构建自定义 CentOS 7.7 镜像

3.1 AIB / VM / Storage Feature 注册

1
2
3
4
5
6
7
8
9
10
11
12
13
14
15
16
# Feature Registration
az feature register --namespace Microsoft.VirtualMachineImages --name VirtualMachineTemplatePreview
az provider register -n Microsoft.VirtualMachineImages

az feature show --namespace Microsoft.VirtualMachineImages --name VirtualMachineTemplatePreview | grep state

az feature show --namespace Microsoft.KeyVault --name VirtualMachineTemplatePreview | grep state

# wait until it says registered

# check you are registered for the providers

az provider show -n Microsoft.VirtualMachineImages | grep registrationState
az provider show -n Microsoft.Storage | grep registrationState
az provider show -n Microsoft.Compute | grep registrationState
az provider show -n Microsoft.KeyVault | grep registrationState

如果命令输出结果显示相关 feature 没注册,则运行以下命令:

1
2
3
4
az provider register -n Microsoft.VirtualMachineImages
az provider register -n Microsoft.Storage
az provider register -n Microsoft.Compute
az provider register -n Microsoft.KeyVault

创建 RG 并设置相关环境变量:

1
2
3
4
5
6
7
8
9
10
11
12
13
14
15
16
17
18
# destination image resource group
imageResourceGroup=aibrg

# location (see possible locations in main docs)
location=southeastasia

# your subscription
# get the current subID : 'az account show | grep id'
subscriptionID=$(az account show | grep id | tr -d '",' | cut -c7-)

# name of the image to be created
imageName=centos77image01

# image distribution metadata reference name
runOutputName=centos77image01ro

# create resource group
az group create -n $imageResourceGroup -l $location

创建 User-Assigned Managed Identity 并赋权:

1
2
3
4
5
6
7
8
9
10
11
12
13
14
15
16
17
18
19
20
21
22
23
24
25
26
27
28
# create user assigned identity for image builder to access the storage account where the script is located
idenityName=aibuami01
az identity create -g $imageResourceGroup -n $idenityName

# get identity id
aibuami01id=$(az identity show -g $imageResourceGroup -n $idenityName | grep "clientId" | cut -c16- | tr -d '",')

# get the user identity URI, needed for the template
aibuami01uri=/subscriptions/$subscriptionID/resourcegroups/$imageResourceGroup/providers/Microsoft.ManagedIdentity/userAssignedIdentities/$idenityName

# download preconfigured role definition example
curl https://raw.githubusercontent.com/TheoDoreW/wxsblog.github.io/master/2021/07/25/2021-07-25-AzureImageBuilderCLMI/template/AIBRoleImageCreation.json -o AIBRoleImageCreation.json

imageRoleDefName="Azure Image Builder Image Def01"

# update the definition
sed -i -e "s/<subscriptionID>/$subscriptionID/g" AIBRoleImageCreation.json
sed -i -e "s/<rgName>/$imageResourceGroup/g" AIBRoleImageCreation.json
sed -i -e "s/Azure Image Builder Service Image Creation Role/$imageRoleDefName/g" AIBRoleImageCreation.json

# create role definitions
az role definition create --role-definition ./AIBRoleImageCreation.json

# grant role definition to the user assigned identity
az role assignment create \
--assignee $aibuami01id \
--role "$imageRoleDefName" \
--scope /subscriptions/$subscriptionID/resourceGroups/$imageResourceGroup

3.2 修改 CentOS 7.7 模板定义文件

1
2
3
4
5
6
7
8
9
10
11
# download the example and configure it with your vars

curl https://raw.githubusercontent.com/TheoDoreW/wxsblog.github.io/master/2021/07/25/2021-07-25-AzureImageBuilderCLMI/template/CentOS77AIBTemplate.json -o CentOS77AIBTemplate.json

sed -i -e "s/<subscriptionID>/$subscriptionID/g" CentOS77AIBTemplate.json
sed -i -e "s/<rgName>/$imageResourceGroup/g" CentOS77AIBTemplate.json
sed -i -e "s/<region>/$location/g" CentOS77AIBTemplate.json
sed -i -e "s/<imageName>/$imageName/g" CentOS77AIBTemplate.json
sed -i -e "s/<runOutputName>/$runOutputName/g" CentOS77AIBTemplate.json

sed -i -e "s%<imgBuilderId>%$aibuami01uri%g" CentOS77AIBTemplate.json

3.3 创建 CentOS 7.7 镜像

该过程会创建一些中间资源,比如 “IT_DestinationResourceGroup_TemplateName” 的 RG 以及 D1v2 大小的 Staging VM,这些资源都是 AIB 自动化创建

1
2
3
4
5
6
7
8
9
10
11
12
13
14
15
16
17
18
19
20
# submit the image confiuration to the VM Image Builder Service

az resource create \
--resource-group $imageResourceGroup \
--properties @CentOS77AIBTemplate.json \
--is-full-object \
--resource-type Microsoft.VirtualMachineImages/imageTemplates \
-n CentOS77AIB01

# wait approx 1-3mins, depending on external links

# start the image build

az resource invoke-action \
--resource-group $imageResourceGroup \
--resource-type Microsoft.VirtualMachineImages/imageTemplates \
-n CentOS77AIB01 \
--action Run

# wait approx 15mins

3.4 创建 CentOS 7.7 VM 并登陆验证

1
2
3
4
5
6
7
8
9
10
11
12
13
14
15
16
17
18
19
az vm create \
--resource-group $imageResourceGroup \
--name centos01 \
--image $imageName \
--location $location \
--admin-username centos \
--ssh-key-value @id_rsa.pub

# and login...

ssh centos@<pubIp>

You should see the image was customized with a Message of the Day as soon as your SSH connection is established!

******************************************************************
** This VM was built from the: **
** !! AZURE VM IMAGE BUILDER Custom CentOS 7.7 Image !! **
** You have just been Customized :-) **
******************************************************************

4. 总结

至此,通过 AIB 自动化构建 CentOS 7.7 镜像的示例就完成了,希望能够给大家一些参考,把这个服务有机的集成利用起来。

Azure Databricks 系列 Blog(四)之通过 Azure Monitor 做集群监控

1. 前言

前面几篇系列博客分别给大家介绍了 Azure Databricks 的概念以及最常用的流计算及批处理框架,作为托管在 Azure 云上的 Spark 商业化产品,能看到 Azure Databricks 带给用户层面的便捷性还是非常具有吸引力的。可是在实际使用过程中,还有一点也非常的重要,就是集群的可靠性。可靠性大概应该分成两个层面,一是集群的可靠性 —— 虽然 Spark Cluster 的分布式架构已经充分考虑了可靠性,但是依然有故障的可能性;二是 Job 的可靠性 —— 提交的 Job 正常运行会和业务影响息息相关。针对这两个层面,可靠性的保证就需要依赖强大的监控系统,一个好的监控系统可以做到出现问题的时候及时通知用户,更好地可以做到未雨绸缪。目前做 Spark 监控的技术方案有很多,比如说 Prometheus、Nagios,包括 Azure Databricks 默认集成的 Ganglia,这些监控工具都有自己的优势和劣势。不过从云原生的角度讲,Azure Databricks 作为微软 Azure 云上的 PaaS 服务也可以和 Azure Monitor 做原生集成。本文就给大家介绍一下通过 Azure Monitor Log Analysis(下文简称 LA )来监控 Azure Databricks Cluster & Job,所有的测试都在 Global Azure US East 2 上测试实现。


2. 前期准备工作

本文的实验是基于 Github 开源代码的实现,原文可以看这里。具体原理是通过编译生成 spark-listeners-loganalytics 和 spark-listeners JAR 包并分发到所有计算节点上,然后 Job 通过 Spark 原生监控系统 Dropwizard Metrics Library 提供的指标集成 LA SDK 将 Cluster & Job 的 Metric & Logs 送到 LA 中,最后通过 LA Kusto 做监控分析告警。在实验开始之前,需要一些基础的准备工作,包括一台编译服务器,本文选择 CentOS 7,并安装 Azure Databricks CLI, JDK 8, Scala 2.11/12, Apache Maven 3.x。需要注意的是,Databricks CLI 的权限验证可以通过 Personal Token 或者 AAD,本文采用 AAD 认证,不过具体过程不赘述,请大家自行参考官方文档。安装好这些工具包之后,可以通过一些简单的测试比如 java -verison, mvn -V 以及 databricks clusters list 来进行验证。

1
2
3
4
# Testing
[root@centos01 ~]# java -verison
[root@centos01 ~]# mvn -V
[root@centos01 ~]# databricks clusters list

3. 编译 Azure Databricks monitoring library

编译 spark-listeners-loganalytics and spark-listeners 这两个 JAR 的时候有两种方法,一种通过 Docker Image 编译打包,另外一种通过 Maven,本文采用 Docker 来编译打包,速度会比较快。具体过程如下:

1
2
3
4
5
# To build all profiles:
[root@centos01 ~]# git clone https://github.com/mspnp/spark-monitoring.git
[root@centos01 ~]# cd spark-monitoring
[root@centos01 ~]# chmod +x ./build.sh
[root@centos01 ~]# docker run -it --rm -v `pwd`:/spark-monitoring -v "$HOME/.m2":/root/.m2 maven:3.5.4-jdk-8 /spark-monitoring/build.sh

编译好之后,所有的 JAR 都在 src/target 下:

1
2
3
4
5
6
7
8
9
10
[root@centos01 spark-monitoring]# ll src/target/
total 952
-rw-r--r-- 1 root root 206859 Mar 16 15:30 spark-listeners_2.4.3_2.11-1.0.0.jar
-rw-r--r-- 1 root root 206860 Mar 16 15:32 spark-listeners_2.4.5_2.11-1.0.0.jar
-rw-r--r-- 1 root root 150449 Mar 16 15:35 spark-listeners_3.0.0_2.12-1.0.0.jar
-rw-r--r-- 1 root root 150449 Mar 16 15:38 spark-listeners_3.0.1_2.12-1.0.0.jar
-rw-r--r-- 1 root root 73214 Mar 16 15:31 spark-listeners-loganalytics_2.4.3_2.11-1.0.0.jar
-rw-r--r-- 1 root root 73213 Mar 16 15:32 spark-listeners-loganalytics_2.4.5_2.11-1.0.0.jar
-rw-r--r-- 1 root root 51211 Mar 16 15:36 spark-listeners-loganalytics_3.0.0_2.12-1.0.0.jar
-rw-r--r-- 1 root root 51212 Mar 16 15:38 spark-listeners-loganalytics_3.0.1_2.12-1.0.0.jar

具体的 JAR 都指定对应了 Spark 和 Scala 版本,创建集群的时候需要注意指定对应的 JAR 。


4. 配置 Databricks workspace

通过 Azure Databricks CLI 在 DBFS 上创建一个目录 dbfs:/databricks/spark-monitoring:

1
dbfs mkdirs dbfs:/databricks/spark-monitoring

修改目录下 src/spark-listeners/scripts/spark-monitoring.sh 添加相关配置信息进入配置文件,包括 LA ID/Key, RG Name 等等,具体的每个配置项按照实际的属性值填入,这些配置会作为 HTTP 请求报头中的信息。

1
2
3
4
5
6
7
8
9
# LA ID/Key
export LOG_ANALYTICS_WORKSPACE_ID=
export LOG_ANALYTICS_WORKSPACE_KEY=
# Environment Variables
export AZ_SUBSCRIPTION_ID=
export AZ_RSRC_GRP_NAME=
export AZ_RSRC_PROV_NAMESPACE=Microsoft.Databricks
export AZ_RSRC_TYPE=workspaces
export AZ_RSRC_NAME=

配置结束后,最后把相关的监控脚本和 JAR 拷贝到 dbfs:/databricks/spark-monitoring 中:

1
2
3
4
[root@centos01 spark-monitoring]# dbfs cp src/spark-listeners/scripts/spark-monitoring.sh dbfs:/databricks/spark-monitoring/spark-monitoring.sh
[root@centos01 spark-monitoring]# ll src/target/ | awk '{print $9}' |sed '1d' > jarlist
[root@centos01 spark-monitoring]# while read line; do dbfs cp src/target/$line dbfs:/databricks/spark-monitoring/; done < jarlist
[root@centos01 spark-monitoring]# rm -f jarlist

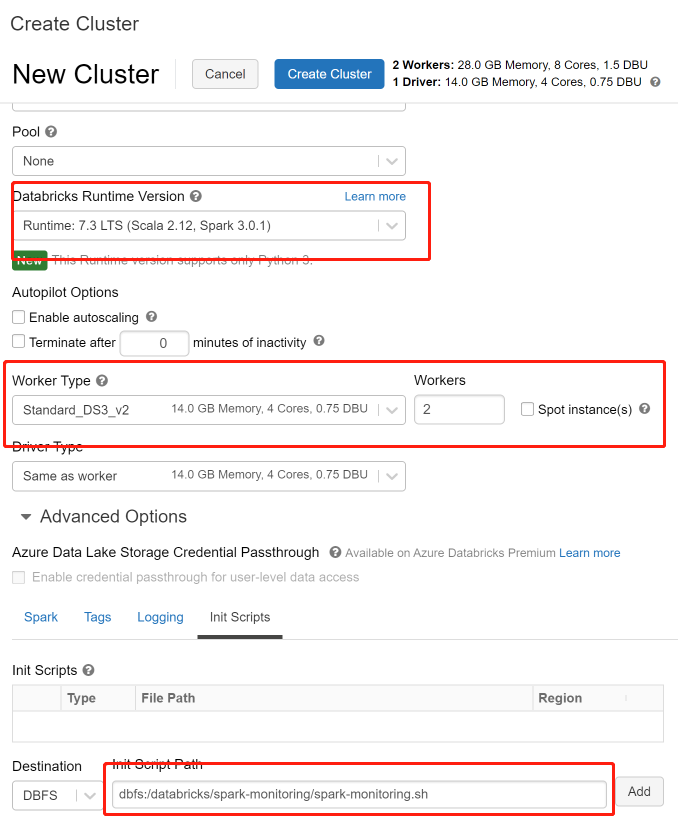
此时,所有准备工作就准备完毕。下面就启动集群并提交运行 Sample Job 然后来看监控数据了。需要注意的是 Databricks Runtime Version 和对应的 Spark 及 Scala 版本以及在初始化运行中需要在 Advanced Options 中指定 Init Scripts 为 dbfs:/databricks/spark-monitoring/spark-monitoring.sh。


5. 运行 Sample Job

这个 Github Repository 同样包含了 Sample Job,可以通过该 Job 测试发送 Metric & Logs 到 LA。构建 Job 的时候,需要注意指定 Databricks Runtime 版本。

Databricks Runtime(s) Maven Profile
5.5 scala-2.11_spark-2.4.3
6.4 - 6.6 scala-2.11_spark-2.4.5
7.0 - 7.2 scala-2.12_spark-3.0.0
7.3 - 7.5 scala-2.12_spark-3.0.1

本文的 Databricks Runtime 为 7.3 LTS,所以对应的 Maven Profile 为 scala-2.12_spark-3.0.1。

1
docker run -it --rm -v `pwd`/sample/spark-sample-job:/spark-sample-job -v "$HOME/.m2":/root/.m2 -w /spark-sample-job maven:3.5.4-jdk-8 mvn install -P scala-2.12_spark-3.0.1

编译结束后,会在 spark-monitoring/sample/spark-sample-job/target 目录下生成一个 spark-monitoring-sample-1.0.0.jar,需要在提交 Job 的时候指定该 JAR 并指定 Main Class 为 com.microsoft.pnp.samplejob.StreamingQueryListenerSampleJob。


6. 在 Azure Monitor 查询验证

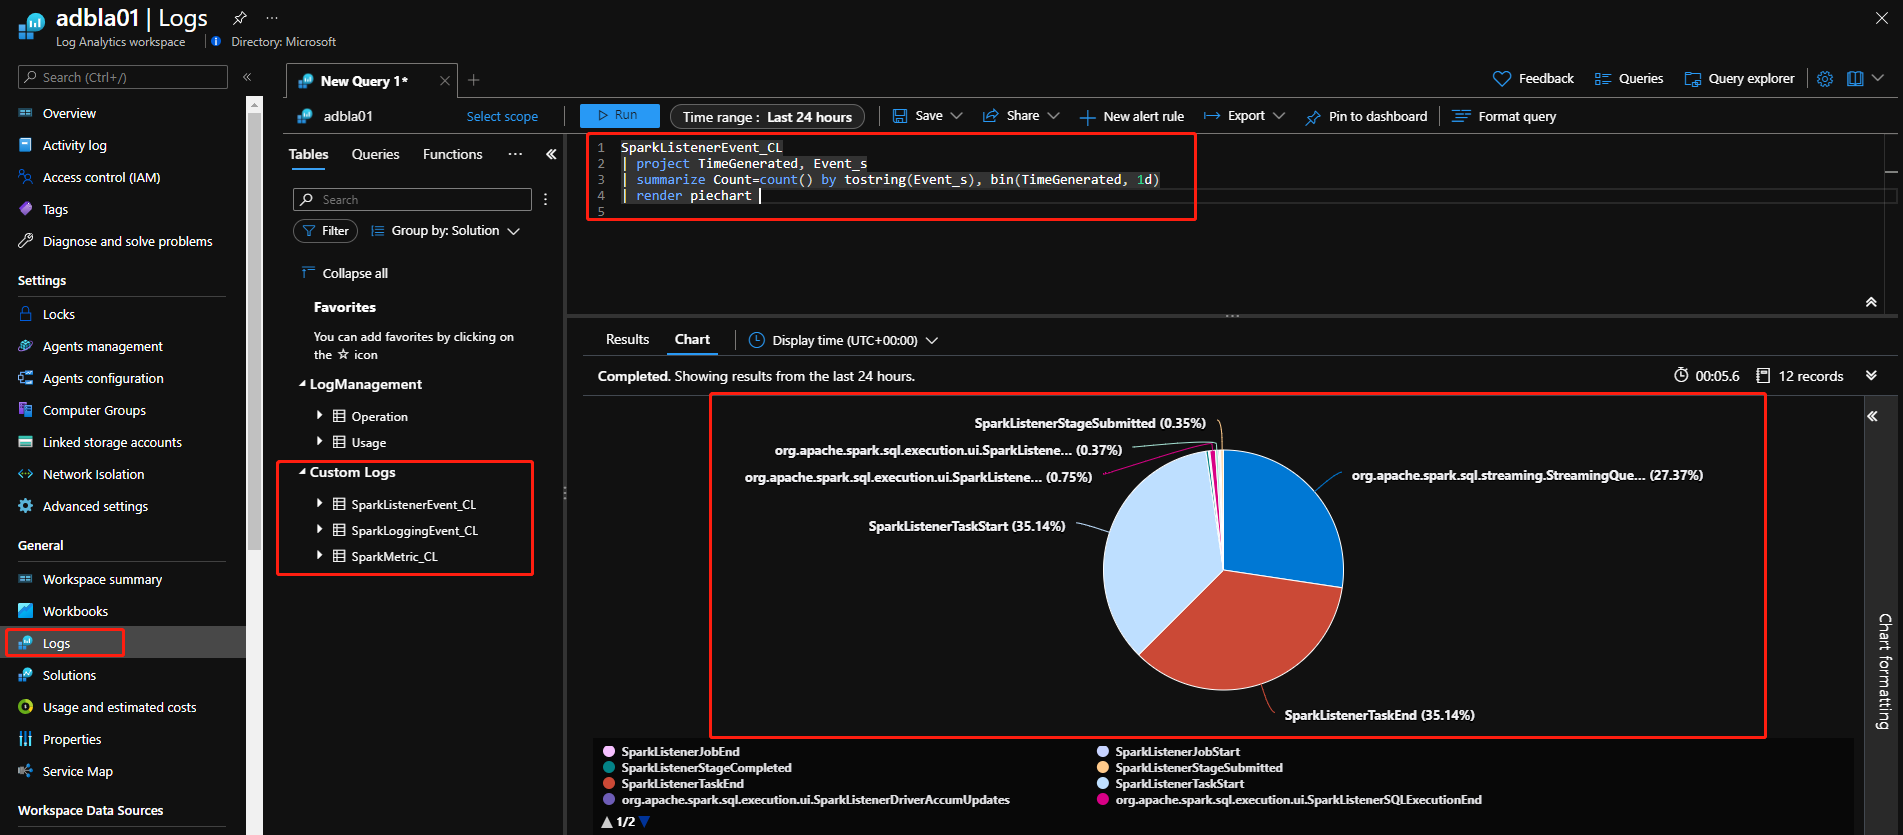
在 Job 提交运行之后,就可以到 LA 查看监控数据了。能够看到 LA 中出现了 3 个 custom table:SparkListenerEvent_CL、SparkLoggingEvent_CL、SparkMetric_CL 对应 Metric 和 Log。我们这里运行一个示例 Kusto 查询,来查询下产生的所有 Event:


7. 总结

至此,通过 Azure Monitor 监控 Azure Databricks 示例就完成了,需要注意在实际场景集成的时候,Job 依然要加载相应的类来做集成。衷心希望本文可以给各位读者一些参考并能在实际场景中有机的结合起来。

Azure Databricks 系列 Blog(三)之 SparkSQL on Delta Lake

1. 前言

上一篇介绍了 Azure Databricks 流计算框架 Structure Streaming,通过一个 Demo 演示了 Spark 的实时流计算框架 Structure Streaming。但是在实际业务中,光有实时数据流是不够的,离线数据的计算和分析也非常重要,并且往往离线分析才能获取业务上所需要的更多的 Insights,而一般来说离线的数据分析都会跑一些 OLAP SQL 查询,所以基于此场景,本文就来介绍并演示下 SparkSQL,一个可以通过 Spark 来进行 SQL 分析的可实时可离线的计算框架。本文场景基于集成 Azure Datalake Gen2 并 Enable Databricks Delta Lake 作为外部存储实现计算存储分离,通过 SparkSQL 新冠肺炎实时统计数据,资源依然沿用前面 Demo 所创建的资源组,具体如何实现,且听下文分解。


2. Delta Lake 介绍及 Azure Datalake Gen2 集成

Delta Lake 是可提高数据湖可靠性的开源存储层,由 Databricks 开发并开源出来。 Delta Lake 提供 ACID 事务和可缩放的元数据处理,并可以统一流处理和批数据处理。 Delta Lake 在现有 Data Lake 的顶层运行,并且可以与 Apache Spark API 完全兼容。具体而言,Delta Lake 提供:

Spark 上的 ACID 事务:可序列化的隔离级别可避免读者看到不一致的数据。
可缩放的元数据处理:利用 Spark 的分布式处理能力,轻松处理包含数十亿文件的 PB 级表的所有元数据。
流式处理和批处理统一:Delta Lake 中的表是批处理表,也是流式处理源和接收器。 流式处理数据引入、批处理历史回填、交互式查询功能都是现成的。
架构强制:自动处理架构变体,以防在引入过程中插入错误的记录。
按时间顺序查看:数据版本控制支持回滚、完整的历史审核线索和可重现的机器学习试验。
更新插入和删除:支持合并、更新和删除操作,以启用复杂用例,如更改数据捕获、渐变维度 (SCD) 操作、流式处理更新插入等。

总的来说,Delta Lake 不仅仅在需要事务的 ACID 场景给予支持,并且针对性能也做了相当大的代码优化,本文的实现也是基于 Delta Lake,需要注意数据格式需要转换成 delta。

正常 Azure Datalake Gen2 与 Delta Lake 的集成需要在 Spark 中增加配置项 “spark.delta.logStore.class=org.apache.spark.sql.delta.storage.AzureLogStore”, 并且集群需要在 lib 库中支持 hadoop-azure-datalake/hadoop-azure/wildfly-openssl JAR,具体过程可以见这里。所以这时候 PaaS 的优势就显示出来了,Azure Databricks 在 Cluster 创建好的同时就已经在集群上启用了该库,直接调用即可。 Azure Datalake Gen2 的创建过程本文不赘述,具体见官方文档。本文介绍两种常见的集成方式,如下图所示并做几点说明:

cmd2:非挂载方式
cmd2 中通过 scala 代码演示 Azure Databricks 集成 Azure Datalake Gen2 的认证配置项,通过创建拥有 IAM Role “Storage Blob Data Contributor” 的 Service Principle 来做认证,验证通过后就可以直接调用 Datalake 里面的文件了,注意相关变量需要替换。

cmd3:挂载方式
cmd3 中通过 Python 代码演示 Azure Databricks 如何挂载 Azure Datalake Gen2,身份验证过程和 cmd2 的方式一样。这种方式的好处是直接可以可以把远端的 Azure Datalake 挂载到 Azure Databricks 上,就好像在使用本地磁盘一样使用 Datalake,本文更推荐并且采用该模式,同时注意相关变量需要替换。

另外,本文的环境由于都是在 Azure 中国区,所以相关的域名都是 https://login.partner.microsoftonline.cn, 如果在 Azure Global,那么注意域名是 https://login.microsoftonline.com。 其实从最佳实践的角度来说,本文并不是实现的最好方式,因为在 Notebook 里面的认证信息全部都是明文出现,最好的方式应该集成 Azure Key Vault 来隐藏密码,该方式不再本文赘述,有兴趣的同学自行研究吧,附上链接供参考。


3. 引入数据源并运行 SparkSQL

前面提到,本文所采用的示例数据是和新冠肺炎实时统计数据相关,讲到这里介绍一个微软提供的一个开放数据集 Repo,链接在这里,包括各种场景下的 csv/json/parquet 格式的原始和脱敏数据,本文所使用的新冠肺炎数据也是在这里获取的,选择 csv 格式数据作为数据源,下载好之后 upload 到 Azure DataLake 上,在 container data 下面再创建个 source folder 作为存放原始数据的目录径。

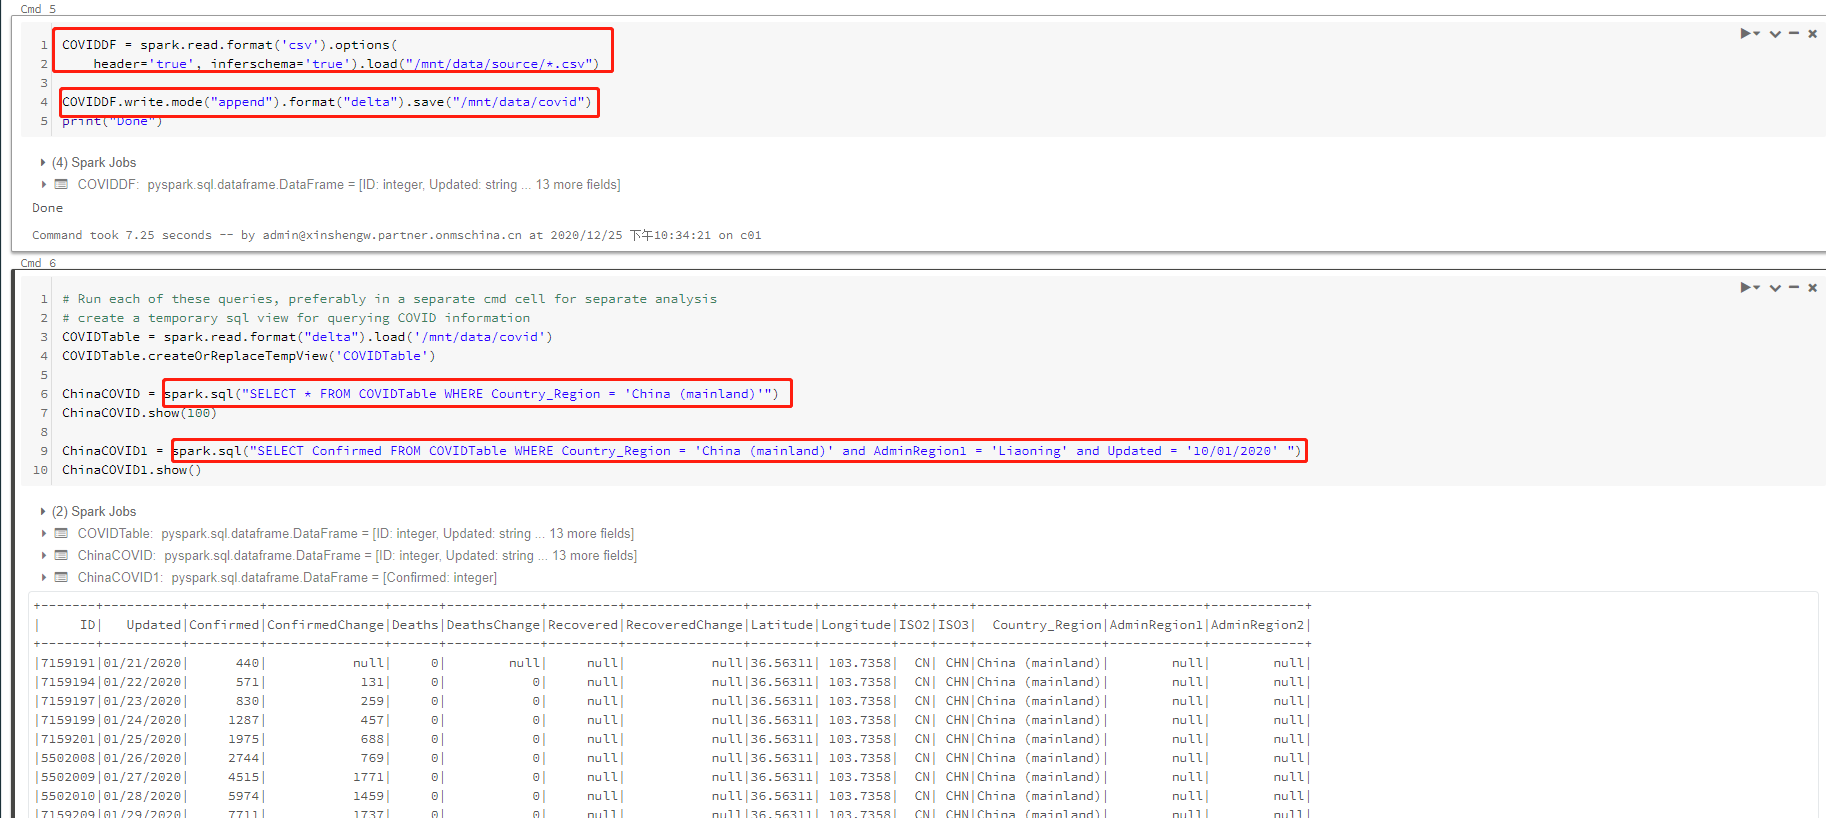
原始数据确定好之后,就可以通过 Notebook 来做 SparkSQL 分析了,本文用到的示例 Notebook 已经上传到了这里,几个重要配置简单说明下:

COVIDDF:COVIDDF 为定义的 DataFrame,通过 spark.read.format(‘csv’) 格式并指定挂载路径引入数据;
COVIDDF.write.mode(“append”).format(“delta”):通过 append 追加的方式写入目标 Table 中,注意这里的格式 delta,也就是前面提到的需要做格式转换,写入的表也需要指定路径,并会在 Azure Dalalake 中生成相应的文件;
ChinaCOVID 及 ChinaCOVID1:经过上面的建表过程之后就可以运行 SparkSQL 来做 SQL 查询了;


4. 总结

一个通过集成 Azure Datalake Gen2 作为外部存储并采用 Delta Lake 格式进行 SparkSQL 分析的示例就完成了,本文基本上使用了 PySpark 来实现,其实除此之外通过 SQL 或者 Scala 也是一样可以实现的,有兴趣的同学可以自己再深入研究下吧。

Azure Databricks 系列 Blog(二)之流计算 Structure Streaming

1. 前言

经过开箱介绍后,想必都对 Azure Databricks 有了大致的了解,那乘胜追击,本文介绍一下 Azure Databricks 的流计算架构。基于的场景是设计一个实时告警系统:“针对一家杂货店的购物者的购物异常习惯进行实时采样和告警,主要针对的产品是止咳糖浆,如果采样发现一次性购物超过 10 瓶就进行实时告警”,毕竟需要防止下一个沃尔特·怀特出现。需要用到的服务全部部署在中国区 Azure 上,后文对具体每项服务功能不多做介绍,请读者到官网自行搜索查询。


2. 流计算架构说明

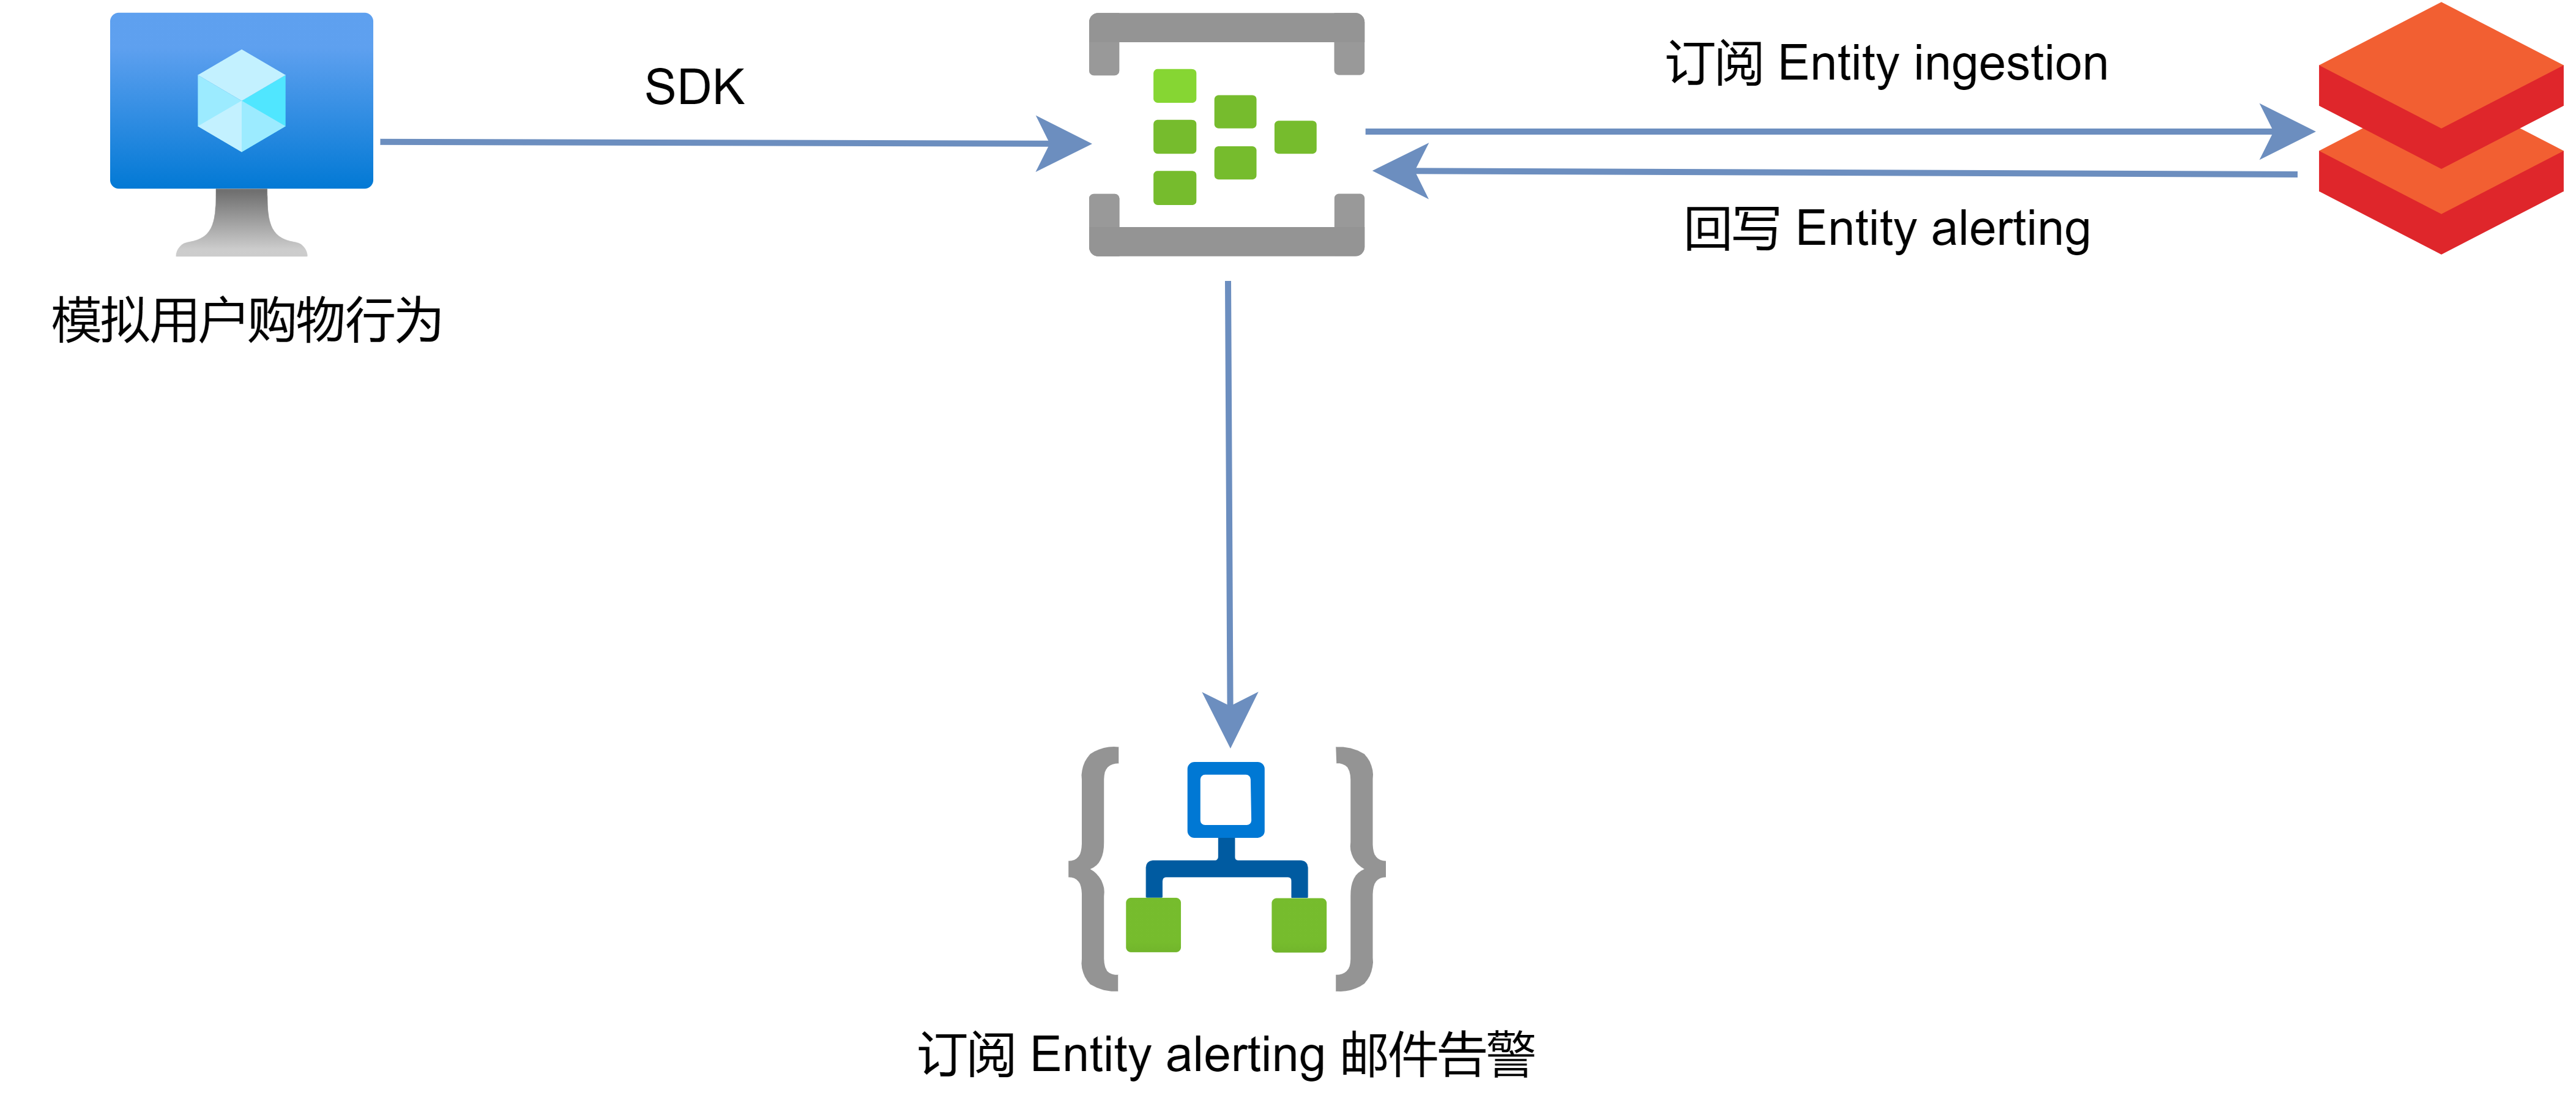
依据本文模拟的场景,设计的云上架构如下图所示:

用到的相关服务组件功能做如下说明:
Azure VM:数据源,扮演 Producer 生产者,通过 Python 代码模拟客户购买行为,生成示例数据通过 SDK 发送数据到 Azure Eventhub。
Azure Eventhub:消息队列,做上下游生产者消费者服务的解耦,Entity ingestion 接收 Producer 发送的数据,Entity alerting 接收经过 Databricks 实时计算后的数据。
Azure Databricks:订阅 Eventhub Entity ingestion 作为数据源,通过 Structure Streaming 对数据进行实时处理后发送 Entity alerting。
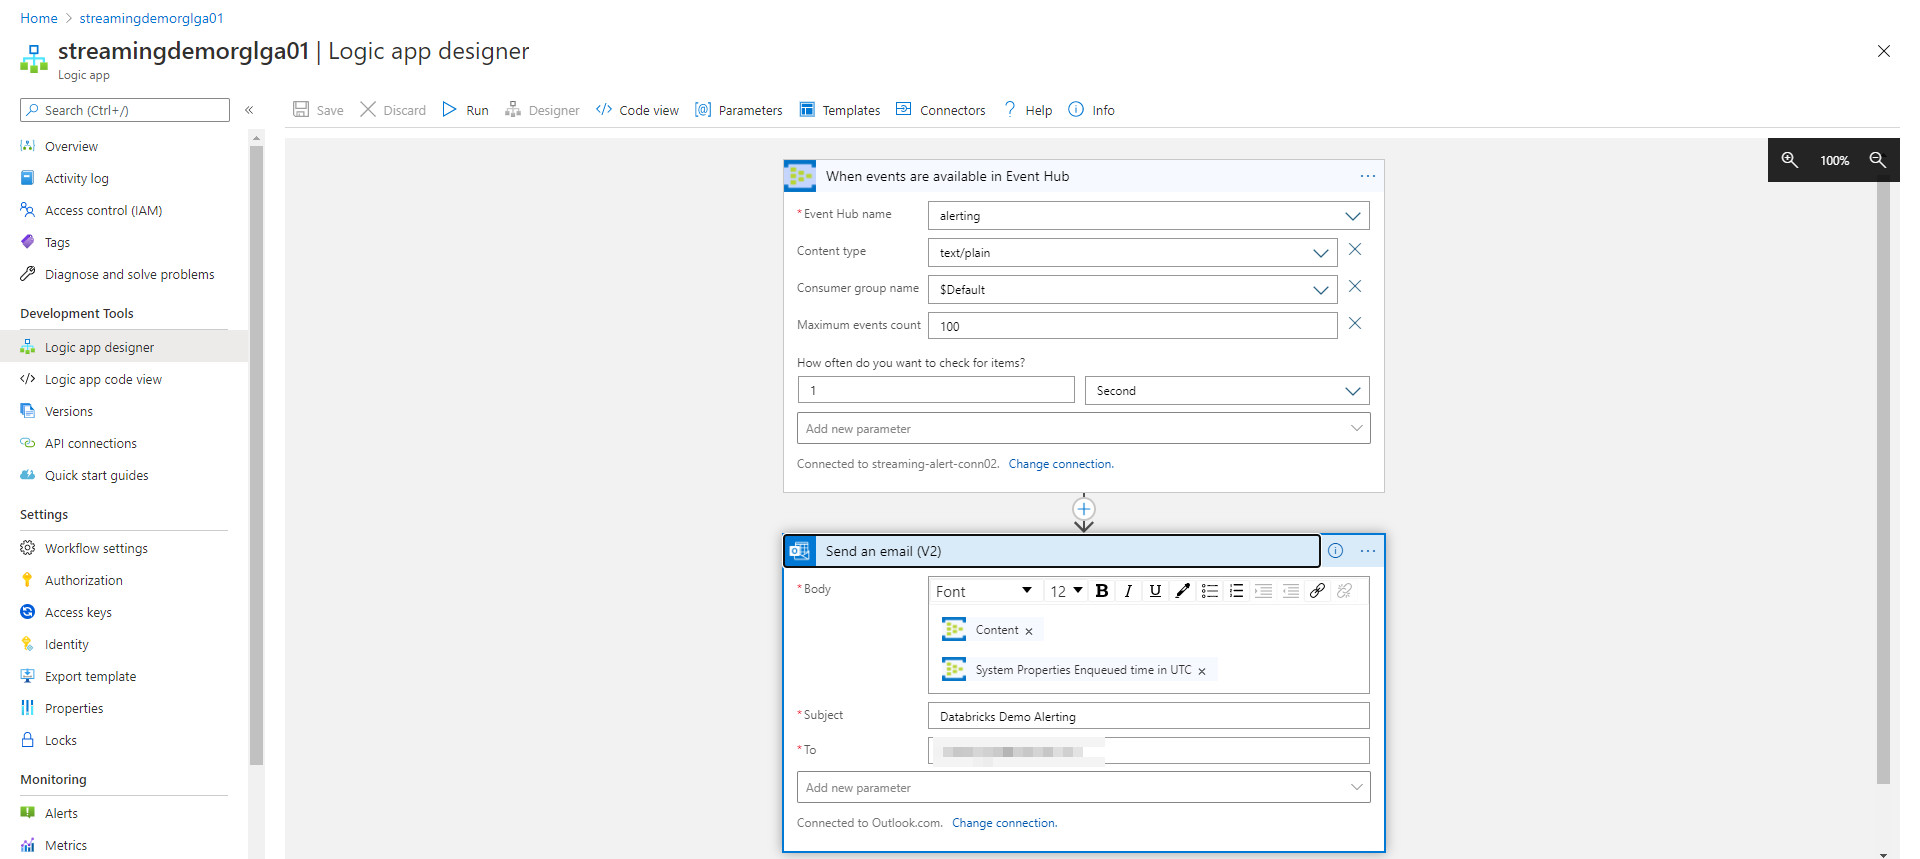
Azure LogicApp:订阅 Eventhub Entity alerting 并做邮件实时告警。

整个数据流:Producer 生产者发送数据 &rarr; Eventhub Entity ingestion &rarr; Databricks Structured Streaming &rarr; Eventhub Entity alerting &rarr; Logic App


3. Azure Databrick Structure Streaming 实现

3.1 Terraform 自动化部署

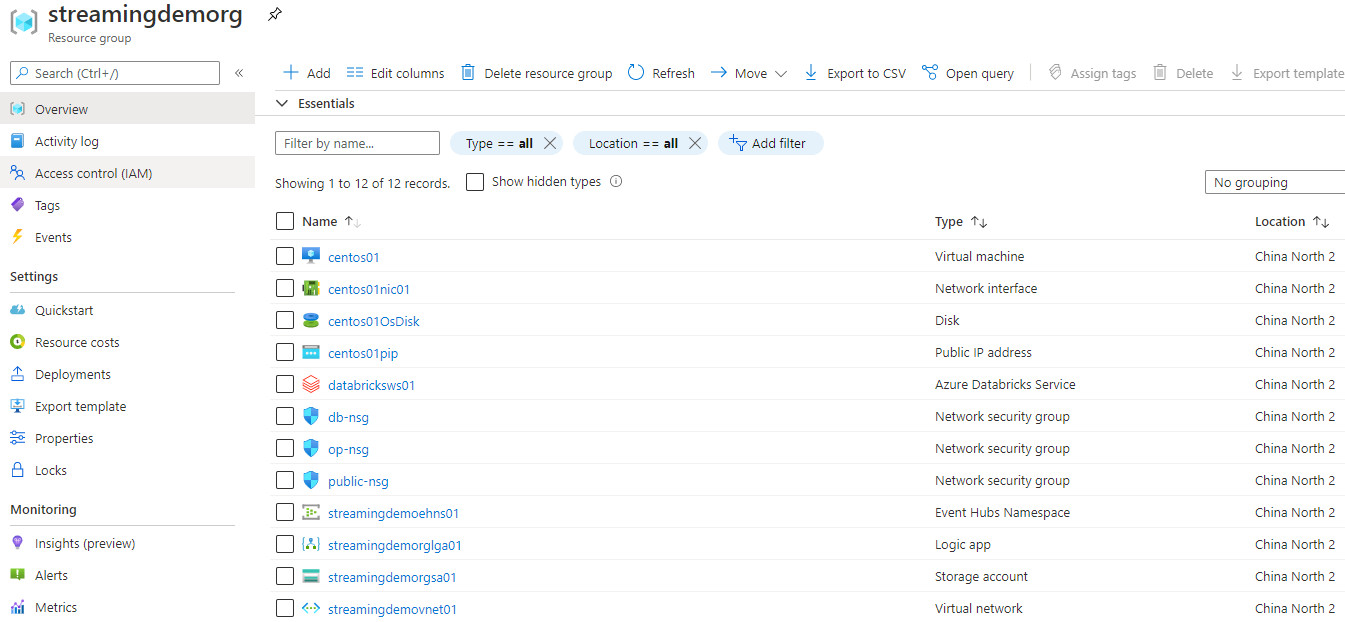
通过 Terraform 部署的服务组件包括 Azure Virtual Machine、 Azure Databricks、Eventhub、Logic App,具体的 tf 文件和变量见这里,每一项服务 Terraform Azure Provider 都有 Resource 支持,具体可以参考官方文档。部署完成之后的资源清单如下图所示,所有资源都部署在中国北二区域。

3.2 Producer 代码发布

模拟的生产者代码通过 VM 发布,通过调用 Azure Eventhub 的 SDK 将 Messages 进行写入,具体代码见这里,几个重要配置简单说明下:
azure.eventhub:Azure Eventhub SDK 包,需要通过 pip3 install azure.eventhub 来指定安装。
create_batch():通过该方法 batch 发送数据,本次示例以 1 条消息为 1 个 batch 发送到 Eventhub Entity ingestion。
CONNECTION_STR:Azure Eventhub Endpoint,该连接字符串可以在 Portal 上 Shared access policies 的 Connection string–primary key 查看。
EVENTHUB_NAME:写入的 Eventhub Entity Name。

3.3 Azure Databricks 集群配置及 Structure Streaming Notebook 集成

Azure Databricks 的创建过程是先需要在 Azure 上创建一个 Databricks 实体,然后在此基础上在实体内部创建 Workspace 以及 Cluster,再提交 Job 等等。针对 Databricks 资源,都会有唯一的 ID 和 Endpoint 与之对应,以便能够进行 Restful API 调用,集群通过 Databricks Portal 创建即可。本示例创建 1 Driver 2 Worker 共计 3 个节点的 Standard Cluster,Databricks 版本为 6.4 (includes Apache Spark 2.4.5, Scala 2.11)。如果需要做机器学习相关的计算,可以启用集成 GPU/ML 框架的版本,详细说明见官方文档,不做赘述。

集群状态变为 Running 后就意味着 Ready 可以使用了,不过在导入 Python Notebook 之前,需要通过 Maven Central 安装 com.microsoft.azure:azure-eventhubs-spark 库文件以便安装 Spark 连接 Azure Eventhub Connector,需要注意库文件的版本要匹配。

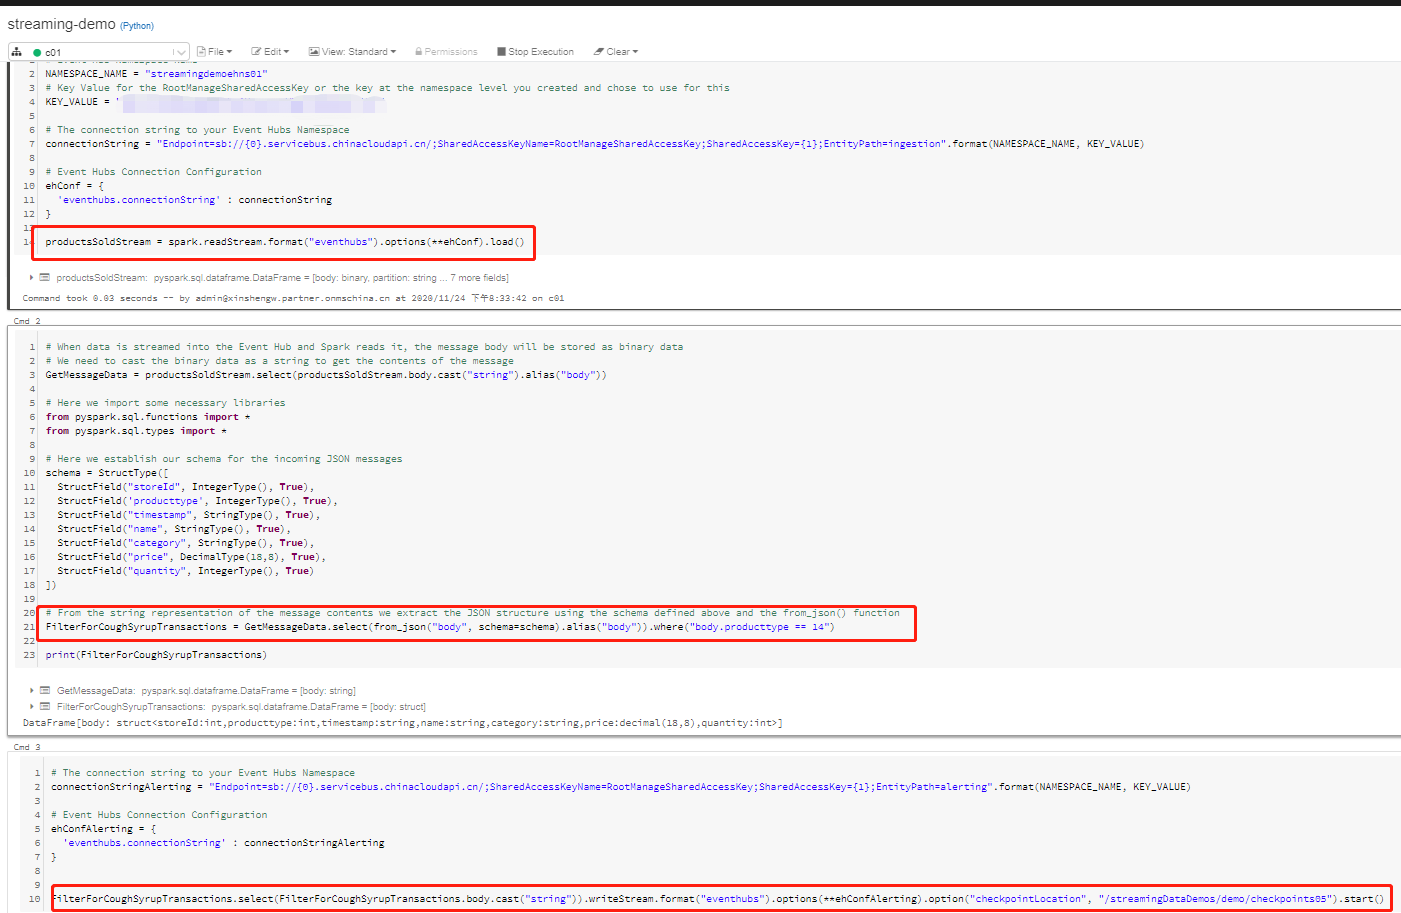
Notebook 可以直接在 Portal 里新建写入,也可以在 VS Code 等 IDE 编写完之后发布,本文采用第二种模式,原因是 IDE 丰富的插件可以提高效率。具体的 Notebook 本文不做展示,放在这里,有需要的读者可以自行查看。通过 import 导入后,附上导入后的截图并做几点说明:

整个 Notebook 分为三个 stage:
第一阶段:从 Eventhub Entity ingestion 读取 Producer 写入的数据,通过 Streaming DataFrames 的 spark.readStream() 创建。
第二阶段:通过 DataFrame 丰富的函数做字段筛选,筛选出来我们需要的字段。
第二阶段:回写 Eventhub Entity alerting,通过 Streaming DataFrames 的 spark.writeStream() 流式写入,注意利用 checkpoint 方便任务终止再运行。

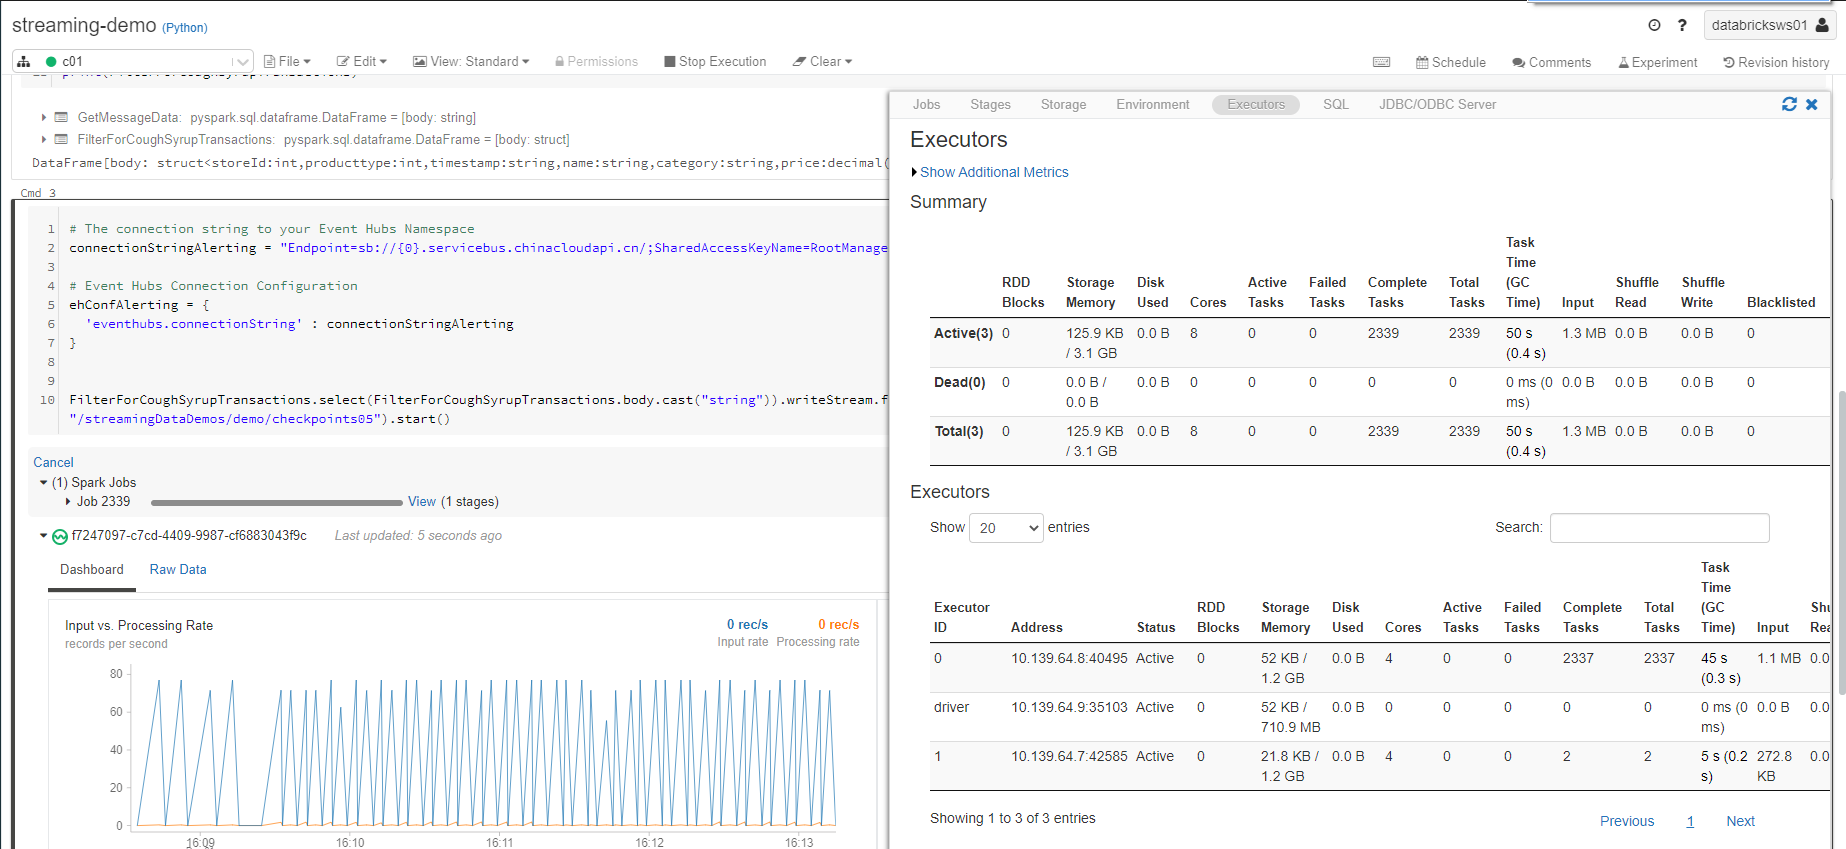
当 Producer 运行起来的时候,Eventhub 就会不断有数据写入,所以能看到 Spark 的 Input Records 的图像。对于每一个 Job,都能看到对于该任务分配的资源和 Spark 参数配置项。

3.4 Logic APP 配置邮件告警

经过 Azure Databricks 的数据筛选后,筛选出来的 Messages 都写入了 Eventhub Entity alerting 中,此时通过 LogicApp 来定义一个自动化的 workflow 来进行邮件告警。具体创建过程选择 Blank 然后自己创建 Step 即可,当然 Azure Portal 上的示例模板也可以用来参考,如下图所示:

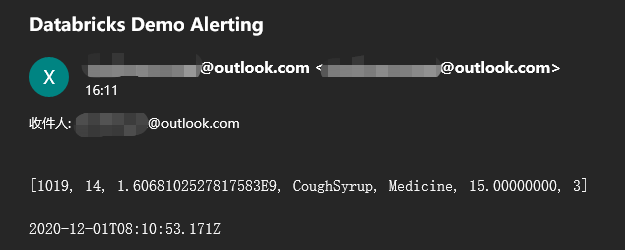
第一步订阅 Eventhub Entity alerting,第二步集成 Outlook 邮件接口发送告警邮件。所以当目标消息被筛选出来之后,LogicApp 就按照定义的邮件内容(本文是 Messages 内容和时间戳)来发送邮件,发送邮件的截图如下:


4. 总结

总体上,一个通过消息队列 Azure Eventhub 以及 Databricks 做流计算处理的示例就完成了。如果消息生产者 Producer 不断产生消息,那么整个任务就会一直运行下去,当出现目标消息的时候就会不断的持续告警。在 Spark 推出 Structure Streaming 以后,也解决了 Spark Streaming microbatch 的局限性。介绍完流式计算,下一篇聊聊 Azure Databricks SparkSQL ,敬请期待吧~

Azure Databricks 系列 Blog(一)之开箱

1. 前言

随着云计算技术的高速发展以及相关云服务的产品化完善,Cloud 已经从互联网应用上云的 1.0 时代逐渐衍变成了 Cloud + AI + 5G 的 2.0 时代,伴随着的是企业的云化加深、核心业务上云,同时对于云计算 1.0 时代遗留的问题的改造也都提上了日程,其中比较典型的就是各行各业都开始数字化转型,那数据对企业的价值更是不言而喻了。可如果数据只保存不分析,那再多的数据也是徒劳,除了增加成本外毫无价值可言。由此可见,数据要想有价值,那就需要找到合适的好的工具,把收集的数据有机地结合起来做分析,从数据源头跟踪到最后有价值的输出。

目前,在数据分析领域已经很多成熟的方案和技术,比如数据仓库 Azure Synapse / Impala / Presto,大数据的计算框架 Spark / Flink 等,每一项技术都有自己所擅长解决的问题和场景以便供用户选择,本文不会对这些技术方案做详解和说明,不熟悉的读者请自行搜索科普。本文主要介绍微软 Azure 云上新发布的产品 Azure Databricks —— “一款基于纯 Spark 技术栈的大数据解决方案”。通过本文的介绍,希望可以帮助选择该技术方案解决业务需求的用户提供一些意见和参考。Azure Databricks 很早就已经在 Global Azure GA,最近刚刚在国内 Mooncake Azure Preview,如果要在国内 Azure 上使用需要申请。好,话不多说,下面就来揭开它的神秘面纱。


2. 什么是 Azure Databricks

Azure Databricks 是基于 Apache Spark 的分析平台,已针对 Microsoft Azure 云服务平台进行优化。 Databricks 是由 Spark 原作者团队创办的一家做 Spark 商业化产品的公司。微软与其合作,将 Databricks 与 Azure 集成以提供一键式部署等简化工作,从而能够帮助用户更专注地做基于业务的数据分析或者科学计算。Azure Databricks 和原生云服务产品的集成的缩略图如下所示:

由此可见,Azure Databricks 可以和很多 Azure 云上服务做集成,支持例如 Azure Blob,DataLake,CosmosDB,Synapse,Eventhub 等作为其上下游服务进行对接,通过 Spark 计算框架提供的流批计算技术进行大数据计算,同时也可以集成机器学习来提取并探索数据中所包含的 insights。Azure Databricks 按照层次结构划分由底而上大致分为:

Databricks IO:Databricks I/O 模块,又称 DBIO,利用垂直集成堆栈显著提高 Spark 在云上的性能。
Databricks Runtime: 除原生 Spark 外,还提供其他组件来提高大数据分析的可用性、性能和安全性。
Databricks Workspace:工作区是可以提供访问所有 Azure Databricks 资源的一组环境,包括 Notebook / Libraries / Experiments 等对象组织到文件夹中,并提供其对数据对象和计算资源的访问权限。
Databricks Enterprise Security:Databricks 企业安全(DBES)模块添加了诸如静态和动态数据加密、细粒度数据访问控制和审核等功能,以满足标准合规性(例如 HIPAA、SOC2)和最严格的安全要求。

同时,Azure Databricks 也是 100% 兼容 Apache Spark 提供的集群技术和功能的,具体所包含的 Spark 组件如下图所示:

Spark SQL:SparkSQL 是用于处理结构化数据的 Spark 模块,基于 Spark DataFrames 分布式数据集合,可以把它在概念上理解为关系型数据库中的表。
Streaming:实时数据处理和分析,适用于实时分析与交互式应用程序以及构建实时数仓,可以与 HDFS、Flume 和 Kafka 等集成。
MLlib:由常见机器学习算法和工具(包括分类、回归、筛选、维数约简以及底层优化基元等)组成的机器学习库。
GraphX:图形和图形计算,适用于从认知分析到数据探索的广泛用例。
Spark Core API:包含对 R、SQL、Python、Scala 和 Java 的支持。


3. Azure Databricks 架构及特性介绍

Azure Databricks 是基于 Apache Spark 的快速、简单、协作型分析服务,具体的 Architecture 如图所示:

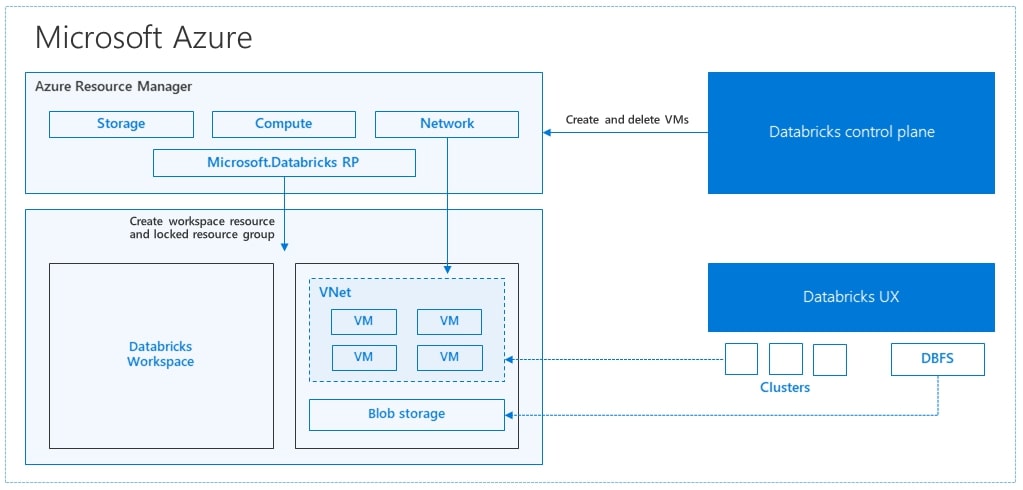
Azure Databricks 整体分为 Control Plane 和 Data Plane。Control Plane 由 Azure 托管,负责管理集群主节点、提交的任务调度、账号权限等。Data Plane 交由用户管理,可以通过 Databricks 提供的接口来对集群进行操作,常见的一般有 UI / API / CLI。具体地说,当启动 Azure Databricks Cluster 时,需要指定要使用的 VM 类型和数量,同时部署出来集成 VNet / NSG / Storage Account 的托管资源组。部署完毕后,用户就可以通过 Azure Databricks UI 来管理集群。所有元数据(如计划作业)都存储在具有异地复制功能的 Azure 数据库中。值得一提的是,Azure Databricks 和容器的集成也逐渐深度了起来,在创建集群的时候也可以指定容器镜像,方便用户打包自己的定制化镜像从而进行集成以及 CI/CD 的可能性。总体上说,目前 Databricks 和 Azure 的集成基本上有以下几个方面:

VM 类型的多样性:可集成所有现有的 VM 类型,例如 CPU 优化的 F 系列、内存优化的 E 系列、通用的 D 系列等等。
网络拓扑的灵活性:提供 Azure Databricks 与 VNET 集成来满足多样化的基础架构网络的访问需求。
Azure 存储和数据湖集成:通过 DBFS 向 Databricks 公开,以提供对现有数据的缓存和优化分析。
Azure Power BI:可以使用 JDBC 将 Power BI 直接连接到 Azure Databricks 来进行大规模交互方式查询数据。
Azure AD:通过 Azure AD 来做集群的访问控制和权限认证。
Azure SQL 数据仓库、Azure SQL DB 和 Azure CosmosDB:可以与 Azure 上其余的 Data Services 进行快速便捷地集成,方便用户快速建立端到端的云上数据架构。

除此之外,还有很多特性,文本不再赘述,大家可以通过官方文档自行查看。


4. 后续篇幅计划及总结

介绍完开箱,想必都体会到 Azure Databricks 的优秀了吧?是不是都想动手实战下?那心动不如行动~后续会在此基础上分享一系列关于 Azure Databricks 在真实场景下落地的最佳实践,具体包括:

Azure Databricks 系列 Blog(二)之 流计算 Structure Streaming
Azure Databricks 系列 Blog(三)之 批处理 Spark SQL
Azure Databricks 系列 Blog(四)之 安全访问控制
Azure Databricks 系列 Blog(五)之 机器学习 Machine Learning

拭目以待吧!

使用 jsDelivr CDN 加速 Github Pages

1. 前言

Github Pages 是个非常好的用来托管静态网页的功能,所以很多同学用来把自己的 Blog 放在上面去做托管,这么酷的功能既能让你心满意足地写博客,又可以同时找到 Coding 感觉,配合着静态站点生成器比如说 JekyllHexo,自己还不需要做维护,何乐而不为~ 不过这里面有个不太方面国内使用的问题,Github 服务器都在海外,在国内访问 Github Pages Blog 会出现访问比较慢的问题,尤其是 Blog 中需要加载的图片,稍微大一点的需要加载很长时间,但是 Github 在微软收购之后依然良心, 此时本文的主角登场,jsDelivr CDN


2. jsDelivr CDN 介绍

jsDelivr 是国外的一家优秀的公共 CDN 服务提供商,也是首个「打通中国大陆(网宿公司运营)与海外的免费 CDN 服务」,同时也为 npm、GitHub、WordPress 插件和具有特殊要求的其他几个项目的自定义终结点提供镜像。

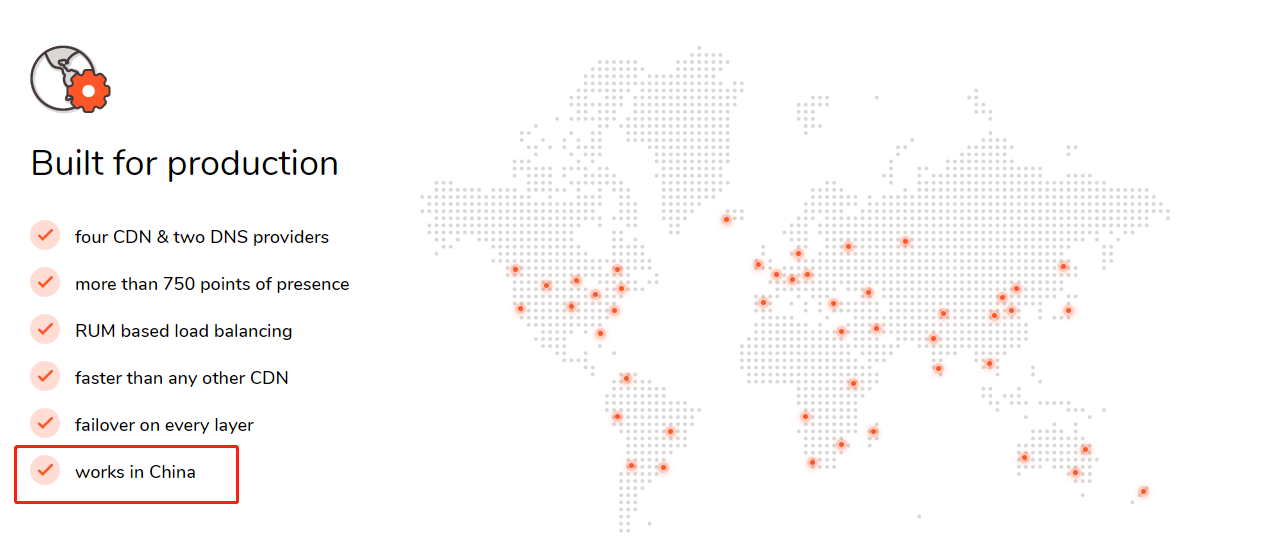
能够看出来,POP 点也是分布全球比较均匀的,最重要的是标红的那句,能够在中国使用!是不是很令人激动~ 本文就给大家演示下如何用 jsDelivr CDN 加速 Github Pages 的图床,这样图片就可以秒加载啦!


3. 使用 jsDelivr CDN 加速 Github Pages 图床

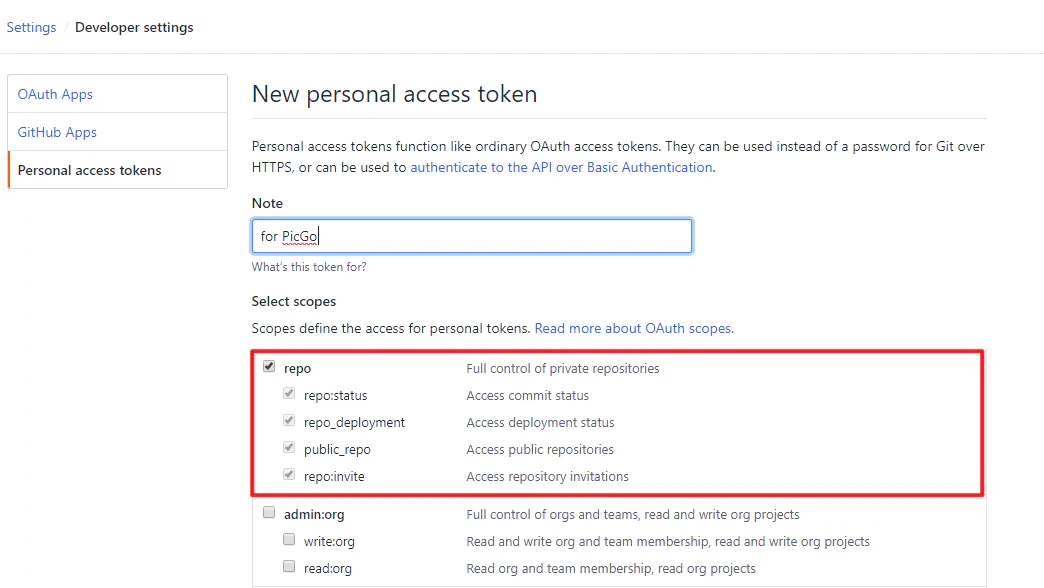
3.1 Github 配置

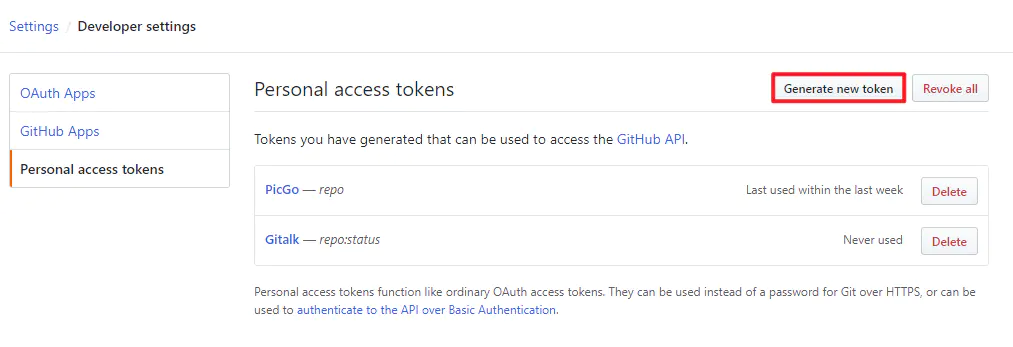
首先需要创建一个 Github Repo,然后生成一个 Token,使得使用这个 key 可以有权限控制该仓库。如下面两张图所示:

记录好 Token,下面会用得到。

3.2 下载 PicGo 并配置

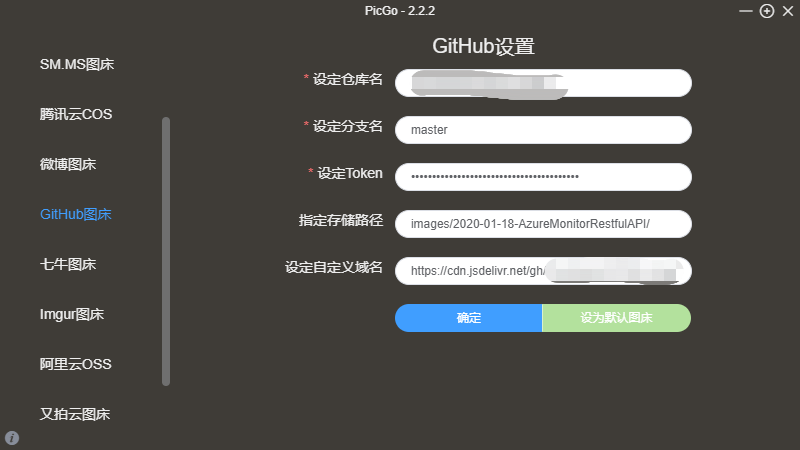
下载地址点击这里,建议使用 GA 的版本,具体根据对应的平台下载相应的安装包即可,我们这里的环境是 Windows 10,那就选择 PicGo-Setup-2.2.2.exe 下载安装即可。安装好后,打开界面如图所示,有几个配置项,一一解释下:

设定仓库名:存放图床的 Repo 名字,一般都是 xxx/xxx 格式;
设定分支名:具体的分支,一般都是 master;
设定 Token:3.1章节生成的 Token,填进去;
指定存储路径:具体的 Repo 下面存储图片的路径;
指定存储路径:一般都是 https://cdn.jsdelivr.net/gh/xxx/xxx@master ,域名是 jsDelivr CDN 本身发布的域名,gh 代表 Github,xxx/xxx@master 代表 Repo 以及 master 分支;

配置好之后,就可以切换到 “图片上传” 选择 “图片上传 - GitHub图床” 后就可以上传图片了,支持拖拽、点击、剪贴板上传,上传后,图片链接直接复制的你的剪贴板中。

能够看出来,Github 可以识别出来是通过 PicGo 上传的。


4. 总结

至此,Github Pages 使用 jsDelivr CDN 加速图片的教程就完成了。其实可以做的更细致,比如说 js 静态文件也通过 CDN 做加速,都可以配置的,剩余的工作交由感兴趣的同学们自己来完成啦。

Azure Monitor 通过 SNMP 协议监控网络设备 Fortigate Firewall

1. 前言

快过年了,先在这里祝大家鼠年大吉。最近真是爱上了 Azure Monitor 这个服务,不仅功能强大而且还是云厂商托管滴,真的是让用户只需要关注业务场景的监控需求落地即可。这篇博客跟大家分享一下实际生产过程当中的一个案例,许多用户都会在混合云或者公有云多 Region 场景中选择自建防火墙来做更深入的定制化网络设计,而网络设备的监控也是非常必要的,这关系到整个基础架构的稳定性和可靠性,那本文来介绍下如何通过 SNMP 协议监控网络设备 Fortigate Firewall。

&nbsp;

2. 实验架构图及相关组件介绍

本文的实验的具体架构图如下所示:

解释一下具体使用的一些产品和服务:
Fortigate:飞塔防火墙设备,Azure上可以通过marketplace来做部署,分为PAYG和BYOL,分别代表两种lic激活模式。由于订阅的一些限制,本文不能通过此方式部署,只能通过vhd的方式部署,具体部署过程不进行赘述,大家可以参阅这里
Collectd:Collectd是一个守护 (daemon) 进程,用来定期收集系统和应用程序的性能指标,同时提供了以不同的方式来存储这些指标值的机制。Collectd从各种来源收集指标,例如 操作系统,应用程序,日志文件和外部设备,并存储此信息或通过网络使其可用。 这些统计数据可用于监控系统、查找性能瓶颈(即性能分析)并预测未来的系统负载(即容量规划)等。支持插件,所有的插件可以看这里

3. Azure Monitor 通过 SNMP 协议监控网络设备 Fortigate Firewall

3.1 创建 Fortigate Firewall 并启用 SNMP 监听

具体过程不进行赘述了,配置好之后,如图所示:

3.2 部署 CentOS 7.7 并配置 Collectd Service 将数据转发 Azure Log Analysis Workspace

首先,通过 Terraform 自动化部署 CentOS 7.7 实例,不贴具体 tf 文件了,具体可以参考这里。通过 Terraform 进行部署的过程大概需要10分钟左右。创建完成后,登陆节点测试 snmpwalk 是否能够拉取 metric:

1
2
3
4
5
6
7
8
9
10
11
12
13
14
15
16
17
18
19
20
21
22
23
24
25
$ snmpwalk -c public -v 2c 10.11.0.5 |more
SNMPv2-MIB::sysDescr.0 = STRING: fortigate
SNMPv2-MIB::sysObjectID.0 = OID: SNMPv2-SMI::enterprises.12356.101.1.90081
DISMAN-EVENT-MIB::sysUpTimeInstance = Timeticks: (647990) 1:47:59.90
SNMPv2-MIB::sysContact.0 = STRING:
SNMPv2-MIB::sysName.0 = STRING: FGVM08TM20000228
SNMPv2-MIB::sysLocation.0 = STRING:
SNMPv2-MIB::sysServices.0 = INTEGER: 78
SNMPv2-MIB::sysORLastChange.0 = Timeticks: (0) 0:00:00.00
SNMPv2-MIB::sysORIndex.1 = INTEGER: 1
SNMPv2-MIB::sysORID.1 = OID: SNMPv2-SMI::zeroDotZero.0
SNMPv2-MIB::sysORDescr.1 = STRING:
SNMPv2-MIB::sysORUpTime.1 = Timeticks: (0) 0:00:00.00
IF-MIB::ifNumber.0 = INTEGER: 2
IF-MIB::ifIndex.1 = INTEGER: 1
IF-MIB::ifIndex.2 = INTEGER: 2
IF-MIB::ifDescr.1 = STRING:
IF-MIB::ifDescr.2 = STRING:
IF-MIB::ifType.1 = INTEGER: ethernetCsmacd(6)
IF-MIB::ifType.2 = INTEGER: tunnel(131)
IF-MIB::ifMtu.1 = INTEGER: 1500
IF-MIB::ifMtu.2 = INTEGER: 1500
IF-MIB::ifSpeed.1 = Gauge32: 1000000000
IF-MIB::ifSpeed.2 = Gauge32: 0
...

10.11.0.5 是 Fortigate 的内网地址,SNMP 监控的 Metric 定义可以根据 Fortigate 的 MiB 库进行定制,具体可以参考这里。部署配置 Collectd,采用分向式配置文件:

1
2
3
4
5
6
7
8
9
10
11
12
13
14
15
16
17
18
19
20
21
22
23
24
25
26
27
28
29
30
31
32
33
34
35
36
37
38
39
40
41
42
43
44
45
46
47
48
49
50
51
52
53
54
55
56
57
58
59
60
61
62
63
64
65
66
67
68
69
70
71
72
73
74
75
76
77
78
79
80
81
82
83
84
85
86
87
88
89
90
91
92
93
94
95
96
97
98
99
100
101
102
103
104
105
106
107
108
109
110
111
112
113
114
115
116
117
118
119
120
121
122
123
124
125
126
127
128
129
130
131
132
133
134
135
136
137
138
139
140
141
142
143
144
145
146
147
148
149
150
151
152
153
154
155
156
157
158
159
160
161
162
163
164
165
166
167
168
169
170
171
172
173
174
175
176
177
178
179
180
181
182
183
184
185
186
$ yum install epel-release -y
$ yum install collectd collectd-snmp -y
$ vi /etc/collectd.d/snmp.conf
LoadPlugin snmp
<Plugin snmp>
<Data "session_count">
Type "counter"
Table false
Instance "session_count"
Values "1.3.6.1.4.1.12356.101.4.1.8.0"
</Data>
<Data "cpu_usage">
Type "counter"
Table false
Instance "cpu_usage"
Values "1.3.6.1.4.1.12356.101.4.1.3.0"
</Data>
<Data "version">
Type "absolute"
Table false
Instance "version"
Values "1.3.6.1.4.1.12356.101.4.1.1.0"
</Data>
<Data "memory_usage">
Type "counter"
Table false
Instance "memory_usage"
Values "1.3.6.1.4.1.12356.101.4.1.4.0"
</Data>
<Data "disk_usage">
Type "counter"
Table false
Instance "disk_usage"
Values "1.3.6.1.4.1.12356.101.4.1.6.0"
</Data>
<Data "fgSysSesRate1">
# The average session setup rate over the past minute.
Type "counter"
Table false
Instance "fgSysSesRate1"
Values "1.3.6.1.4.1.12356.101.4.1.11.0"
</Data>
<Data "fgSysSesRate10">
# The average session setup rate over the past 10 minute.
Type "counter"
Table false
Instance "fgSysSesRate10"
Values "1.3.6.1.4.1.12356.101.4.1.12.0"
</Data>
<Data "fgSysSesRate30">
# The average session setup rate over the past 30 minute.
Type "counter"
Table false
Instance "fgSysSesRate30"
Values "1.3.6.1.4.1.12356.101.4.1.13.0"
</Data>
<Data "fgSysSesRate60">
# The average session setup rate over the past 60 minute.
Type "counter"
Table false
Instance "fgSysSesRate60"
Values "1.3.6.1.4.1.12356.101.4.1.14.0"
</Data>
<Data "fgHwSensorCount">
# The number of entries in fgHwSensorTable
Type "counter"
Table false
Instance "fgHwSensorCount"
Values "1.3.6.1.4.1.12356.101.4.3.1.0"
</Data>
<Data "leePrdVpnStatus">
# The number of entries in fgHwSensorTable
# 1.3.6.1.4.1.12356.101.12.2.2.1.3.2
Type "counter"
Table false
Instance "leePrdVpnStatus"
Values "1.3.6.1.4.1.12356.101.12.2.2.1.20.2"
</Data>
<Data "leeIntVpnStatus">
# The number of entries in fgHwSensorTable
# 1.3.6.1.4.1.12356.101.12.2.2.1.3.3
Type "counter"
Table false
Instance "leeIntVpnStatus"
Values "1.3.6.1.4.1.12356.101.12.2.2.1.20.3"
</Data>
<Data "leePpdVpnStatus">
# The number of entries in fgHwSensorTable
# 1.3.6.1.4.1.12356.101.12.2.2.1.3.4
Type "counter"
Table false
Instance "leePpdVpnStatus"
Values "1.3.6.1.4.1.12356.101.12.2.2.1.20.4"
</Data>
<Data "AMMPrdVpnStatus">
# 1.3.6.1.4.1.12356.101.12.2.2.1.3.5
Type "counter"
Table false
Instance "AMMPrdVpnStatus"
Values "1.3.6.1.4.1.12356.101.12.2.2.1.20.5"
</Data>
<Data "AMMAdmVpnStatus">
# 1.3.6.1.4.1.12356.101.12.2.2.1.3.6
Type "counter"
Table false
Instance "AMMAdmVpnStatus"
Values "1.3.6.1.4.1.12356.101.12.2.2.1.20.6"
</Data>
<Data "AMMIntVpnStatus">
# 1.3.6.1.4.1.12356.101.12.2.2.1.3.7
Type "counter"
Table false
Instance "AMMIntVpnStatus"
Values "1.3.6.1.4.1.12356.101.12.2.2.1.20.7"
</Data>
<Data "AMMPpdVpnStatus">
# 1.3.6.1.4.1.12356.101.12.2.2.1.3.8
Type "counter"
Table false
Instance "AMMPddVpnStatus"
Values "1.3.6.1.4.1.12356.101.12.2.2.1.20.8"
</Data>
<Data "CSTVpnStatus">
# 1.3.6.1.4.1.12356.101.12.2.2.1.3.4
Type "counter"
Table false
Instance "CSTVpnStatus"
Values "1.3.6.1.4.1.12356.101.12.2.2.1.20.4"
</Data>
<Data "ifInOctetsmgmt1">
Type "counter"
Table false
Instance "ifInOctetsmgmt1"
Values "1.3.6.1.2.1.2.2.1.10.1"
</Data>
<Data "ifInOctetsmgmt2">
Type "counter"
Table false
Instance "ifInOctetsmgmt2"
Values "1.3.6.1.2.1.2.2.1.10.2"
</Data>
<Data "ifInOctetsAMEWAN1">
Type "counter"
Table false
Instance "ifInOctetsAMEWAN1"
Values "1.3.6.1.2.1.2.2.1.10.15"
</Data>
<Data "ifInOctetsAMELAN1">
Type "counter"
Table false
Instance "ifInOctetsAMELAN1"
Values "1.3.6.1.2.1.2.2.1.10.16"
</Data>
<Data "ifInOctetsAMELANPRD1">
Type "counter"
Table false
Instance "ifInOctetsAMELANPRD1"
Values "1.3.6.1.2.1.2.2.1.10.17"
</Data>
<Data "ifInOctetsAMELANPPD1">
Type "counter"
Table false
Instance "ifInOctetsAMELANPPD1"
Values "1.3.6.1.2.1.2.2.1.10.18"
</Data>
<Data "ifInOctetsAMELANINT1">
Type "counter"
Table false
Instance "ifInOctetsAMELANINT1"
Values "1.3.6.1.2.1.2.2.1.10.19"
</Data>
<Data "ifInOctetsAMELANADMIN1">
Type "counter"
Table false
Instance "ifInOctetsAMELANADMIN1"
Values "1.3.6.1.2.1.2.2.1.10.23"
</Data>

<Host "fortigate0001">
Address "10.11.0.5"
Version 2c
Community "public"
Collect "session_count" "version" "cpu_usage" "memory_usage" "disk_usage" "fgSysSesRate1" "fgSysSesRate10" "fgSysSesRate30" "fgSysSesRate60" "fgHwSensorCount" "leePrdVpnStatus" "leeIntVpnStatus" "leePpdVpnStatus" "AMMPrdVpnStatus""AMMAdmVpnStatus" "AMMIntVpnStatus" "AMMPpdVpnStatus" "CSTVpnStatus" "ifInOctetsmgmt1" "ifInOctetsmgmt2" "ifInOctetsAMEWAN1" "ifInOctetsAMELAN1" "ifInOctetsAMELANPRD1" "ifInOctetsAMELANPPD1" "ifInOctetsAMELANINT1" "ifInOctetsAMELANADMIN1"
Interval 300
</Host>
</Plugin>

保存退出后,配置 Azure Log Analysis Agent,如图所示:

<img src=”LA-Installation.jpg” “height:800px” width=”800px” div align=center/>

显示绿色图标,代表连接正常。

3.2 部署单节点 MongoDB Server 4.2.0

3.2.1 配置 CentOS 7.7 MongoDB 4.x Yum 源

1
2
3
4
5
6
7
8
$ cd /etc/yum.repos.d/
$ vi mongodb.repo
[mongodb-org-4.2]
name=MongoDB Repository
baseurl=https://repo.mongodb.org/yum/redhat/$releasever/mongodb-org/4.2/x86_64/
gpgcheck=1
enabled=1
gpgkey=https://www.mongodb.org/static/pgp/server-4.2.asc

保存退出,Yum 源配置完成。

3.2.2 安装单节点 MongoDB Server 4.2.0

安装 MongoDB Server 4.2.0:

1
$ yum install -y mongodb-org-4.2.0 mongodb-org-server-4.2.0 mongodb-org-shell-4.2.0 mongodb-org-mongos-4.2.0 mongodb-org-tools-4.2.0

检查安装包及版本:

1
2
3
4
5
6
$ rpm -qa |grep mongodb
mongodb-org-tools-4.2.0-1.el7.x86_64
mongodb-org-mongos-4.2.0-1.el7.x86_64
mongodb-org-shell-4.2.0-1.el7.x86_64
mongodb-org-4.2.0-1.el7.x86_64
mongodb-org-server-4.2.0-1.el7.x86_64

修改 MongoDB Server 配置文件:

1
2
3
4
5
6
7
8
9
10
11
12
13
14
15
16
17
18
19
20
21
22
23
24
25
26
27
28
29
30
31
32
33
34
35
36
37
$ vi /etc/mongod.conf
# mongod.conf

# for documentation of all options, see:
# http://docs.mongodb.org/manual/reference/configuration-options/

# where to write logging data.
systemLog:
destination: file
logAppend: true
path: /var/log/mongodb/mongod.log

# Where and how to store data.
storage:
dbPath: /var/lib/mongo
journal:
enabled: true
# engine:
# wiredTiger:

# how the process runs
processManagement:
fork: true # fork and run in background
pidFilePath: /var/run/mongodb/mongod.pid # location of pidfile
timeZoneInfo: /usr/share/zoneinfo

# network interfaces
net:
port: 27017
bindIp: 0.0.0.0 # Enter 0.0.0.0,:: to bind to all IPv4 and IPv6 addresses or, alternatively, use the net.bindIpAll setting.

#security:
#operationProfiling:
replication:
oplogSizeMB: "20480"
replSetName: repconfig

启动 MongoDB Sever 服务:

1
systemctl start mongod && systemctl enable mongod

MongoDB 初始化:

1
2
3
4
5
6
7
8
9
10
11
12
13
14
15
16
17
18
19
20
21
22
23
24
25
26
$ mongo --port 27017
> repconfig = { _id : "repconfig", members : [ {_id : 0, host : "10.11.0.4:27017" , priority: 1 } ] }
{
"_id" : "repconfig",
"members" : [
{
"_id" : 0,
"host" : "10.11.0.4:27017",
"priority" : 1
}
]
}
> rs.initiate(repconfig);
{
"ok" : 1,
"$clusterTime" : {
"clusterTime" : Timestamp(1579339466, 1),
"signature" : {
"hash" : BinData(0,"AAAAAAAAAAAAAAAAAAAAAAAAAAA="),
"keyId" : NumberLong(0)
}
},
"operationTime" : Timestamp(1579339466, 1)
}
repconfig:SECONDARY>
repconfig:PRIMARY>

初始化结束后,可以通过 Mongo Shell rs.status() 来查 Replica 信息。

3.3 通过 Python 调用 Azure Monitor Restful API 来监控 Mongodb Server 4.2.0

3.3.1 创建 Azure Log Analysis Workspace

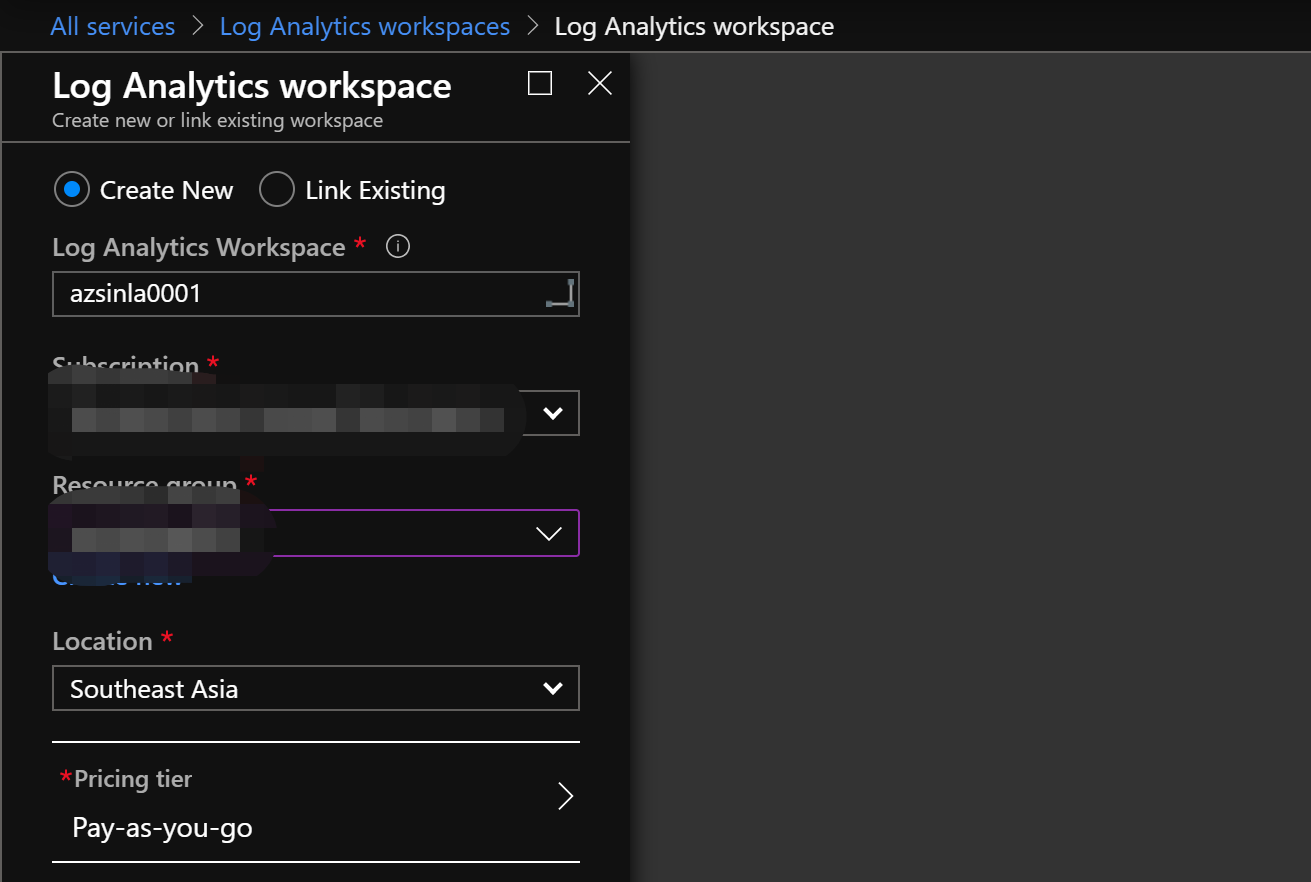
具体操作过程不再赘述,通过 Portal 或者 Cli 等方式 Step by Step 点击创建即可,如图:

<img src=”LA-Creation.jpg” “height:800px” width=”600px” div align=center/>

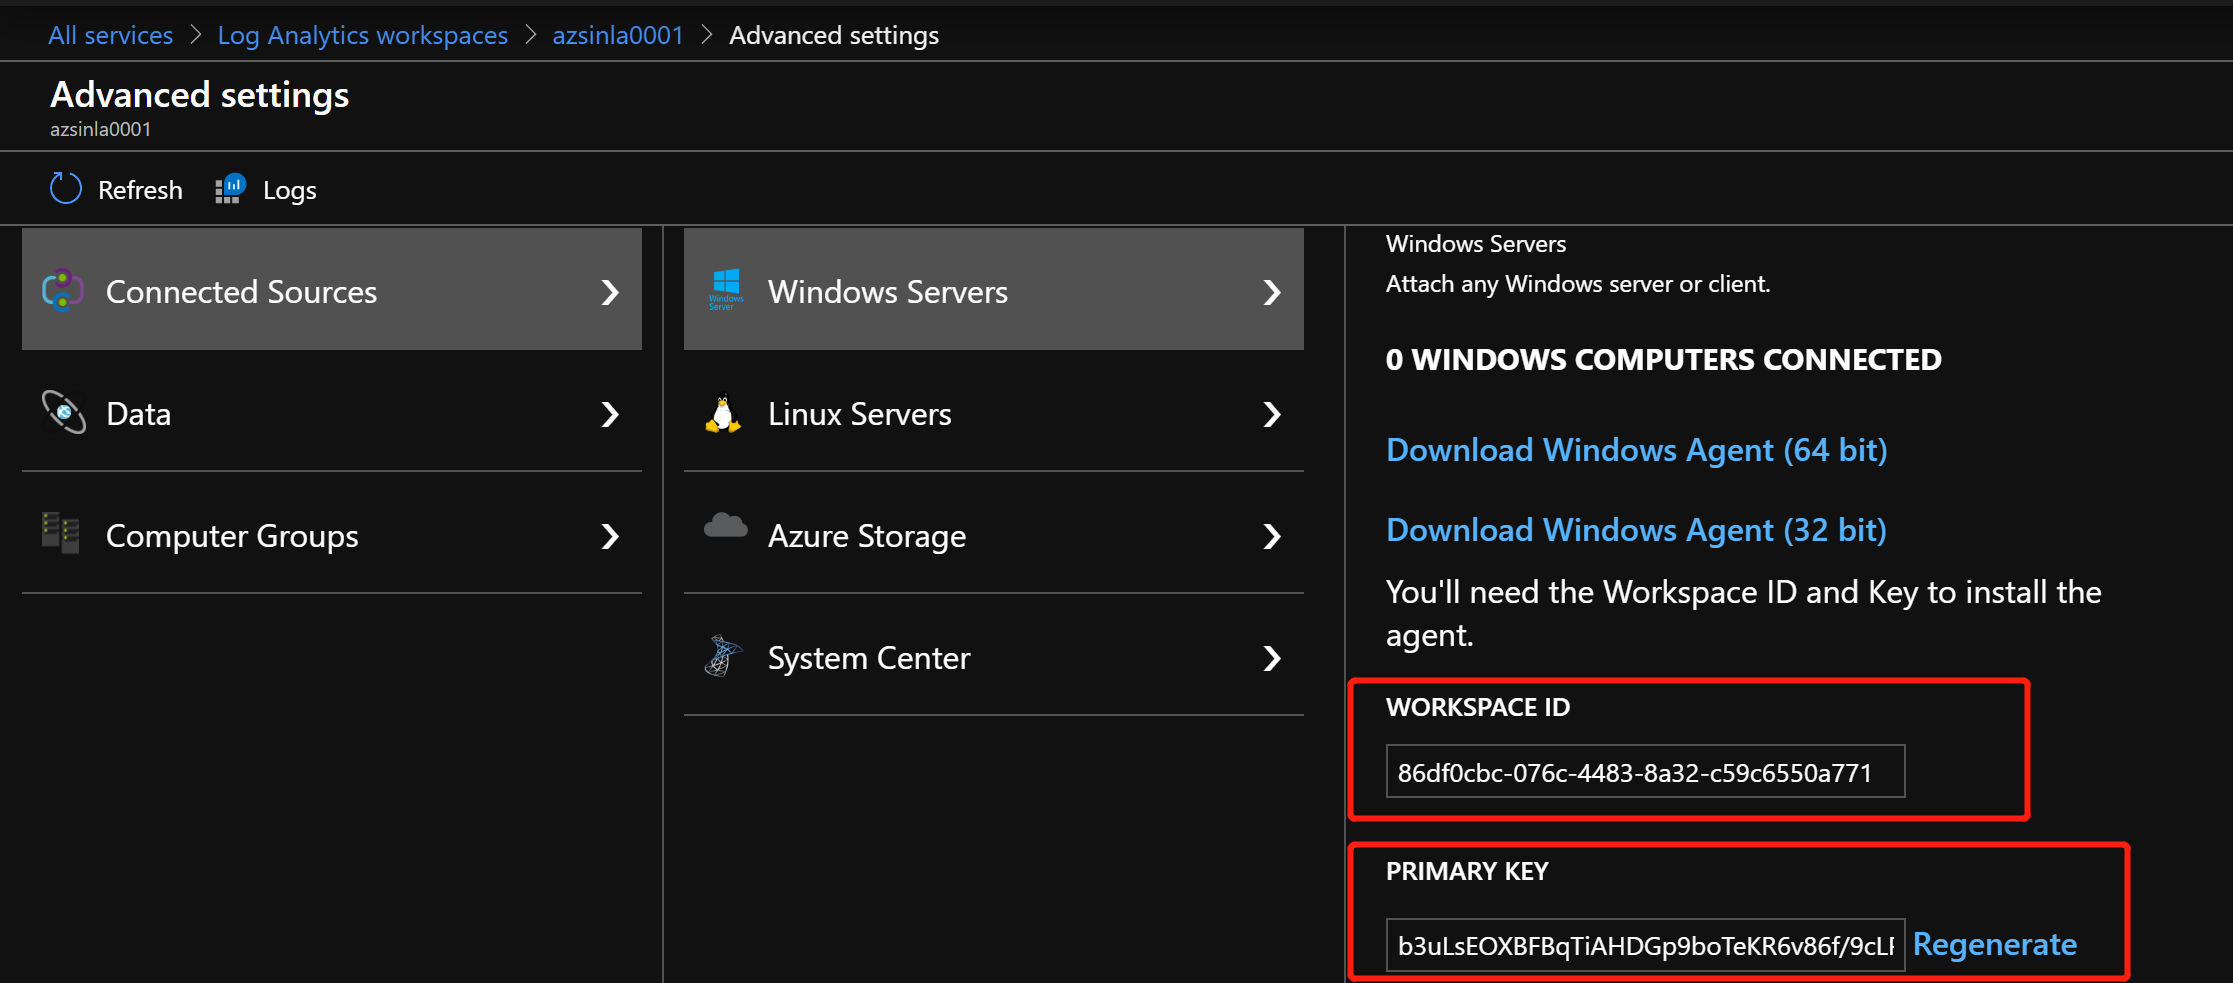
创建好了需要的几个信息,如图:

<img src=”LA-Info.jpg” “height:800px” width=”800px” div align=center/>

“WORKSPACE ID” 为脚本中的 customer_id,”PRIMARY KEY” 为脚本中的 shared_key。

3.3.2 Python 调用 Azure Monitor Restful API 向 Azure Log Analysis Workspace 传送数据

Azure Monitor Restful API 不做赘述,具体可以参考这里。本实验先通过 pymongo 收集 MongoDB Metrics,然后送到 Azure Log Analysis Workspace 中,先安装 pymongo:

1
2
$ yum install python-pip y
$ pip install pymongo requests

具体的 Python 脚本如下:

1
2
3
4
5
6
7
8
9
10
11
12
13
14
15
16
17
18
19
20
21
22
23
24
25
26
27
28
29
30
31
32
33
34
35
36
37
38
39
40
41
42
43
44
45
46
47
48
49
50
51
52
53
54
55
56
57
58
59
60
61
62
63
64
65
66
67
68
69
70
71
72
73
74
75
76
77
78
79
80
81
82
83
84
85
86
87
88
89
90
91
92
93
94
95
96
97
98
99
100
101
102
103
104
105
106
107
108
109
110
111
112
113
114
115
116
117
118
119
120
121
122
123
124
125
126
127
128
129
130
131
132
133
134
135
136
137
138
139
140
141
142
143
144
145
146
147
148
149
150
151
152
153
154
155
156
157
158
159
160
161
162
163
164
165
166
167
168
169
170
171
172
173
174
175
176
177
178
179
180
181
182
183
184
185
186
187
188
189
190
191
192
193
194
195
196
197
198
199
200
201
202
203
204
205
206
207
208
209
210
211
212
213
214
215
216
217
218
219
220
221
222
223
224
225
226
227
228
229
230
231
232
233
234
235
236
237
238
239
240
241
242
243
244
245
246
247
248
249
250
251
252
253
254
255
256
257
258
259
260
261
262
263
264
265
266
267
268
269
270
271
272
273
274
275
276
277
278
279
280
281
282
283
284
285
286
287
288
289
290
291
292
293
294
295
296
297
298
299
300
301
#!/usr/bin/env python
"""
Date: 01/18/2020
Author: Xinsheng Wang
Description: A custom script to get MongoDB metrics and send data to Azure Monitor
Requires: MongoClient in python
"""

from calendar import timegm
from time import gmtime

from pymongo import MongoClient, errors
from sys import exit

import json
import requests
import datetime
import hashlib
import hmac
import base64
import os
from glob import glob

# Update the customer ID to your Log Analytics workspace ID
customer_id = '86df0cbc-076c-4483-8a32-c59c6550a771'

# For the shared key, use either the primary or the secondary Connected Sources client authentication key
shared_key = "b3uLsEOXBFBqTiAHDGp9boTeKR6v86f/9cLPWWsWUvs+LcjBIqjDp9CDJL+7vxlKDDRxqXIf1jjjKcZbdV0H/Q=="

# The log type is the name of the event that is being submitted
log_type = 'MongoDBMonitorLog'

class MongoDB(object):
"""main script class"""
# pylint: disable=too-many-instance-attributes

def delete_temporary_files(self):
"""delete temporary files"""
for file in glob('/tmp/mongometrics000*'):
os.remove(file)

def __init__(self):
self.mongo_host = "10.11.0.4"
self.mongo_port = 27017
self.mongo_db = ["admin", ]
self.mongo_user = None
self.mongo_password = None
self.__conn = None
self.__dbnames = None
self.__metrics = []

def connect(self):
"""Connect to MongoDB"""
if self.__conn is None:
if self.mongo_user is None:
try:
self.__conn = MongoClient('mongodb://%s:%s' %
(self.mongo_host,
self.mongo_port))
except errors.PyMongoError as py_mongo_error:
print('Error in MongoDB connection: %s' %
str(py_mongo_error))
else:
try:
self.__conn = MongoClient('mongodb://%s:%s@%s:%s' %
(self.mongo_user,
self.mongo_password,
self.mongo_host,
self.mongo_port))
except errors.PyMongoError as py_mongo_error:
print('Error in MongoDB connection: %s' %
str(py_mongo_error))

def add_metrics(self, k, v):
"""add each metric to the metrics list"""
global body
dict_metrics = {}
dict_metrics["key"] = k
dict_metrics["value"] = v
self.__metrics.append(dict_metrics)
dic = json.dumps(dict_metrics, sort_keys=True, indent=4, separators=(',', ':')).replace('}', '},')

f = open('/tmp/mongometrics0001.txt','a')
f.write(dic)
f.close

os.system("cat /tmp/mongometrics0001.txt |sed '$s/\}\,/\}\]/g;1s/{/[{/' > /tmp/mongometrics0002.txt")

with open('/tmp/mongometrics0002.txt','r') as src:
body = src.read()
print(body)

def get_db_names(self):
"""get a list of DB names"""
if self.__conn is None:
self.connect()
db_handler = self.__conn[self.mongo_db[0]]

master = db_handler.command('isMaster')['ismaster']
dict_metrics = {}
dict_metrics['key'] = 'mongodb.ismaster'
if master:
dict_metrics['value'] = 1
db_names = self.__conn.database_names()
self.__dbnames = db_names
else:
dict_metrics['value'] = 0
self.__metrics.append(dict_metrics)

def get_mongo_db_lld(self):
"""print DB list in json format, to be used for mongo db discovery"""
if self.__dbnames is None:
db_names = self.get_db_names()
else:
db_names = self.__dbnames
dict_metrics = {}
db_list = []
dict_metrics['key'] = 'mongodb.discovery'
dict_metrics['value'] = {"data": db_list}
if db_names is not None:
for db_name in db_names:
dict_lld_metric = {}
dict_lld_metric['{#MONGODBNAME}'] = db_name
db_list.append(dict_lld_metric)
dict_metrics['value'] = '{"data": ' + json.dumps(db_list) + '}'
self.__metrics.insert(0, dict_metrics)

def get_oplog(self):
"""get replica set oplog information"""
if self.__conn is None:
self.connect()
db_handler = self.__conn['local']

coll = db_handler.oplog.rs

op_first = (coll.find().sort('$natural', 1).limit(1))
op_last = (coll.find().sort('$natural', -1).limit(1))

# if host is not a member of replica set, without this check we will
# raise StopIteration as guided in
# http://api.mongodb.com/python/current/api/pymongo/cursor.html

if op_first.count() > 0 and op_last.count() > 0:
op_fst = (op_first.next())['ts'].time
op_last_st = op_last[0]['ts']
op_lst = (op_last.next())['ts'].time

status = round(float(op_lst - op_fst), 1)
self.add_metrics('mongodb.oplog', status)

current_time = timegm(gmtime())
oplog = int(((str(op_last_st).split('('))[1].split(','))[0])
self.add_metrics('mongodb.oplog-sync', (current_time - oplog))


def get_maintenance(self):
"""get replica set maintenance info"""
if self.__conn is None:
self.connect()
db_handler = self.__conn

fsync_locked = int(db_handler.is_locked)
self.add_metrics('mongodb.fsync-locked', fsync_locked)

try:
config = db_handler.admin.command("replSetGetConfig", 1)
connstring = (self.mongo_host + ':' + str(self.mongo_port))
connstrings = list()

for i in range(0, len(config['config']['members'])):
host = config['config']['members'][i]['host']
connstrings.append(host)

if connstring in host:
priority = config['config']['members'][i]['priority']
hidden = int(config['config']['members'][i]['hidden'])

self.add_metrics('mongodb.priority', priority)
self.add_metrics('mongodb.hidden', hidden)
except errors.PyMongoError:
print ('Error while fetching replica set configuration.'
'Not a member of replica set?')
except UnboundLocalError:
print ('Cannot use this mongo host: must be one of ' + ','.join(connstrings))
exit(1)

def get_server_status_metrics(self):
"""get server status"""
if self.__conn is None:
self.connect()
db_handler = self.__conn[self.mongo_db[0]]
ss = db_handler.command('serverStatus')

# db info
self.add_metrics('mongodb.version', ss['version'])
self.add_metrics('mongodb.storageEngine', ss['storageEngine']['name'])
self.add_metrics('mongodb.uptime', int(ss['uptime']))
self.add_metrics('mongodb.okstatus', int(ss['ok']))

# asserts
for k, v in ss['asserts'].items():
self.add_metrics('mongodb.asserts.' + k, v)

# operations
for k, v in ss['opcounters'].items():
self.add_metrics('mongodb.operation.' + k, v)

# connections
for k, v in ss['connections'].items():
self.add_metrics('mongodb.connection.' + k, v)

# extra info
self.add_metrics('mongodb.page.faults',
ss['extra_info']['page_faults'])

#wired tiger
if ss['storageEngine']['name'] == 'wiredTiger':
self.add_metrics('mongodb.used-cache',
ss['wiredTiger']['cache']
["bytes currently in the cache"])
self.add_metrics('mongodb.total-cache',
ss['wiredTiger']['cache']
["maximum bytes configured"])
self.add_metrics('mongodb.dirty-cache',
ss['wiredTiger']['cache']
["tracked dirty bytes in the cache"])

# global lock
lock_total_time = ss['globalLock']['totalTime']
self.add_metrics('mongodb.globalLock.totalTime', lock_total_time)
for k, v in ss['globalLock']['currentQueue'].items():
self.add_metrics('mongodb.globalLock.currentQueue.' + k, v)
for k, v in ss['globalLock']['activeClients'].items():
self.add_metrics('mongodb.globalLock.activeClients.' + k, v)

def get_db_stats_metrics(self):
"""get DB stats for each DB"""
if self.__conn is None:
self.connect()
if self.__dbnames is None:
self.get_db_names()
if self.__dbnames is not None:
for mongo_db in self.__dbnames:
db_handler = self.__conn[mongo_db]
dbs = db_handler.command('dbstats')
for k, v in dbs.items():
if k in ['storageSize', 'ok', 'avgObjSize', 'indexes',
'objects', 'collections', 'fileSize',
'numExtents', 'dataSize', 'indexSize',
'nsSizeMB']:
self.add_metrics('mongodb.stats.' + k +
'[' + mongo_db + ']', int(v))
def close(self):
"""close connection to mongo"""
if self.__conn is not None:
self.__conn.close()

# Build the API signature
def build_signature(customer_id, shared_key, date, content_length, method, content_type, resource):
x_headers = 'x-ms-date:' + date
string_to_hash = method + "\n" + str(content_length) + "\n" + content_type + "\n" + x_headers + "\n" + resource
bytes_to_hash = bytes(string_to_hash).encode('utf-8')
decoded_key = base64.b64decode(shared_key)
encoded_hash = base64.b64encode(hmac.new(decoded_key, bytes_to_hash, digestmod=hashlib.sha256).digest())
authorization = "SharedKey {}:{}".format(customer_id,encoded_hash)
return authorization

# Build and send a request to the POST API
def mongodb_azuremonitor_loganalysis_post_data(customer_id, shared_key, body, log_type):
method = 'POST'
content_type = 'application/json'
resource = '/api/logs'
rfc1123date = datetime.datetime.utcnow().strftime('%a, %d %b %Y %H:%M:%S GMT')
content_length = len(body)
signature = build_signature(customer_id, shared_key, rfc1123date, content_length, method, content_type, resource)
uri = 'https://' + customer_id + '.ods.opinsights.azure.com' + resource + '?api-version=2016-04-01'

headers = {
'content-type': content_type,
'Authorization': signature,
'Log-Type': log_type,
'x-ms-date': rfc1123date
}

response = requests.post(uri,data=body, headers=headers)
if (response.status_code >= 200 and response.status_code <= 299):
print 'Accepted'
else:
print "Response code: {}".format(response.status_code)

if __name__ == '__main__':
mongodb = MongoDB()
mongodb.delete_temporary_files()
mongodb.get_db_names()
mongodb.get_mongo_db_lld()
mongodb.get_oplog()
mongodb.get_maintenance()
mongodb.get_server_status_metrics()
mongodb.get_db_stats_metrics()
mongodb.close()
mongodb_azuremonitor_loganalysis_post_data(customer_id, shared_key, body, log_type)

注意相应的 customer_id 和 shared_key 替换成图中的 key,log_type 为收集到 Log Analysis Workspace 的 namespace 名字。保存脚本名字为 AzureMonitor_LogAnalysis_MongodbMetrics.py,执行脚本:

1
python AzureMonitor_LogAnalysis_MongodbMetrics.py

通过 print 可以打印一些交互式信息,观察数据是否已经送到 Azure Log Analysis Workspace。

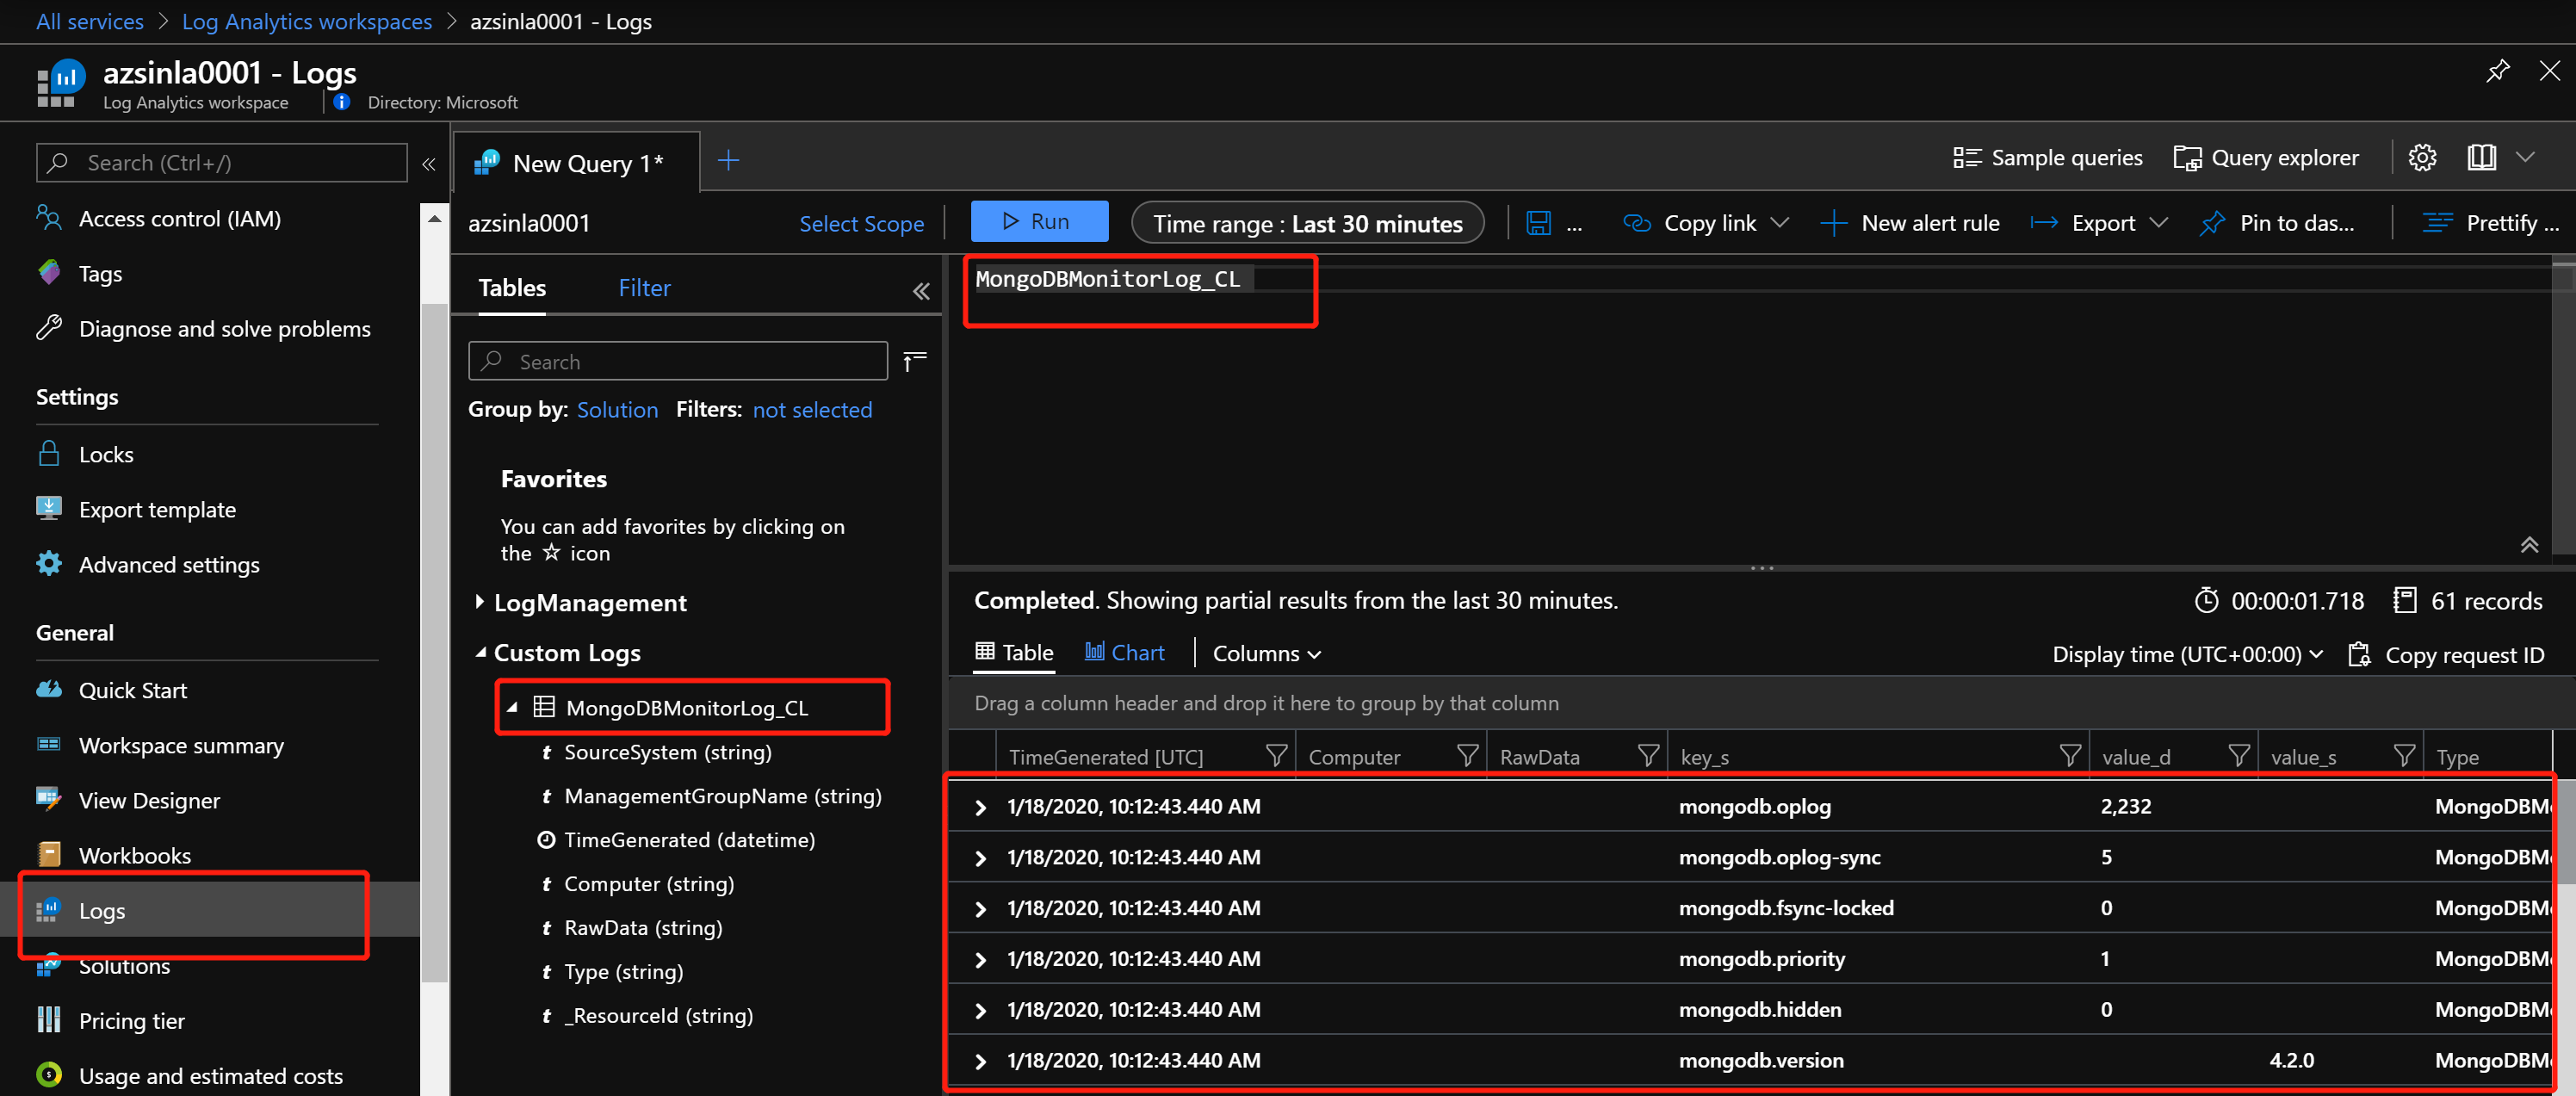
3.3.3 利用 Kusto 查询 MongoDB Custom Logs

在 Azure Portal 查看并通过 KQL 查询 MongoDB 的数据:

<img src=”Azure-Monitor-Restful-API-MongoDB.jpg” “height:800px” width=”800px” div align=center/>

如图可见,数据已经成功送到了 Azure Log Analysis Workspace,后续可以写更复杂的 Kusto 来做相关的查询,并可以考虑结合调度或者 Linux Crontab 等服务做定时的数据拉取和告警了。

4. 总结

测试至此,Azure Monitor Restful API 监控 MongoDB 的示例完成了,希望能够给想要通过 Azure Monitor 做二次开发的同学们一些参考。但本文还有一些可以优化之处,比如 Python 脚本没有考虑更多的 Log Output 以及执行失败时候的 Retry 逻辑,在实际生产中,为了严谨,还是希望大家要充分考虑逻辑在上线,不过这些功能有待大家自己添加了。

集成 Microsoft Azure Monitor Restful API 来监控 MongoDB

1. 前言

随时 IT 技术的蓬勃发展,出现了越来越多地以各种技术栈为核心的应用程序,同时应用架构和服务的调用关系也就变得越来越复杂,所以建立一个强大的监控系统的必要性就很自然的体现了出来。一般在实际的生产环境中,监控对象类型丰富多样,工具平台也有很多可以来选择。比如从最早的 Smokeping,Cacti,Nagios,Ganglia 发展到现在比较流行功能也更加强大的 Zabbix,Prometheus,Openfalcon 以及偏业务层做代码追踪的监控平台 CAT,Zipkin 等,这些都是很不错的工具和平台,只要运用合适,都可以解决很多场景和不同维度的监控需求。但是维护这些监控平台并不是一件容易的事情,从可靠性、性能到定制化开发,都需要花费很多的人力物力来做底层代码层面的修改,不然直接上生产有非常大的风险。依据此背景,Azure 也推出自己的监控服务 Azure Monitor,帮助客户不需要担心监控系统的可靠性,只需要关注业务的可靠性和监控需求的落地即可。Azure Monitor 支持从基础架构层、应用层甚至于容器层面的监控。本文主要介绍通过 Azure Monitor Restful API 来收集 MongoDB 的指标,从而来模拟通过 Azure Monitor 来做二开监控平台的场景。


2. Azure Monitor 介绍

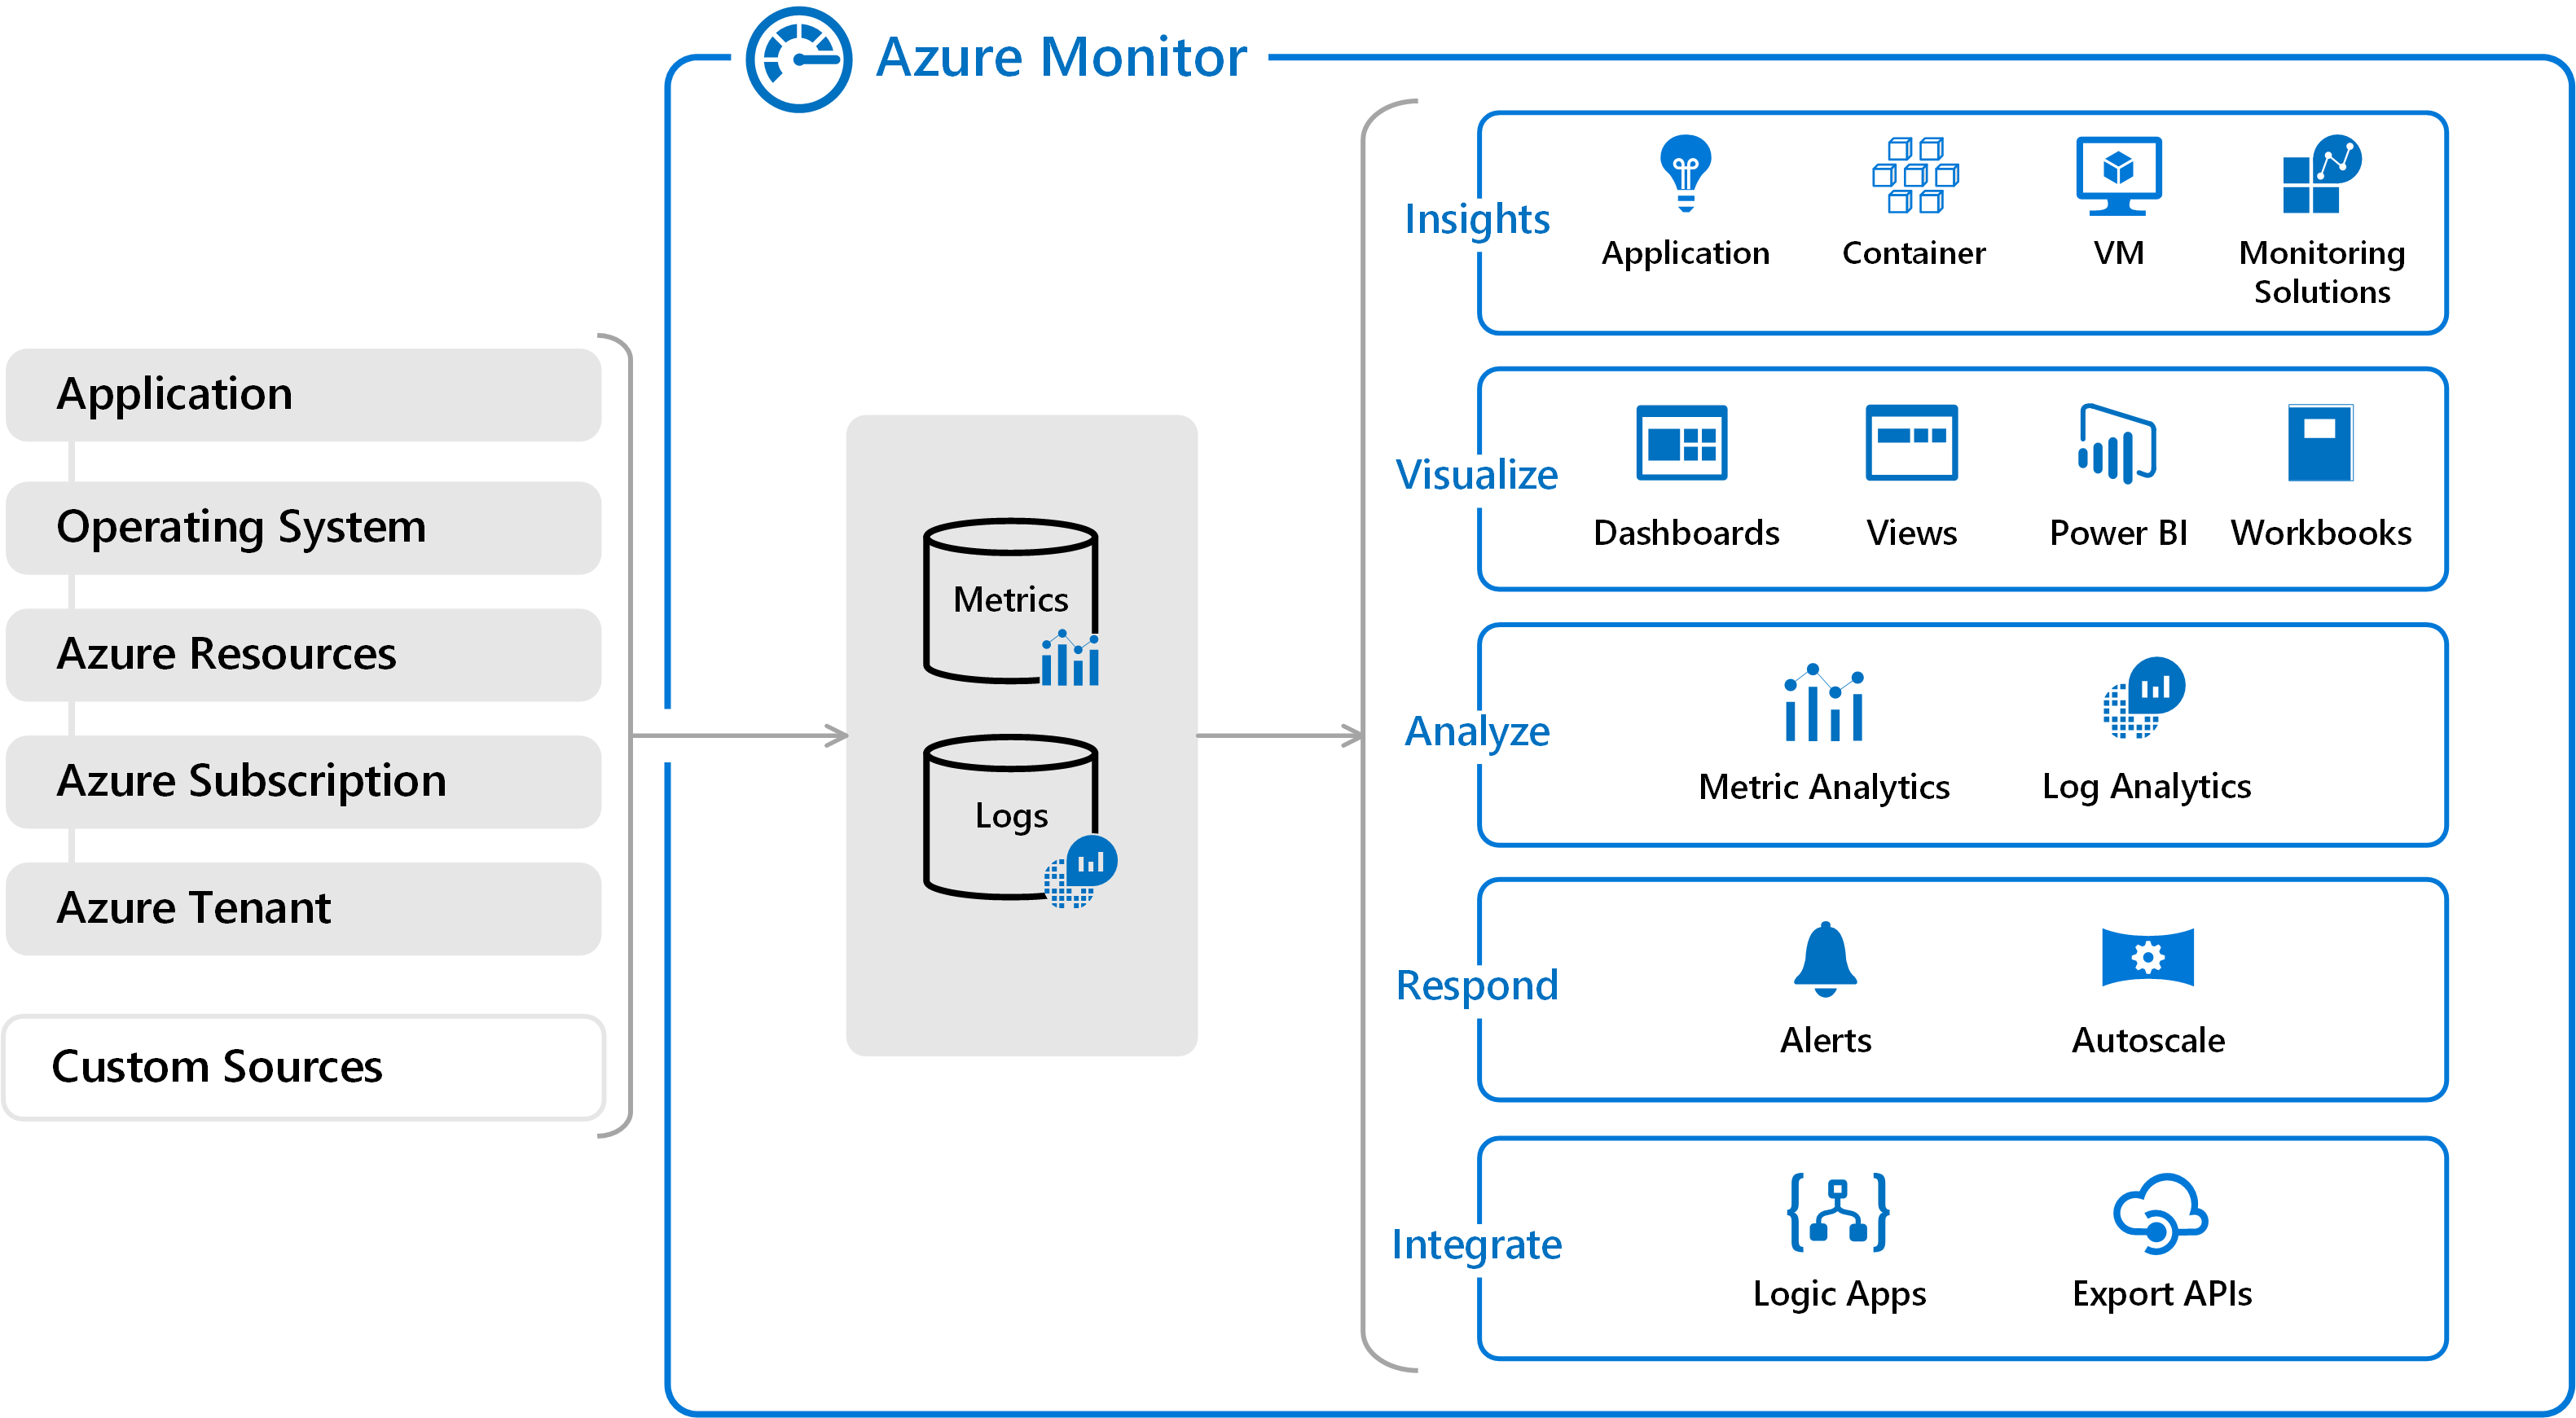
Azure Monitor 提供用于收集、分析和处理来自云与本地环境的遥测数据的综合解决方案,可将应用程序和服务的可用性和性能最大化。它可以帮助你了解应用程序的性能,并主动识别影响应用程序及其所依赖资源的问题。下图提供了 Azure Monitor 的概要视图。示意图的中心是用于存储指标和日志 ( Azure Monitor 使用的两种基本类型的数据 ) 的数据存储,左侧是用于填充这些数据存储的监视数据源,右侧是 Azure Monitor 针对这些收集的数据执行的不同功能,例如分析、警报和流式传输到外部系统。

Azure Monitor 支持监控的数据类型的层级都很多,具体可以参考官方文档,就不在此赘述了。对于收集上来的数据,Azure Monitor 使用 Azure Data Explorer 使用的 Kusto 查询语言来做查询,同时包括高级功能,例如聚合、联接和智能分析等。话不多说,直接开干。


3. Azure Monitor 通过 Restful API 监控 MongoDB

3.1 创建测试服务器 CentOS Server

首先,通过 Terraform 自动化部署 CentOS 7.7 实例,具体的 .tf 文件内容如下,其中变量引用

1
2
3
4
5
6
7
8
9
10
11
12
13
14
15
16
17
18
19
20
21
22
23
24
25
26
27
28
29
30
31
32
33
34
35
36
37
38
39
40
41
42
43
44
45
46
47
48
49
50
51
52
53
54
55
56
57
58
59
60
61
62
63
64
65
66
67
68
69
70
71
72
73
74
75
76
77
78
79
80
81
82
83
84
85
86
87
88
89
90
91
92
93
94
95
96
97
98
99
100
101
102
103
104
105
106
107
108
109
110
111
112
113
114
115
116
117
118
119
120
121
122
123
124
125
126
127
128
129
130
131
132
133
134
135
136
137
138
139
140
141
142
143
144
145
146
147
148
149
150
151
152
153
154
155
156
157
158
159
160
161
162
163
164
165
166
167
168
169
170
171
172
173
174
175
176
177
178
179
180
181
182
183
184
185
186
187
188
189
190
191
192
193
194
195
196
197
198
199
200
# Configure the Microsoft Azure Provider
provider "azurerm" {
subscription_id = "${var.subscription_id}"
client_id = "${var.client_id}"
client_secret = "${var.client_secret}"
tenant_id = "${var.tenant_id}"
}

# Create a resource group if it doesn’t exist
resource "azurerm_resource_group" "myterraformgroup" {
name = "${var.lab_namespace}rg0001"
location = "${var.location}"
tags = {
environment = "Azure Terraform Automation"
}
}

# Create virtual network
resource "azurerm_virtual_network" "myterraformnetwork" {
name = "${var.lab_namespace}vnet0001"
address_space = ["10.11.0.0/16"]
location = "${var.location}"
resource_group_name = "${azurerm_resource_group.myterraformgroup.name}"

tags = {
environment = "Azure Terraform Automation"
}
}

# Create Network Security Group and rule
resource "azurerm_network_security_group" "publicnsg" {
name = "public-nsg"
location = "${var.location}"
resource_group_name = "${azurerm_resource_group.myterraformgroup.name}"

security_rule {
name = "SSH"
priority = 1001
direction = "Inbound"
access = "Allow"
protocol = "Tcp"
source_port_range = "*"
destination_port_range = "22"
source_address_prefix = "*"
destination_address_prefix = "*"
}

security_rule {
name = "RDP"
priority = 1002
direction = "Inbound"
access = "Allow"
protocol = "Tcp"
source_port_range = "*"
destination_port_range = "3389"
source_address_prefix = "*"
destination_address_prefix = "*"
}

tags = {
environment = "Azure Terraform Automation"
}
}
resource "azurerm_network_security_group" "opnsg" {
name = "op-nsg"
location = "${var.location}"
resource_group_name = "${azurerm_resource_group.myterraformgroup.name}"

security_rule {
name = "SSH"
priority = 1001
direction = "Inbound"
access = "Allow"
protocol = "Tcp"
source_port_range = "*"
destination_port_range = "22"
source_address_prefix = "*"
destination_address_prefix = "*"
}

security_rule {
name = "RDP"
priority = 1002
direction = "Inbound"
access = "Allow"
protocol = "Tcp"
source_port_range = "*"
destination_port_range = "3389"
source_address_prefix = "*"
destination_address_prefix = "*"
}

tags = {
environment = "Azure Terraform Automation"
}
}

# Create subnet
resource "azurerm_subnet" "publicsubnet" {
name = "publicsubnet0001"
resource_group_name = "${azurerm_resource_group.myterraformgroup.name}"
virtual_network_name = "${azurerm_virtual_network.myterraformnetwork.name}"
address_prefix = "10.11.0.0/23"
network_security_group_id = "${azurerm_network_security_group.publicnsg.id}"
}
resource "azurerm_subnet" "opsubnet" {
name = "opsubnet0001"
resource_group_name = "${azurerm_resource_group.myterraformgroup.name}"
virtual_network_name = "${azurerm_virtual_network.myterraformnetwork.name}"
address_prefix = "10.11.2.0/23"
network_security_group_id = "${azurerm_network_security_group.opnsg.id}"
}

# Create Public IP
resource "azurerm_public_ip" "centospips" {
name = "centos0001pip"
location = "${var.location}"
resource_group_name = "${azurerm_resource_group.myterraformgroup.name}"
allocation_method = "Static"

tags = {
environment = "Azure Terraform Automation"
}
}

# Create Network interface
resource "azurerm_network_interface" "centosnics" {
name = "centos0001nic0001"
location = "${var.location}"
resource_group_name = "${azurerm_resource_group.myterraformgroup.name}"

ip_configuration {
name = "centos0001nic0001"
subnet_id = "${azurerm_subnet.publicsubnet.id}"
private_ip_address_allocation = "Static"
private_ip_address = "10.11.0.4"
public_ip_address_id = "${azurerm_public_ip.centospips.id}"
}

tags = {
environment = "Azure Terraform Automation"
}
}

# Create storage account for boot diagnostics
resource "azurerm_storage_account" "mystorageaccount" {
name = "${azurerm_resource_group.myterraformgroup.name}sa0001"
resource_group_name = "${azurerm_resource_group.myterraformgroup.name}"
location = "${var.location}"
account_kind = "StorageV2"
account_tier = "Standard"
account_replication_type = "LRS"

tags = {
environment = "Azure Terraform Automation"
}
}

# Create virtual machine
resource "azurerm_virtual_machine" "centos0001" {
name = "centos0001"
location = "${var.location}"
resource_group_name = "${azurerm_resource_group.myterraformgroup.name}"
network_interface_ids = ["${azurerm_network_interface.centosnics.id}"]
vm_size = "Standard_D2s_v3"

storage_os_disk {
name = "centos0001OsDisk"
caching = "ReadWrite"
create_option = "FromImage"
managed_disk_type = "Standard_LRS"
}

storage_image_reference {
id = "/subscriptions/xxxxxxxx-xxxx-xxxx-xxxx-xxxxxxxxxxxx/resourceGroups/xxxxxx/providers/Microsoft.Compute/images/centos77image0001"
}

os_profile {
computer_name = "centos0001"
admin_username = "${var.admin_username}"

}

os_profile_linux_config {
disable_password_authentication = true
ssh_keys {
path = "/home/${var.admin_username}/.ssh/authorized_keys"
key_data = "${var.ssh_public_key_data}"
}
}

boot_diagnostics {
enabled = "true"
storage_uri = "${azurerm_storage_account.mystorageaccount.primary_blob_endpoint}"
}

tags = {
environment = "Azure Terraform Automation"
}
}

整个部署过程大概需要10分钟左右完成。

3.2 部署单节点 MongoDB Server 4.2.0

3.2.1 配置 CentOS 7.7 MongoDB 4.x Yum 源

1
2
3
4
5
6
7
8
$ cd /etc/yum.repos.d/
$ vi mongodb.repo
[mongodb-org-4.2]
name=MongoDB Repository
baseurl=https://repo.mongodb.org/yum/redhat/$releasever/mongodb-org/4.2/x86_64/
gpgcheck=1
enabled=1
gpgkey=https://www.mongodb.org/static/pgp/server-4.2.asc

保存退出,Yum 源配置完成。

3.2.2 安装单节点 MongoDB Server 4.2.0

安装 MongoDB Server 4.2.0:

1
$ yum install -y mongodb-org-4.2.0 mongodb-org-server-4.2.0 mongodb-org-shell-4.2.0 mongodb-org-mongos-4.2.0 mongodb-org-tools-4.2.0

检查安装包及版本:

1
2
3
4
5
6
$ rpm -qa |grep mongodb
mongodb-org-tools-4.2.0-1.el7.x86_64
mongodb-org-mongos-4.2.0-1.el7.x86_64
mongodb-org-shell-4.2.0-1.el7.x86_64
mongodb-org-4.2.0-1.el7.x86_64
mongodb-org-server-4.2.0-1.el7.x86_64

修改 MongoDB Server 配置文件:

1
2
3
4
5
6
7
8
9
10
11
12
13
14
15
16
17
18
19
20
21
22
23
24
25
26
27
28
29
30
31
32
33
34
35
36
37
$ vi /etc/mongod.conf
# mongod.conf

# for documentation of all options, see:
# http://docs.mongodb.org/manual/reference/configuration-options/

# where to write logging data.
systemLog:
destination: file
logAppend: true
path: /var/log/mongodb/mongod.log

# Where and how to store data.
storage:
dbPath: /var/lib/mongo
journal:
enabled: true
# engine:
# wiredTiger:

# how the process runs
processManagement:
fork: true # fork and run in background
pidFilePath: /var/run/mongodb/mongod.pid # location of pidfile
timeZoneInfo: /usr/share/zoneinfo

# network interfaces
net:
port: 27017
bindIp: 0.0.0.0 # Enter 0.0.0.0,:: to bind to all IPv4 and IPv6 addresses or, alternatively, use the net.bindIpAll setting.

#security:
#operationProfiling:
replication:
oplogSizeMB: "20480"
replSetName: repconfig

启动 MongoDB Sever 服务:

1
systemctl start mongod && systemctl enable mongod

MongoDB 初始化:

1
2
3
4
5
6
7
8
9
10
11
12
13
14
15
16
17
18
19
20
21
22
23
24
25
26
$ mongo --port 27017
> repconfig = { _id : "repconfig", members : [ {_id : 0, host : "10.11.0.4:27017" , priority: 1 } ] }
{
"_id" : "repconfig",
"members" : [
{
"_id" : 0,
"host" : "10.11.0.4:27017",
"priority" : 1
}
]
}
> rs.initiate(repconfig);
{
"ok" : 1,
"$clusterTime" : {
"clusterTime" : Timestamp(1579339466, 1),
"signature" : {
"hash" : BinData(0,"AAAAAAAAAAAAAAAAAAAAAAAAAAA="),
"keyId" : NumberLong(0)
}
},
"operationTime" : Timestamp(1579339466, 1)
}
repconfig:SECONDARY>
repconfig:PRIMARY>

初始化结束后,可以通过 Mongo Shell rs.status() 来查 Replica 信息。

3.3 通过 Python 调用 Azure Monitor Restful API 来监控 Mongodb Server 4.2.0

3.3.1 创建 Azure Log Analysis Workspace

具体操作过程不再赘述,通过 Portal 或者 Cli 等方式 Step by Step 点击创建即可,如图:

创建好了需要的几个信息,如图:

“WORKSPACE ID” 为脚本中的 customer_id,”PRIMARY KEY” 为脚本中的 shared_key。

3.3.2 Python 调用 Azure Monitor Restful API 向 Azure Log Analysis Workspace 传送数据

Azure Monitor Restful API 不做赘述,具体可以参考这里。本实验先通过 pymongo 收集 MongoDB Metrics,然后送到 Azure Log Analysis Workspace 中,先安装 pymongo:

1
2
$ yum install python-pip y
$ pip install pymongo requests

具体的 Python 脚本如下:

1
2
3
4
5
6
7
8
9
10
11
12
13
14
15
16
17
18
19
20
21
22
23
24
25
26
27
28
29
30
31
32
33
34
35
36
37
38
39
40
41
42
43
44
45
46
47
48
49
50
51
52
53
54
55
56
57
58
59
60
61
62
63
64
65
66
67
68
69
70
71
72
73
74
75
76
77
78
79
80
81
82
83
84
85
86
87
88
89
90
91
92
93
94
95
96
97
98
99
100
101
102
103
104
105
106
107
108
109
110
111
112
113
114
115
116
117
118
119
120
121
122
123
124
125
126
127
128
129
130
131
132
133
134
135
136
137
138
139
140
141
142
143
144
145
146
147
148
149
150
151
152
153
154
155
156
157
158
159
160
161
162
163
164
165
166
167
168
169
170
171
172
173
174
175
176
177
178
179
180
181
182
183
184
185
186
187
188
189
190
191
192
193
194
195
196
197
198
199
200
201
202
203
204
205
206
207
208
209
210
211
212
213
214
215
216
217
218
219
220
221
222
223
224
225
226
227
228
229
230
231
232
233
234
235
236
237
238
239
240
241
242
243
244
245
246
247
248
249
250
251
252
253
254
255
256
257
258
259
260
261
262
263
264
265
266
267
268
269
270
271
272
273
274
275
276
277
278
279
280
281
282
283
284
285
286
287
288
289
290
291
292
293
294
295
296
297
298
299
300
301
#!/usr/bin/env python
"""
Date: 01/18/2020
Author: Xinsheng Wang
Description: A custom script to get MongoDB metrics and send data to Azure Monitor
Requires: MongoClient in python
"""

from calendar import timegm
from time import gmtime

from pymongo import MongoClient, errors
from sys import exit

import json
import requests
import datetime
import hashlib
import hmac
import base64
import os
from glob import glob

# Update the customer ID to your Log Analytics workspace ID
customer_id = '86df0cbc-076c-4483-8a32-c59c6550a771'

# For the shared key, use either the primary or the secondary Connected Sources client authentication key
shared_key = "b3uLsEOXBFBqTiAHDGp9boTeKR6v86f/9cLPWWsWUvs+LcjBIqjDp9CDJL+7vxlKDDRxqXIf1jjjKcZbdV0H/Q=="

# The log type is the name of the event that is being submitted
log_type = 'MongoDBMonitorLog'

class MongoDB(object):
"""main script class"""
# pylint: disable=too-many-instance-attributes

def delete_temporary_files(self):
"""delete temporary files"""
for file in glob('/tmp/mongometrics000*'):
os.remove(file)

def __init__(self):
self.mongo_host = "10.11.0.4"
self.mongo_port = 27017
self.mongo_db = ["admin", ]
self.mongo_user = None
self.mongo_password = None
self.__conn = None
self.__dbnames = None
self.__metrics = []

def connect(self):
"""Connect to MongoDB"""
if self.__conn is None:
if self.mongo_user is None:
try:
self.__conn = MongoClient('mongodb://%s:%s' %
(self.mongo_host,
self.mongo_port))
except errors.PyMongoError as py_mongo_error:
print('Error in MongoDB connection: %s' %
str(py_mongo_error))
else:
try:
self.__conn = MongoClient('mongodb://%s:%s@%s:%s' %
(self.mongo_user,
self.mongo_password,
self.mongo_host,
self.mongo_port))
except errors.PyMongoError as py_mongo_error:
print('Error in MongoDB connection: %s' %
str(py_mongo_error))

def add_metrics(self, k, v):
"""add each metric to the metrics list"""
global body
dict_metrics = {}
dict_metrics["key"] = k
dict_metrics["value"] = v
self.__metrics.append(dict_metrics)
dic = json.dumps(dict_metrics, sort_keys=True, indent=4, separators=(',', ':')).replace('}', '},')

f = open('/tmp/mongometrics0001.txt','a')
f.write(dic)
f.close

os.system("cat /tmp/mongometrics0001.txt |sed '$s/\}\,/\}\]/g;1s/{/[{/' > /tmp/mongometrics0002.txt")

with open('/tmp/mongometrics0002.txt','r') as src:
body = src.read()
print(body)

def get_db_names(self):
"""get a list of DB names"""
if self.__conn is None:
self.connect()
db_handler = self.__conn[self.mongo_db[0]]

master = db_handler.command('isMaster')['ismaster']
dict_metrics = {}
dict_metrics['key'] = 'mongodb.ismaster'
if master:
dict_metrics['value'] = 1
db_names = self.__conn.database_names()
self.__dbnames = db_names
else:
dict_metrics['value'] = 0
self.__metrics.append(dict_metrics)

def get_mongo_db_lld(self):
"""print DB list in json format, to be used for mongo db discovery"""
if self.__dbnames is None:
db_names = self.get_db_names()
else:
db_names = self.__dbnames
dict_metrics = {}
db_list = []
dict_metrics['key'] = 'mongodb.discovery'
dict_metrics['value'] = {"data": db_list}
if db_names is not None:
for db_name in db_names:
dict_lld_metric = {}
dict_lld_metric['{#MONGODBNAME}'] = db_name
db_list.append(dict_lld_metric)
dict_metrics['value'] = '{"data": ' + json.dumps(db_list) + '}'
self.__metrics.insert(0, dict_metrics)

def get_oplog(self):
"""get replica set oplog information"""
if self.__conn is None:
self.connect()
db_handler = self.__conn['local']

coll = db_handler.oplog.rs

op_first = (coll.find().sort('$natural', 1).limit(1))
op_last = (coll.find().sort('$natural', -1).limit(1))

# if host is not a member of replica set, without this check we will
# raise StopIteration as guided in
# http://api.mongodb.com/python/current/api/pymongo/cursor.html

if op_first.count() > 0 and op_last.count() > 0:
op_fst = (op_first.next())['ts'].time
op_last_st = op_last[0]['ts']
op_lst = (op_last.next())['ts'].time

status = round(float(op_lst - op_fst), 1)
self.add_metrics('mongodb.oplog', status)

current_time = timegm(gmtime())
oplog = int(((str(op_last_st).split('('))[1].split(','))[0])
self.add_metrics('mongodb.oplog-sync', (current_time - oplog))


def get_maintenance(self):
"""get replica set maintenance info"""
if self.__conn is None:
self.connect()
db_handler = self.__conn

fsync_locked = int(db_handler.is_locked)
self.add_metrics('mongodb.fsync-locked', fsync_locked)

try:
config = db_handler.admin.command("replSetGetConfig", 1)
connstring = (self.mongo_host + ':' + str(self.mongo_port))
connstrings = list()

for i in range(0, len(config['config']['members'])):
host = config['config']['members'][i]['host']
connstrings.append(host)

if connstring in host:
priority = config['config']['members'][i]['priority']
hidden = int(config['config']['members'][i]['hidden'])

self.add_metrics('mongodb.priority', priority)
self.add_metrics('mongodb.hidden', hidden)
except errors.PyMongoError:
print ('Error while fetching replica set configuration.'
'Not a member of replica set?')
except UnboundLocalError:
print ('Cannot use this mongo host: must be one of ' + ','.join(connstrings))
exit(1)

def get_server_status_metrics(self):
"""get server status"""
if self.__conn is None:
self.connect()
db_handler = self.__conn[self.mongo_db[0]]
ss = db_handler.command('serverStatus')

# db info
self.add_metrics('mongodb.version', ss['version'])
self.add_metrics('mongodb.storageEngine', ss['storageEngine']['name'])
self.add_metrics('mongodb.uptime', int(ss['uptime']))
self.add_metrics('mongodb.okstatus', int(ss['ok']))

# asserts
for k, v in ss['asserts'].items():
self.add_metrics('mongodb.asserts.' + k, v)

# operations
for k, v in ss['opcounters'].items():
self.add_metrics('mongodb.operation.' + k, v)

# connections
for k, v in ss['connections'].items():
self.add_metrics('mongodb.connection.' + k, v)

# extra info
self.add_metrics('mongodb.page.faults',
ss['extra_info']['page_faults'])

#wired tiger
if ss['storageEngine']['name'] == 'wiredTiger':
self.add_metrics('mongodb.used-cache',
ss['wiredTiger']['cache']
["bytes currently in the cache"])
self.add_metrics('mongodb.total-cache',
ss['wiredTiger']['cache']
["maximum bytes configured"])
self.add_metrics('mongodb.dirty-cache',
ss['wiredTiger']['cache']
["tracked dirty bytes in the cache"])

# global lock
lock_total_time = ss['globalLock']['totalTime']
self.add_metrics('mongodb.globalLock.totalTime', lock_total_time)
for k, v in ss['globalLock']['currentQueue'].items():
self.add_metrics('mongodb.globalLock.currentQueue.' + k, v)
for k, v in ss['globalLock']['activeClients'].items():
self.add_metrics('mongodb.globalLock.activeClients.' + k, v)

def get_db_stats_metrics(self):
"""get DB stats for each DB"""
if self.__conn is None:
self.connect()
if self.__dbnames is None:
self.get_db_names()
if self.__dbnames is not None:
for mongo_db in self.__dbnames:
db_handler = self.__conn[mongo_db]
dbs = db_handler.command('dbstats')
for k, v in dbs.items():
if k in ['storageSize', 'ok', 'avgObjSize', 'indexes',
'objects', 'collections', 'fileSize',
'numExtents', 'dataSize', 'indexSize',
'nsSizeMB']:
self.add_metrics('mongodb.stats.' + k +
'[' + mongo_db + ']', int(v))
def close(self):
"""close connection to mongo"""
if self.__conn is not None:
self.__conn.close()

# Build the API signature
def build_signature(customer_id, shared_key, date, content_length, method, content_type, resource):
x_headers = 'x-ms-date:' + date
string_to_hash = method + "\n" + str(content_length) + "\n" + content_type + "\n" + x_headers + "\n" + resource
bytes_to_hash = bytes(string_to_hash).encode('utf-8')
decoded_key = base64.b64decode(shared_key)
encoded_hash = base64.b64encode(hmac.new(decoded_key, bytes_to_hash, digestmod=hashlib.sha256).digest())
authorization = "SharedKey {}:{}".format(customer_id,encoded_hash)
return authorization

# Build and send a request to the POST API
def mongodb_azuremonitor_loganalysis_post_data(customer_id, shared_key, body, log_type):
method = 'POST'
content_type = 'application/json'
resource = '/api/logs'
rfc1123date = datetime.datetime.utcnow().strftime('%a, %d %b %Y %H:%M:%S GMT')
content_length = len(body)
signature = build_signature(customer_id, shared_key, rfc1123date, content_length, method, content_type, resource)
uri = 'https://' + customer_id + '.ods.opinsights.azure.com' + resource + '?api-version=2016-04-01'

headers = {
'content-type': content_type,
'Authorization': signature,
'Log-Type': log_type,
'x-ms-date': rfc1123date
}

response = requests.post(uri,data=body, headers=headers)
if (response.status_code >= 200 and response.status_code <= 299):
print 'Accepted'
else:
print "Response code: {}".format(response.status_code)

if __name__ == '__main__':
mongodb = MongoDB()
mongodb.delete_temporary_files()
mongodb.get_db_names()
mongodb.get_mongo_db_lld()
mongodb.get_oplog()
mongodb.get_maintenance()
mongodb.get_server_status_metrics()
mongodb.get_db_stats_metrics()
mongodb.close()
mongodb_azuremonitor_loganalysis_post_data(customer_id, shared_key, body, log_type)

注意相应的 customer_id 和 shared_key 替换成图中的 key,log_type 为收集到 Log Analysis Workspace 的 namespace 名字。保存脚本名字为 AzureMonitor_LogAnalysis_MongodbMetrics.py,执行脚本:

1
python AzureMonitor_LogAnalysis_MongodbMetrics.py

通过 print 可以打印一些交互式信息,观察数据是否已经送到 Azure Log Analysis Workspace。

3.3.3 利用 Kusto 查询 MongoDB Custom Logs

在 Azure Portal 查看并通过 KQL 查询 MongoDB 的数据:

如图可见,数据已经成功送到了 Azure Log Analysis Workspace,后续可以写更复杂的 Kusto 来做相关的查询,并可以考虑结合调度或者 Linux Crontab 等服务做定时的数据拉取和告警了。


4. 总结

测试至此,Azure Monitor Restful API 监控 MongoDB 的示例完成了,希望能够给想要通过 Azure Monitor 做二次开发的同学们一些参考。但本文还有一些可以优化之处,比如 Python 脚本没有考虑更多的 Log Output 以及执行失败时候的 Retry 逻辑,在实际生产中,为了严谨,还是希望大家要充分考虑逻辑在上线,不过这些功能有待大家自己添加了。