1. 前言 在复杂多云的环境下,数据库迁移成为了一个既常见又头疼的问题,所以又快又好并保证数据一致性的数据库迁移服务就显得非常必要了。基于这点的考量,Microsoft Azure 也发布了自己的数据迁移服务 Azure Database Migration Service 来帮助想把各类数据库迁移到 Azure 的客户解决数据库迁移的后顾之忧。
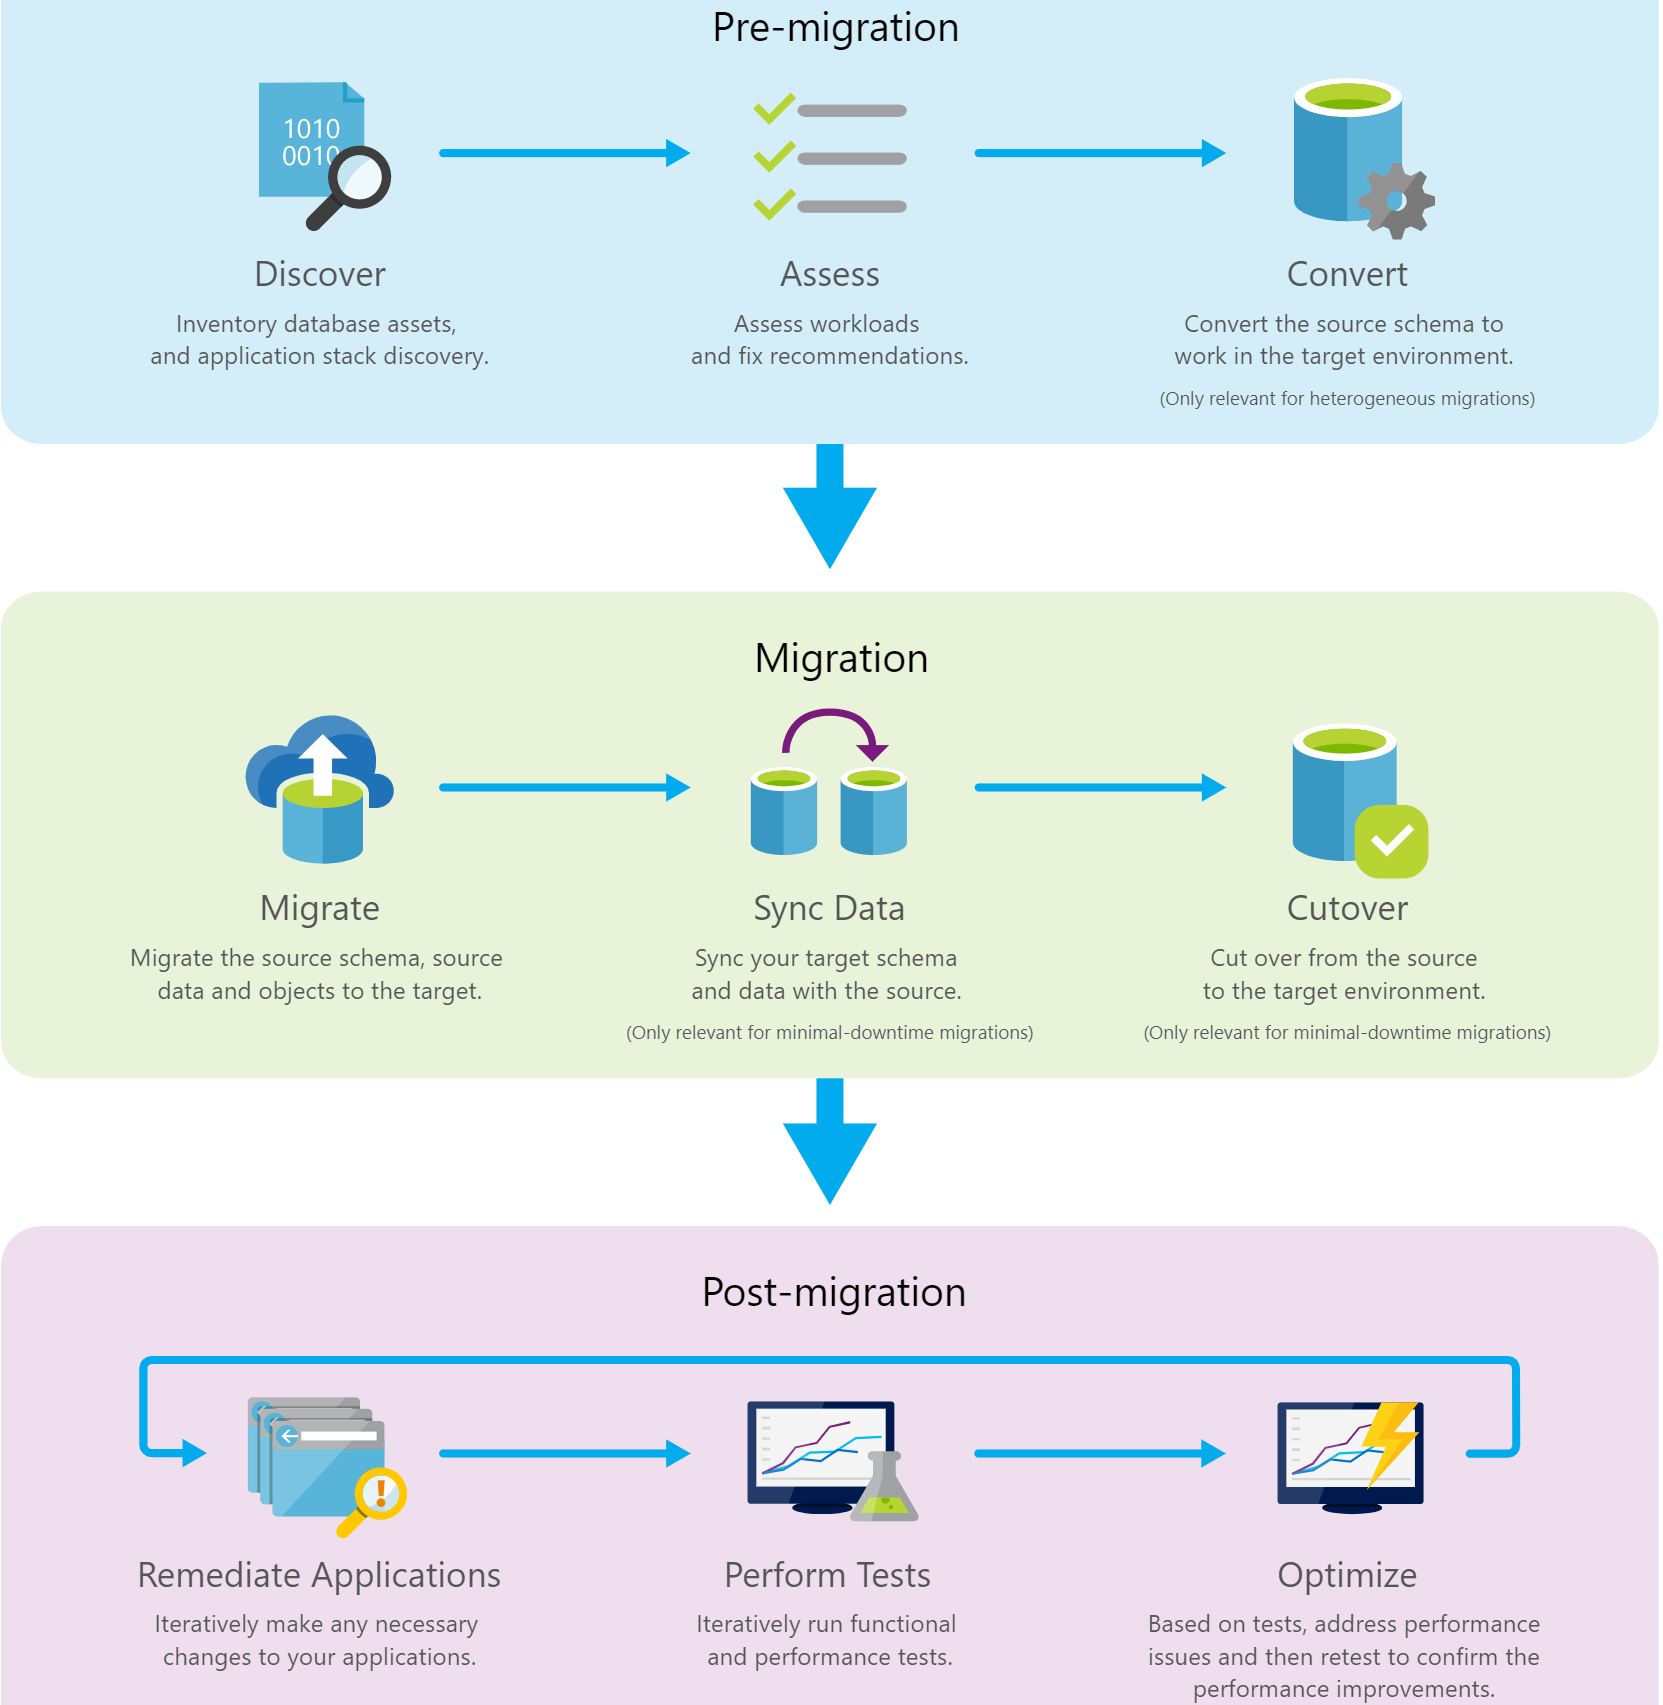
2. Azure Database Migration Service 介绍 Azure Migration Service 是完全托管的服务,旨在实现从多个数据库源无缝迁移到 Azure 并只让应用程序的停机时间最短。该服务集成了一些现有工具和服务的功能从而为客户提供高度可用的综合解决方案,例如使用数据迁移助手生成评估报告,这些报告可以提供建议并能够指导执行迁移之前完成所需的更改。该过程利用了 Microsoft 的最佳实践,因此客户可以在启动迁移项目后便高枕无忧。数据库迁移的过程原理如下图所示:
从上至下来看,在 Pre-migration 阶段评估工作量并做 Schema 的映射,继而开始做接近同步的异步 Migration ,最后可以通过 Cutover 来做应用程序的迁移。除此之外,为了让大家能够更好的学习该服务,Microsoft 也非常良心的提供了学习的素材,不仅包括官方文档 ,还有很多视频材料 可以参考。为了便捷,本文以下内容都使用 Azure Database Migration Service 的简称 Azure DMS,好了话不多说,我们直接来实战操作吧!
3. Aliyun RDS MySQL 迁移至 Azure Mooncake MySQL PaaS 验证 3.1 实验场景以及前期准备 为了尽可能的模拟真实生产,本文模拟从中国 Aliyun RDS MySQL 到 Azure Mooncake MySQL PaaS,Mooncake 为中国区 Azure 的代号。具体的 MySQL 版本为5.7,具体信息如下:
1 Ⅰ. Aliyun RDS MySQL -> Azure Mooncake MySQL PaaS (中国区)
在进行实验之前,需要正确安装 Terraform、MySQL Client 等软件包,详细步骤请参考相应文档,本文不进行赘述。具体的客户端连接 MySQL Server 的操作过程在 WSL2-Ubuntu-18.04 以及 Windows 10 的 Navicat 12 客户端上进行。
3.2 Aliyun RDS MySQL 迁移到 Azure Mooncake MySQL PaaS (中国区) 3.2.1 Azure Mooncake 资源创建初始化 首先,通过 Terraform 自动化部署 MySQL Generel Purpose 2core 实例,需要注意的是在中国区 Azure 创建资源的时候需要指定 environment 为 china,具体的 .tf 文件内容如下:
1 2 3 4 5 6 7 8 9 10 11 12 13 14 15 16 17 18 19 20 21 22 23 24 25 26 27 28 29 30 31 32 33 34 35 36 37 38 39 40 41 42 43 44 45 46 47 48 49 50 51 52 53 54 55 56 57 58 59 60 61 62 63 64 65 66 67 68 69 70 71 72 73 74 75 76 77 78 79 80 81 82 83 84 85 86 87 88 89 90 91 92 93 94 95 96 97 98 99 100 101 102 103 104 105 106 107 108 109 110 111 112 113 114 115 116 117 118 119 120 121 122 123 124 125 126 127 128 129 130 131 132 133 134 135 136 137 138 provider "azurerm" { subscription_id = "xxxxxxxx-xxxx-xxxx-xxxx-xxxxxxxxxxxx" client_id = "xxxxxxxx-xxxx-xxxx-xxxx-xxxxxxxxxxxx" client_secret = "xxxxxxxx-xxxx-xxxx-xxxx-xxxxxxxxxxxx" tenant_id = "xxxxxxxx-xxxx-xxxx-xxxx-xxxxxxxxxxxx" environment = "china" } resource "azurerm_resource_group" "myterraformgroup" { name = "azcndmsrg0001" location = "chinaeast2" tags = { environment = "Azure Terraform Automation" } } resource "azurerm_virtual_network" "myterraformnetwork" { name = "azcndmsvnet0001" address_space = ["10.91.0.0/16" ] location = "chinaeast2" resource_group_name = "${azurerm_resource_group.myterraformgroup.name} " tags = { environment = "Azure Terraform Automation" } } resource "azurerm_network_security_group" "publicnsg" { name = "public-nsg" location = "chinaeast2" resource_group_name = "${azurerm_resource_group.myterraformgroup.name} " security_rule { name = "SSH" priority = 1001 direction = "Inbound" access = "Allow" protocol = "Tcp" source_port_range = "*" destination_port_range = "22" source_address_prefix = "*" destination_address_prefix = "*" } security_rule { name = "RDP" priority = 1002 direction = "Inbound" access = "Allow" protocol = "Tcp" source_port_range = "*" destination_port_range = "3389" source_address_prefix = "*" destination_address_prefix = "*" } tags = { environment = "Azure Terraform Automation" } } resource "azurerm_network_security_group" "opnsg" { name = "op-nsg" location = "chinaeast2" resource_group_name = "${azurerm_resource_group.myterraformgroup.name} " security_rule { name = "SSH" priority = 1001 direction = "Inbound" access = "Allow" protocol = "Tcp" source_port_range = "*" destination_port_range = "22" source_address_prefix = "*" destination_address_prefix = "*" } security_rule { name = "RDP" priority = 1002 direction = "Inbound" access = "Allow" protocol = "Tcp" source_port_range = "*" destination_port_range = "3389" source_address_prefix = "*" destination_address_prefix = "*" } tags = { environment = "Azure Terraform Automation" } resource "azurerm_subnet" "publicsubnet" { name = "public0001" resource_group_name = "${azurerm_resource_group.myterraformgroup.name} " virtual_network_name = "${azurerm_virtual_network.myterraformnetwork.name} " address_prefix = "10.91.0.0/23" network_security_group_id = "${azurerm_network_security_group.publicnsg.id} " } resource "azurerm_subnet" "opsubnet" { name = "op0001" resource_group_name = "${azurerm_resource_group.myterraformgroup.name} " virtual_network_name = "${azurerm_virtual_network.myterraformnetwork.name} " address_prefix = "10.91.2.0/23" network_security_group_id = "${azurerm_network_security_group.opnsg.id} " } resource "azurerm_mysql_server" "mysql0001" { name = "mysql0001" location = "${azurerm_resource_group.myterraformgroup.location} " resource_group_name = "${azurerm_resource_group.myterraformgroup.name} " sku { name = "GP_Gen5_2" capacity = 2 tier = "GeneralPurpose" family = "Gen5" } storage_profile { storage_mb = 20480 backup_retention_days = 7 geo_redundant_backup = "Disabled" } administrator_login = "msadmin" administrator_login_password = "Microsoft2019!" version = "5.7" ssl_enforcement = "Enabled" }
整个部署过程大概10分钟左右,整个初始化过程会创建资源组、Vnet、NSG、Azure MySQL PaaS 实例等。信息如下:
需要注意的是,Azure MySQL PaaS 没有启用 SSL。
3.2.2 创建 Aliyun RDS MySQL 实例 创建 Aliyun RDS MySQL 实例的过程不予赘述,通过 Portal 一步一步点击即可,本文主要阐述功能性验证,所以部署的实例类型为 MySQL 5.7 基础版 1Core2G 的 mysql.n2.small.1 实例,并启用公网地址。
创建好之后的需要设置一下白名单以便能够使 Azure DMS 和 Aliyun RDS MySQL 通过公网调用,Azure China Service IP Range 可以在这里 下载,然后把这些网段加到白名单中即可,避免了直接写0.0.0.0/0。
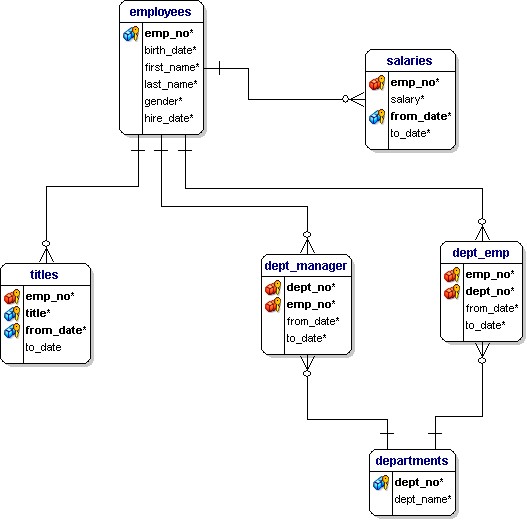
3.2.3 导入示例数据库到 Aliyun RDS MySQL 实例 本文采用 MySQL 官方提供的 employees 数据库,可以参考具体的官网地址 和 Github地址 。该实例数据库包含了300,000 员工及收入信息,数据大概100MB+,数据量已经足够进行测试。employees 库中,表之间的调用关系如下图所示:
下面我们开始进行实验,首先通过 Linux MySQL Client 连接至 Aliyun RDS MySQL 实例安装并导入数据库:
1
2
3
$ git clone https://github.com/datacharmer/test_db.git $ cd test_db/ $ mysql -u'msadmin' -p'Microsoft2019!' -h'rm-uf626yx145z16o277so.mysql.rds.aliyuncs.com' < employees.sql
通过 SQL 查看具体的表容量:
1
2
3
4
5
6
7
8
9
10
11
mysql> select table_schema as '数据库' , sum (table_rows) as '记录数' , sum (truncate (data_length/1024/1024, 2)) as '数据容量(MB)' , sum (truncate (index_length/1024/1024, 2)) as '索引容量(MB)' from information_schema.tables group by table_schema order by sum (data_length) desc, sum (index_length) desc; +--------------------+-----------+------------------+------------------+ | 数据库 | 记录数 | 数据容量(MB) | 索引容量(MB) | +--------------------+-----------+------------------+------------------+ | employees | 3911631 | 141.22 | 5.53 | | mysql | 126112 | 5.41 | 0.07 | | information_schema | NULL | 0.10 | 0.00 | | sys | 0 | 0.01 | 0.00 | | performance_schema | 11701 | 0.00 | 0.00 | +--------------------+-----------+------------------+------------------+ 5 rows in set (0.22 sec)
安装完可以进行验证:
1
2
3
4
5
6
7
8
9
10
11
12
13
14
15
16
17
18
19
20
21
22
23
24
25
26
27
28
29
30
31
32
33
34
35
36
37
38
39
40
41
42
43
44
45
46
47
$ mysql -u'msadmin' -p'Microsoft2019!' -h'rm-uf626yx145z16o277so.mysql.rds.aliyuncs.com' -t < test_employees_md5.sql +----------------------+ | INFO | +----------------------+ | TESTING INSTALLATION | +----------------------+ +--------------+------------------+----------------------------------+ | table_name | expected_records | expected_crc | +--------------+------------------+----------------------------------+ | departments | 9 | d1af5e170d2d1591d776d5638d71fc5f | | dept_emp | 331603 | ccf6fe516f990bdaa49713fc478701b7 | | dept_manager | 24 | 8720e2f0853ac9096b689c14664f847e | | employees | 300024 | 4ec56ab5ba37218d187cf6ab09ce1aa1 | | salaries | 2844047 | fd220654e95aea1b169624ffe3fca934 | | titles | 443308 | bfa016c472df68e70a03facafa1bc0a8 | +--------------+------------------+----------------------------------+ +--------------+------------------+----------------------------------+ | table_name | found_records | found_crc | +--------------+------------------+----------------------------------+ | departments | 9 | d1af5e170d2d1591d776d5638d71fc5f | | dept_emp | 331603 | ccf6fe516f990bdaa49713fc478701b7 | | dept_manager | 24 | 8720e2f0853ac9096b689c14664f847e | | employees | 300024 | 4ec56ab5ba37218d187cf6ab09ce1aa1 | | salaries | 2844047 | fd220654e95aea1b169624ffe3fca934 | | titles | 443308 | bfa016c472df68e70a03facafa1bc0a8 | +--------------+------------------+----------------------------------+ +--------------+---------------+-----------+ | table_name | records_match | crc_match | +--------------+---------------+-----------+ | departments | OK | ok | | dept_emp | OK | ok | | dept_manager | OK | ok | | employees | OK | ok | | salaries | OK | ok | | titles | OK | ok | +--------------+---------------+-----------+ +------------------+ | computation_time | +------------------+ | 00:00:21 | +------------------+ +---------+--------+ | summary | result | +---------+--------+ | CRC | OK | | count | OK | +---------+--------+
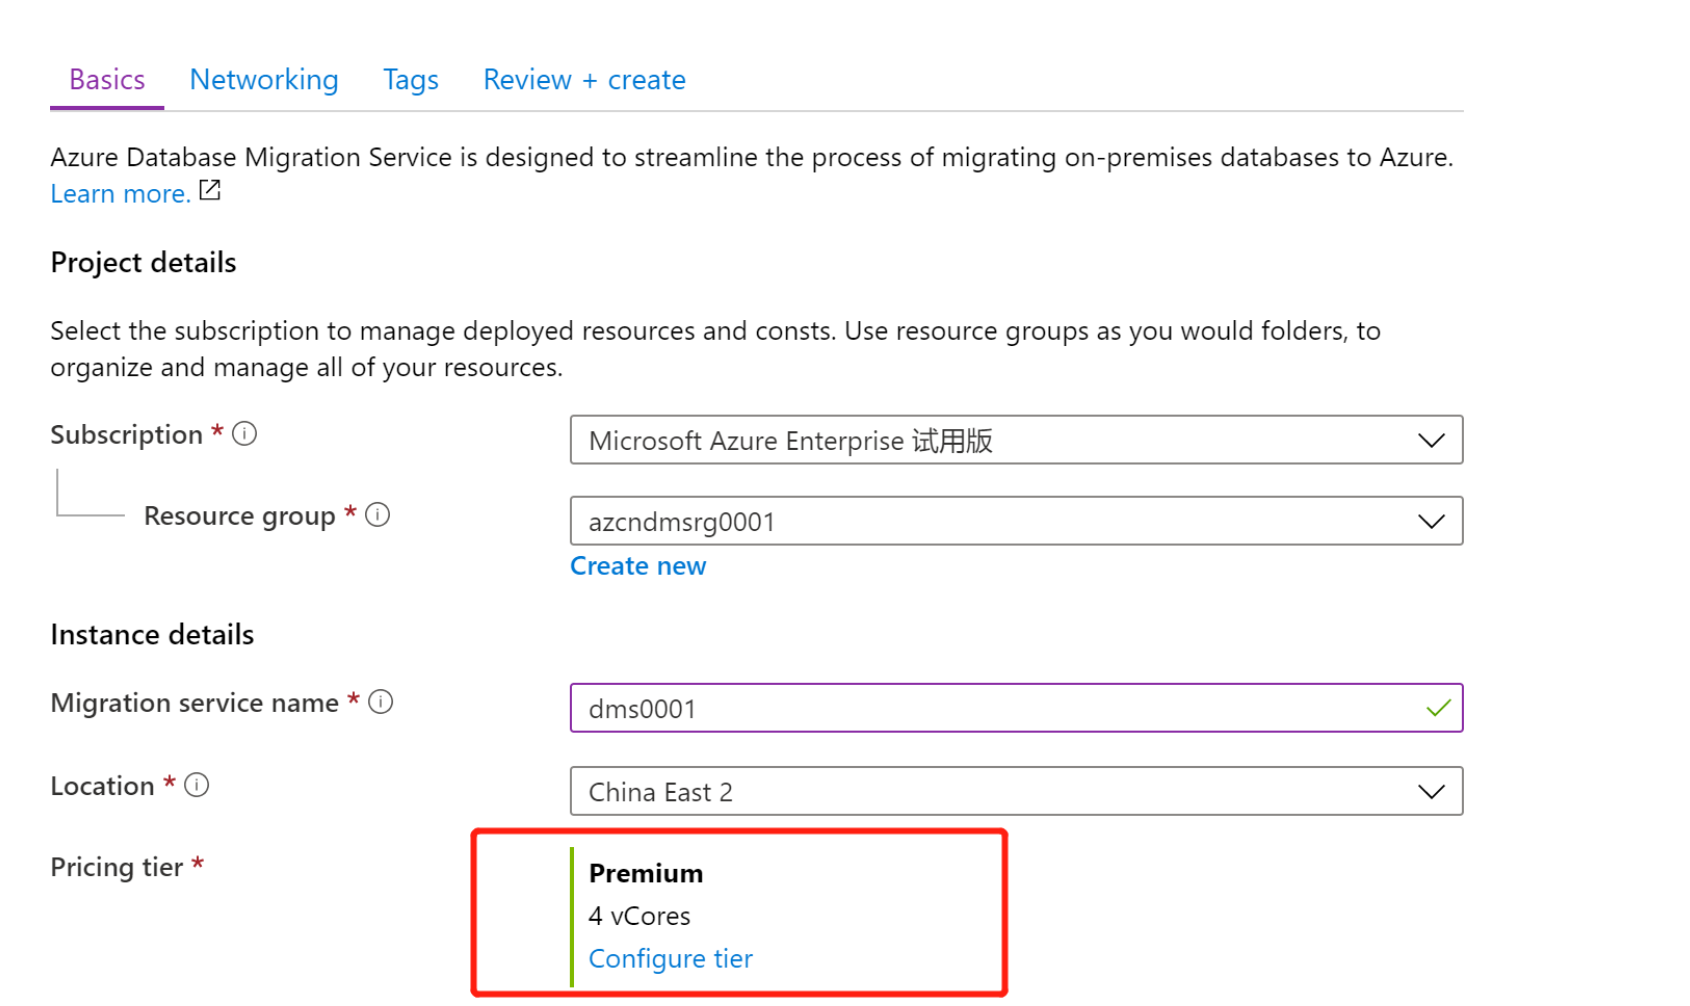
3.2.4 创建 Azure DMS 实例 登陆到 Azure China Portal ,选择 All services -> Azure Database Migration Services -> 点击 Add :
注意,Azure DMS 有 Standard 和 Premium 两个 SKU 可以选择,具体的性能指标和价格可以看这里 。本实验选择 Premium 的主要原因是 Premium SKU 支持 Online 的迁移。
3.2.5 在目标 Azure MySQL PaaS 上创建 Schema 通过 mysqldump 配合 –no-data 从 Aliyun RDS MySQL 导出 Schema SQL 并导入到 Azure MySQL PaaS 中:
1
2
3
4
$ mysqldump -u'msadmin' -p'Microsoft2019!' -h'rm-uf626yx145z16o277so.mysql.rds.aliyuncs.com' --databases 'employees' --no-data > sourcedata.sql $ sed -e 's/DEFINER[ ]*=[ ]*[^*]*\*/\*/ ' sourcedata.sql > sourcedatanew.sql $ awk '{ if (index($0,"GTID_PURGED")) { getline; while (length($0) > 0) { getline; } } else { print $0 } }' sourcedatanew.sql | grep -iv 'set @@' > sourcedata.sql $ mysql -u'msadmin@mysql0001' -p'Microsoft2019!' -h'mysql0001.mysql.database.chinacloudapi.cn' < sourcedata.sql
导入之后需要删除 Azure MySQL PaaS employees 库里的 Foreign Key(s),查询外键的 SQL 如下:
1
2
3
4
5
6
7
8
9
10
11
$ mysql> SELECT SchemaName, GROUP_CONCAT(DropQuery SEPARATOR ';\n' ) as DropQuery, GROUP_CONCAT(AddQuery SEPARATOR ';\n' ) as AddQuery -> FROM -> (SELECT -> KCU.REFERENCED_TABLE_SCHEMA as SchemaName, KCU.TABLE_NAME, KCU.COLUMN_NAME, -> CONCAT('ALTER TABLE ' , KCU.TABLE_NAME, ' DROP FOREIGN KEY ' , KCU.CONSTRAINT_NAME) AS DropQuery, -> CONCAT('ALTER TABLE ' , KCU.TABLE_NAME, ' ADD CONSTRAINT ' , KCU.CONSTRAINT_NAME, ' FOREIGN KEY (`' , KCU.COLUMN_NAME, '`) REFERENCES `' , KCU.REFERENCED_TABLE_NAME, '` (`' , KCU.REFERENCED_COLUMN_NAME, '`) ON UPDATE ' ,RC.UPDATE_RULE, ' ON DELETE ' ,RC.DELETE_RULE) AS AddQuery -> FROM INFORMATION_SCHEMA.KEY_COLUMN_USAGE KCU, information_schema.REFERENTIAL_CONSTRAINTS RC -> WHERE -> KCU.CONSTRAINT_NAME = RC.CONSTRAINT_NAME -> AND KCU.REFERENCED_TABLE_SCHEMA = RC.UNIQUE_CONSTRAINT_SCHEMA) Queries -> GROUP BY SchemaName;
选择出结果中关于 Drop 的语句并执行:
1
2
3
4
5
6
7
mysql> use employees; mysql> ALTER TABLE dept_emp DROP FOREIGN KEY dept_emp_ibfk_1; mysql> ALTER TABLE dept_emp DROP FOREIGN KEY dept_emp_ibfk_2; mysql> ALTER TABLE dept_manager DROP FOREIGN KEY dept_manager_ibfk_1; mysql> ALTER TABLE dept_manager DROP FOREIGN KEY dept_manager_ibfk_2; mysql> ALTER TABLE salaries DROP FOREIGN KEY salaries_ibfk_1; mysql> ALTER TABLE titles DROP FOREIGN KEY titles_ibfk_1;
至此,Schema 在 Azure MySQL PaaS 上迁移完毕。
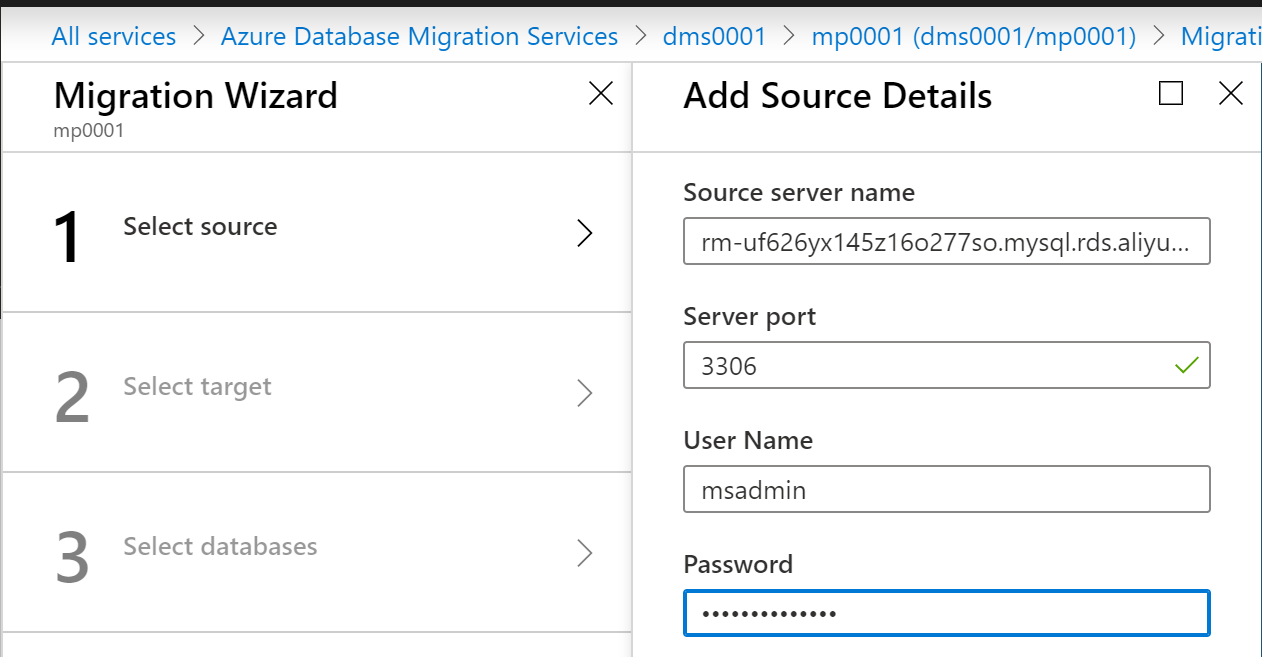
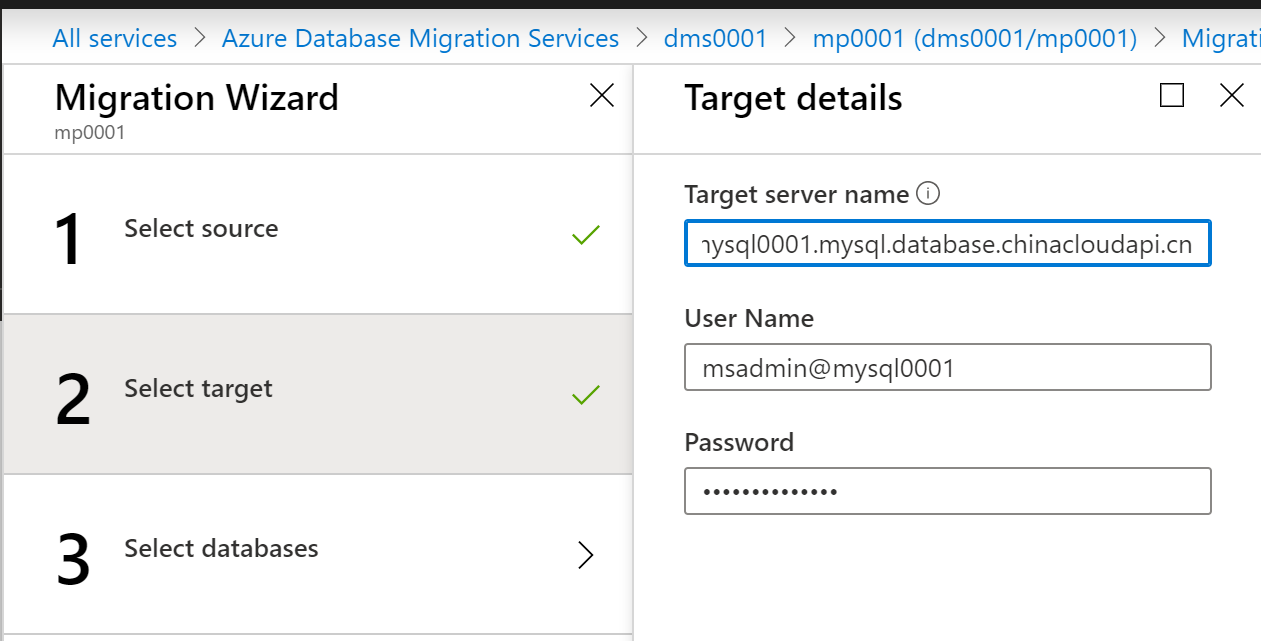
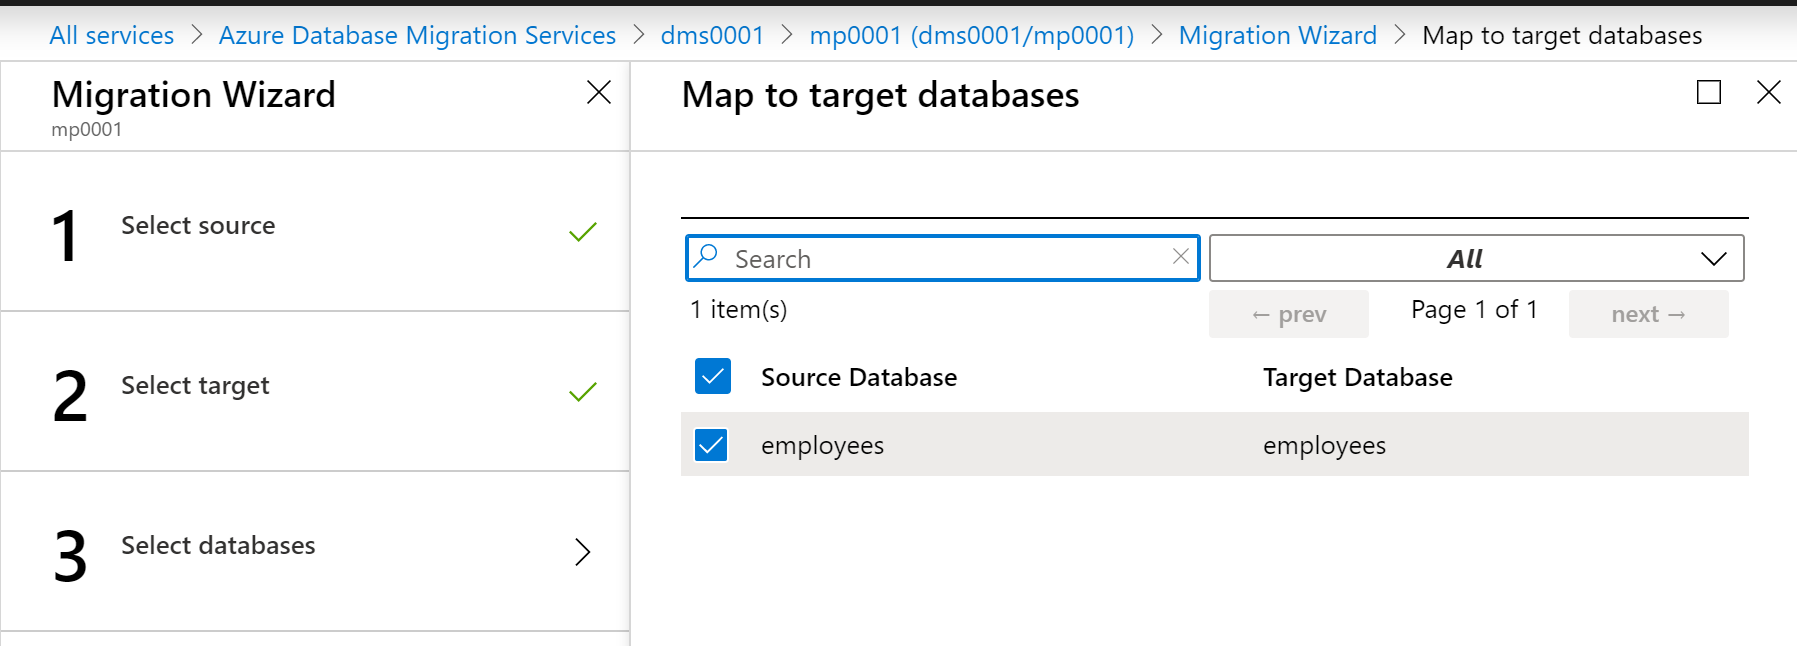
3.2.5 创建 Migration Project 并做 Online Migration 创建过程按照 Migration Wizards 一步一步操作即可,注意需要在 Azure MySQL PaaS 上配置允许 Azure DMS 的访问,Source Database 类型选择 MySQL 或者 Amazon RDS MySQL 都可以。
配置好之后,直接 Run Migration 就可以开始做迁移了,迁移结束后的状态如图所示。值得注意的是,由于选择的迁移类型是 Online 的,所以迁移结束后,DMS 还处于 Running 状态。如果此时需要停止,可以进行 Cutover。
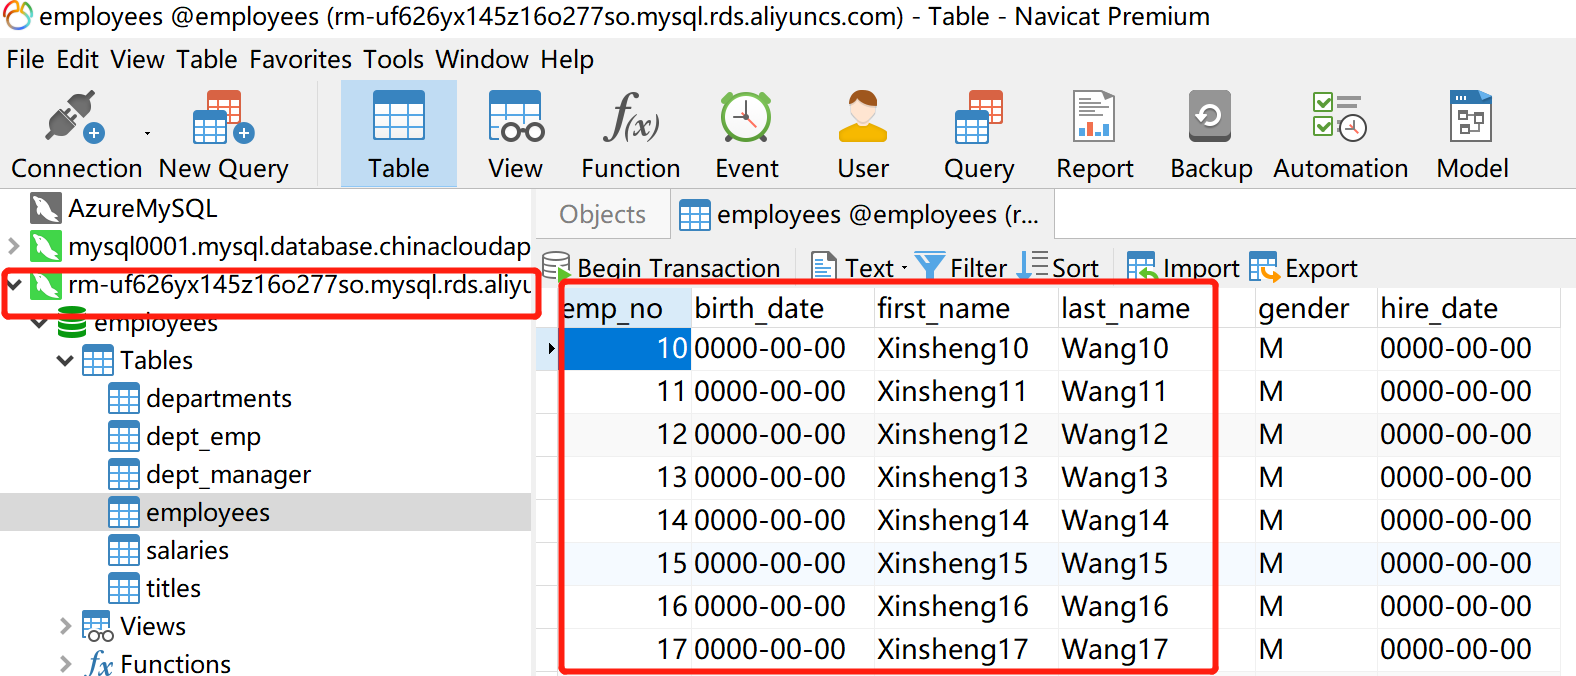
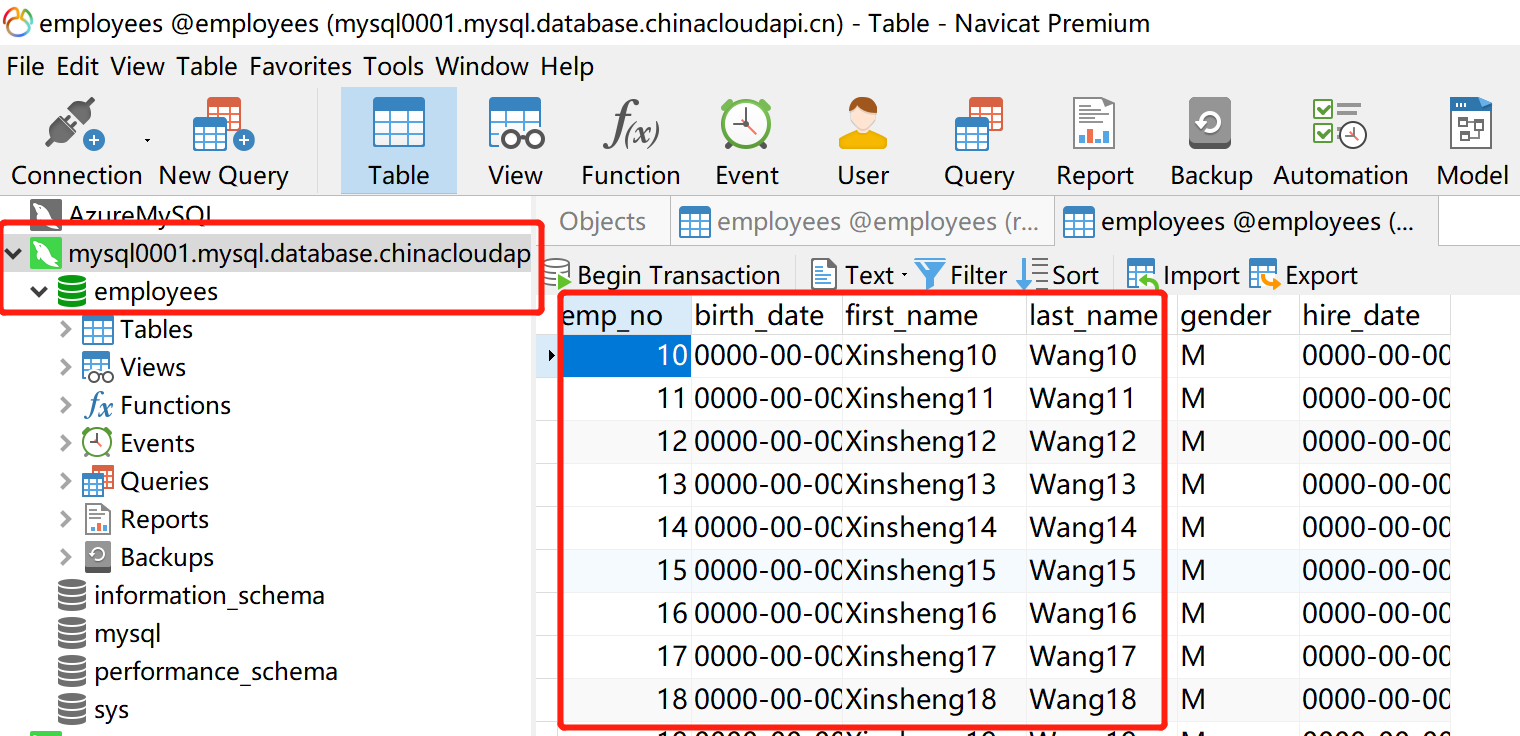
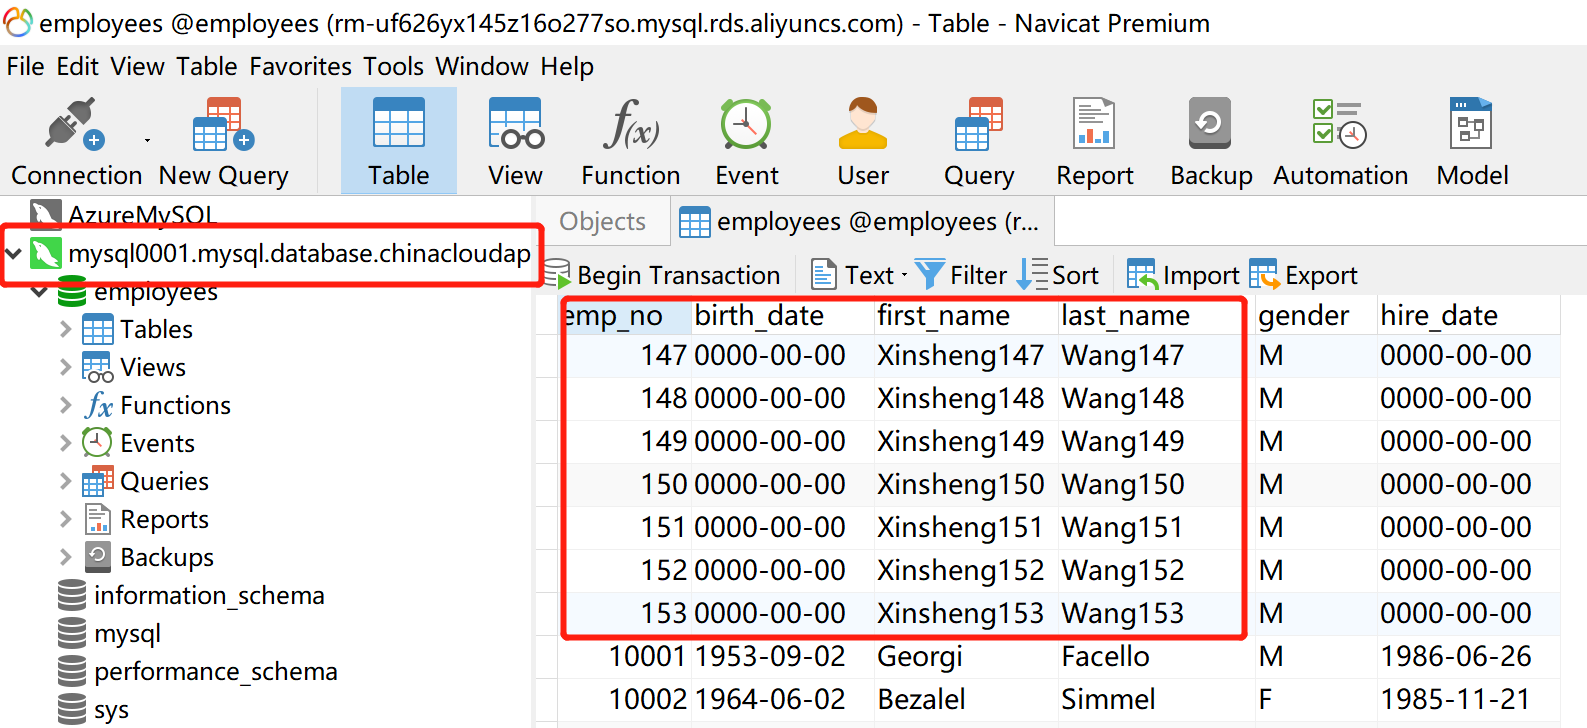
离线迁移做完,现在我们模拟在 Aliyun RDS MySQL 的实时写入并在 Azure MySQL PaaS 上查看异步同步的数据来模拟 Online 迁移。具体写入 employees 库的 employees 表,插入主键 emp_no 范围在 10 ~ 153 这 144 条记录,为了避免冲突,可以考虑先在插入之前用 SQL Query 确认一下是否有插入的字段。插入脚本如下:
1
2
3
4
5
$ for time in $(seq 10 153) > do > mysql -u'msadmin' -p'Microsoft2019!' -h'rm-uf626yx145z16o277so.mysql.rds.aliyuncs.com' -e "INSERT INTO employees.employees (emp_no, first_name, last_name) VALUES ('$time ', 'Xinsheng$time ', 'Wang$time ');" > sleep 1 > done
为了方便更直观的查看结果,该结果使用 Navicat 12 连接数据库,具体插入同步结果如下:Aliyun RDS MySQL
Azure MySQL PaaS
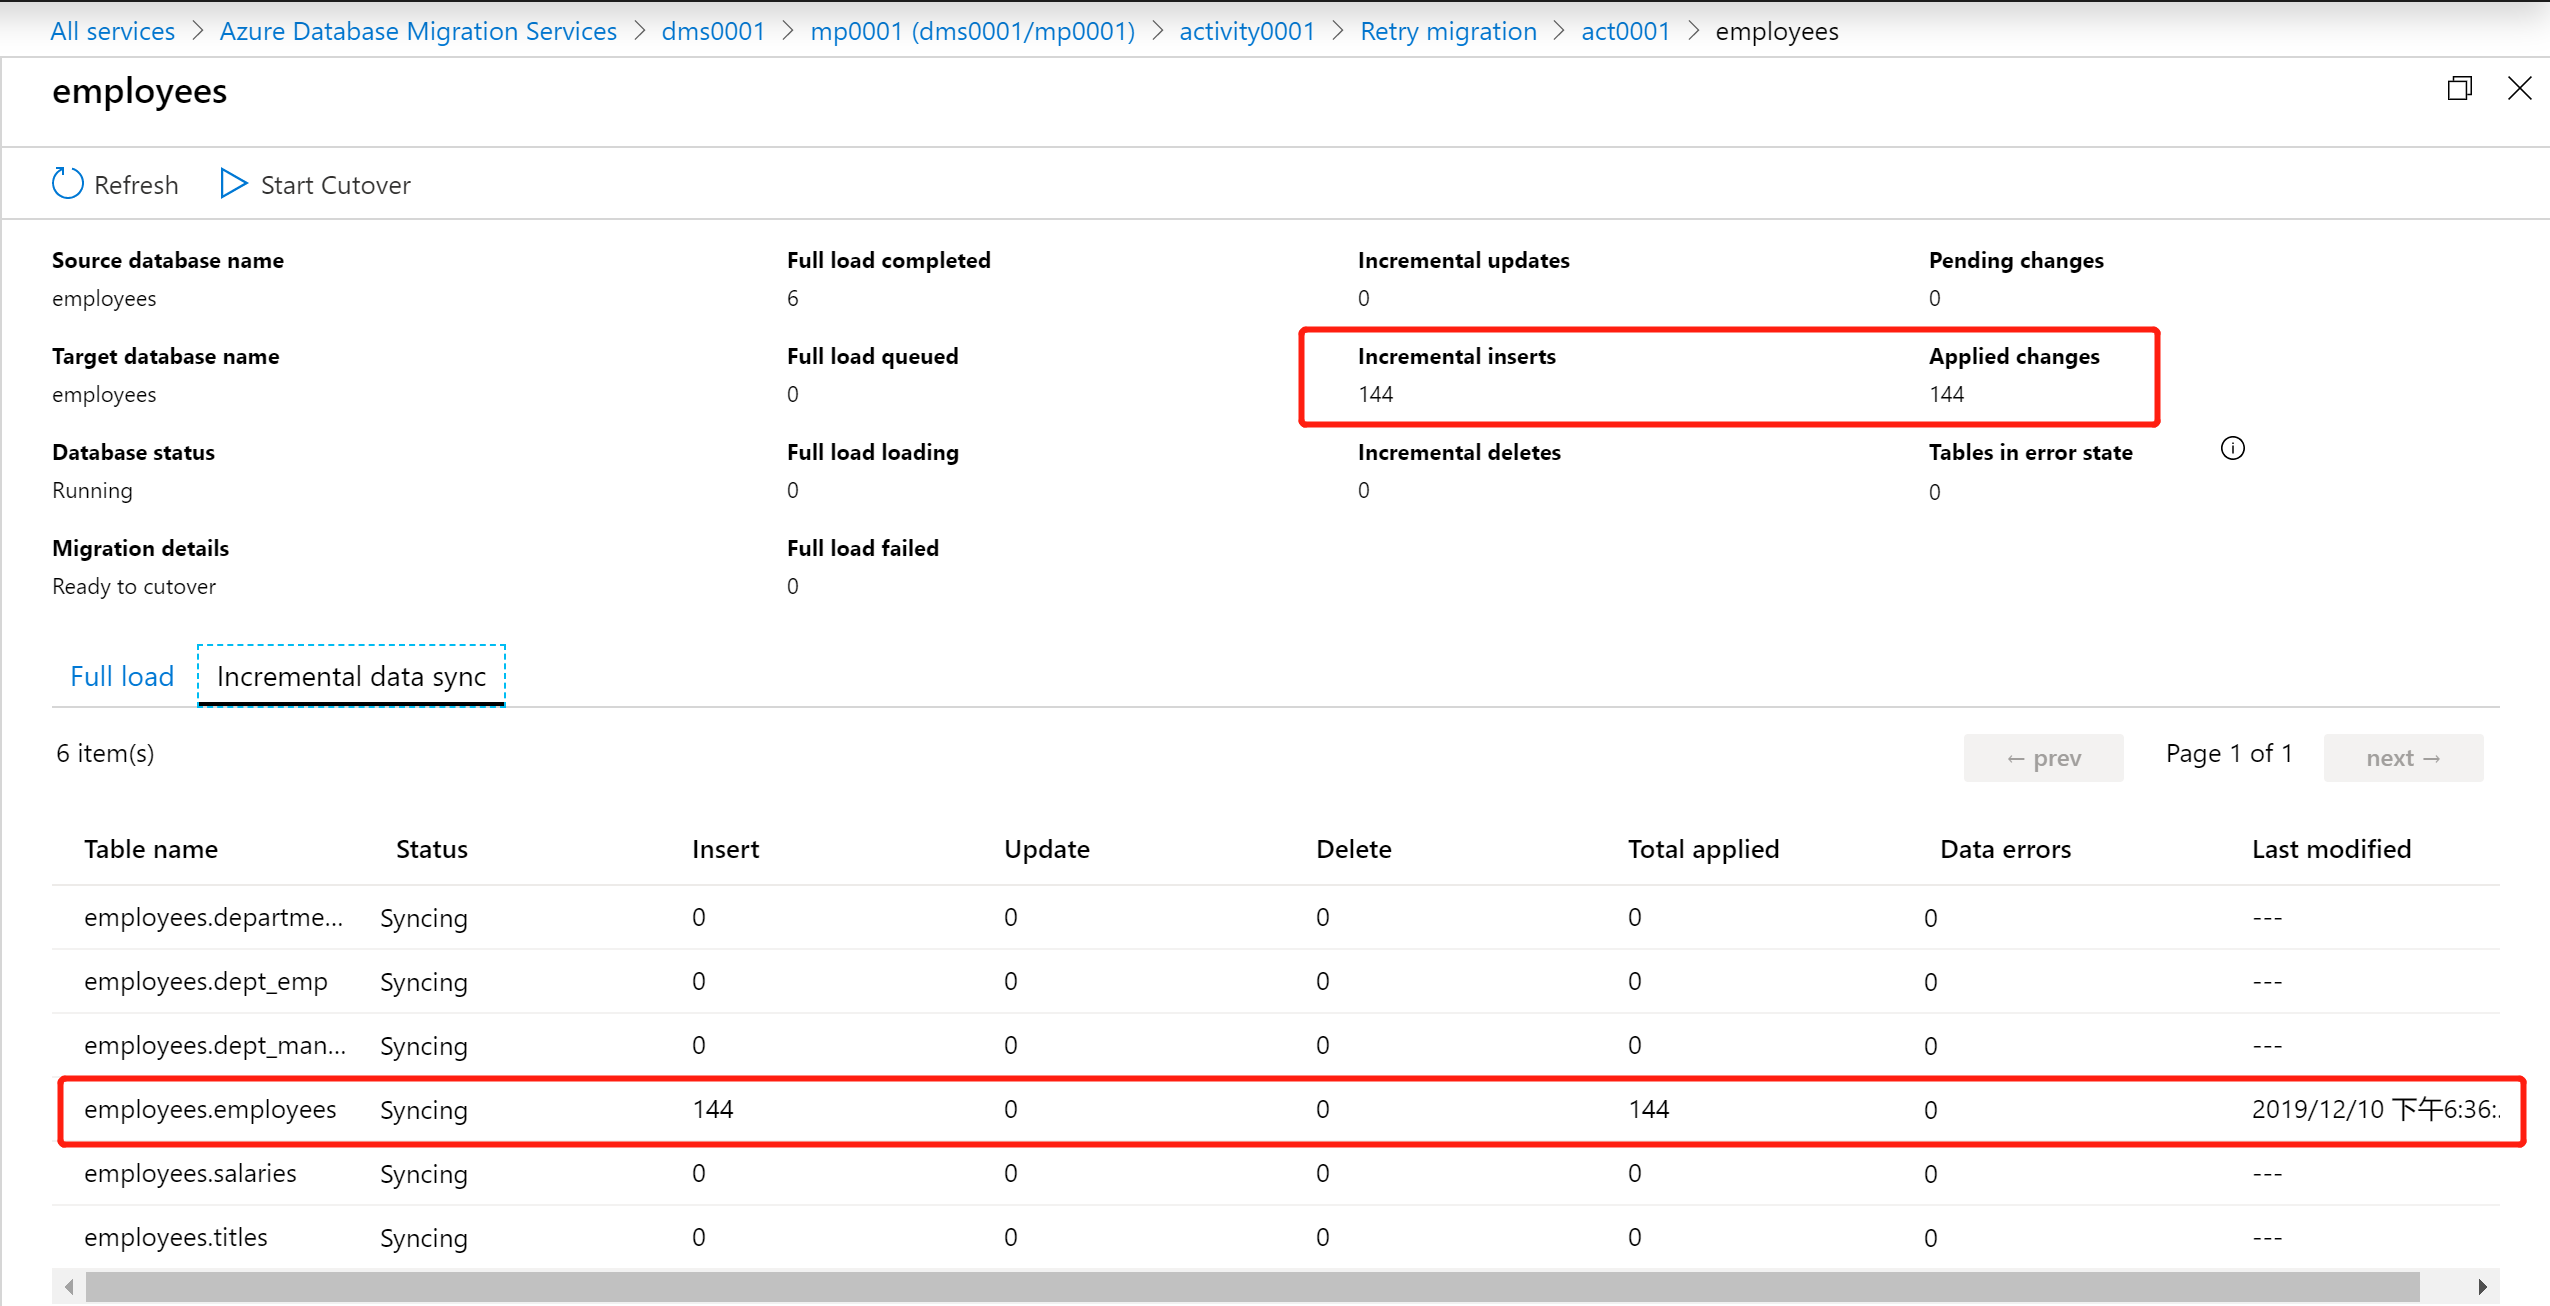
144条记录同步确认
通过 Azure DMS 可以看出来异步同步的记录数量,同时查询数据库也可以做双重验证。
除此之外,Azure DMS 也能够根据写入的速度、频率及数据量大小来评估出来应用程序在做 Cutover 的时候的停机时间,这也是非常的人性化了。
4. 总结 至此,跨云平台的 MySQL PaaS 迁移已经完成了,通过 Azure DMS 可以做到 Online 的数据库迁移至 Azure 并且能够给出校验结果。但是本文还有一些可以优化的场景,比如说 Azure DMS 的迁移可以通过 VPN 链路,VPN 通过两朵云的 VPN Gateway 打通即可,亲测可行,篇幅有限就不放在这篇博客了,留给大家自己测试吧。
