Azure Image Builder(一)之自动化构建自定义托管镜像 CentOS 7.7

1. 前言

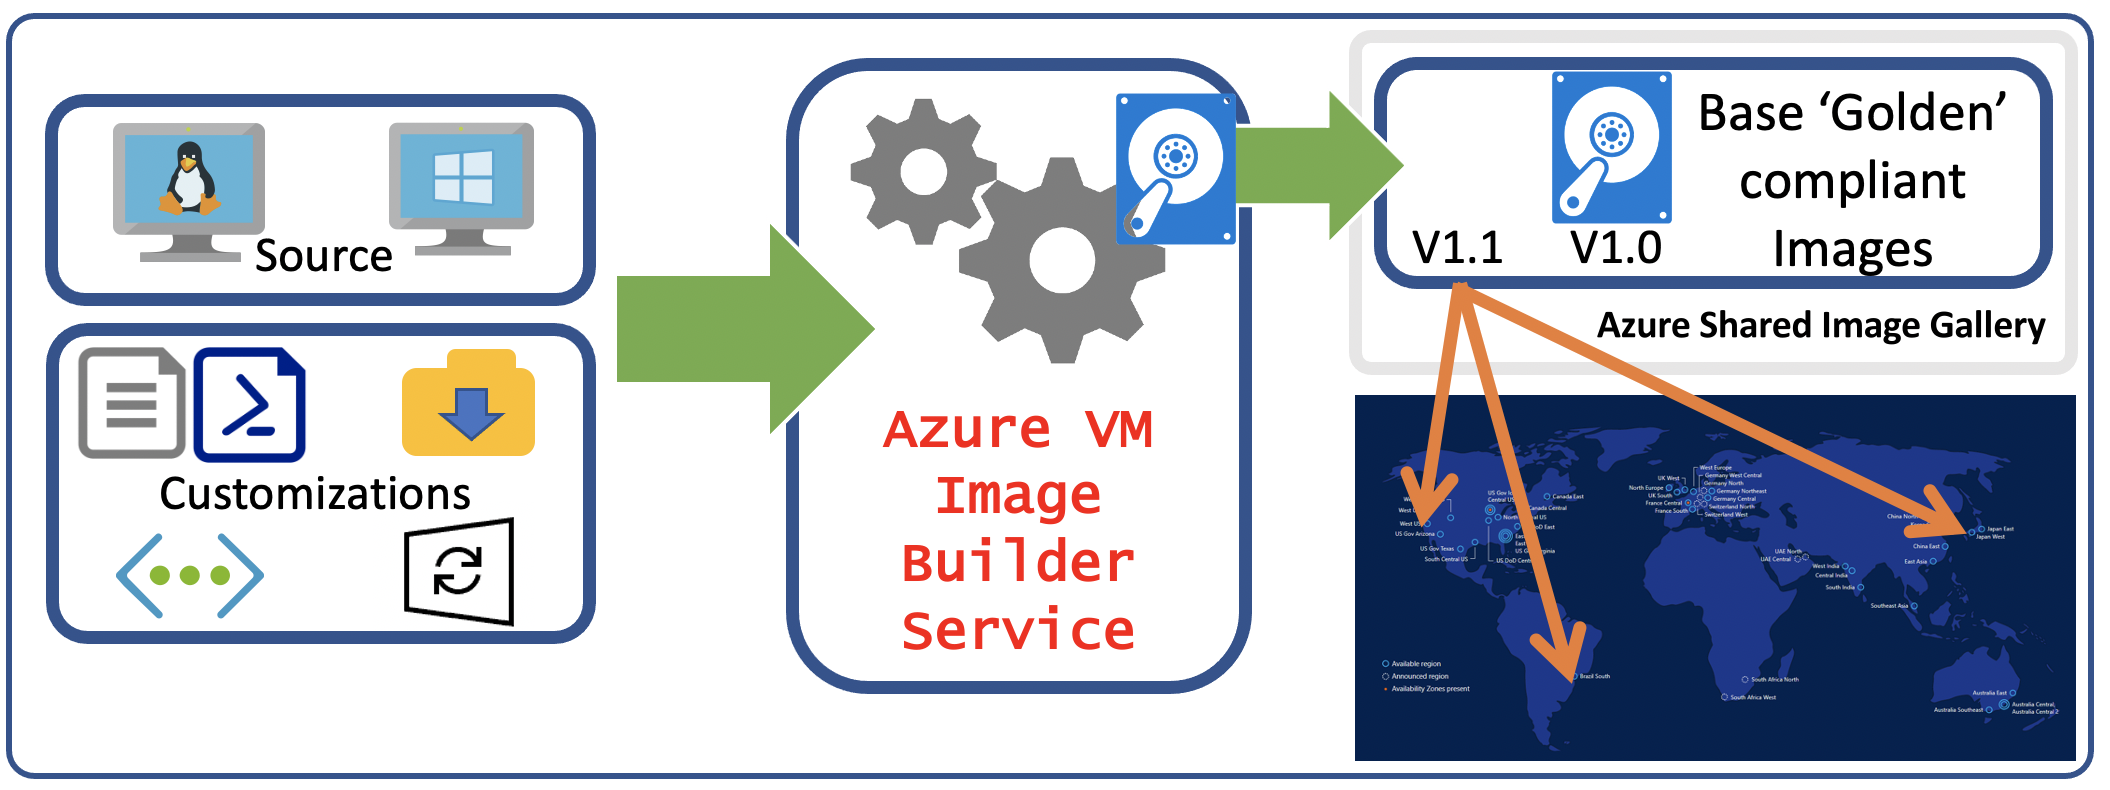
云计算的自动化一直都是一个热门话题,无论 IaaS / PaaS / SaaS 都正在以 Everything As A Code 的方向发展,同时也诞生了很多优秀的云原生或第三方开源自动化工具,HashiCorp Packer 就是其中之一,一个镜像即代码的自动化构建镜像工具。相比开源界,云厂商更没有闲着,我软也不例外,最近在钻研 Azure Kubernetes Service 的同时发现了 Global Azure 目前在 Preview 的一个服务:Azure Image Builder(后文简称AIB)。该服务是构建在 Packer 上的 Azure 云托管服务,用户从基于 Windows 或 Linux 的 Azure 市场映像、现有自定义映像开始,添加自己的自定义项,只需提供一个描述映像的配置,将其提交给该服务,即可生成映像并进行分发,具体 Pipeline 如下图所示。好了,话不多说,第一篇博客我们来测测如何利用这个服务来构建自定义托管的 CentOS 7.7 镜像吧。


2. 前期准备工作

目前 AIB 依然是 Global Azure Preview Service,所以还存在一些限制,包括 Location 以及 OS 版本等,具体在使用 AIB 之前建议充分查看官方文档。本文我们在 Global Azure Region Southeastasia 测试 CentOS 7.7,需要准备好 Global Azure 账户,配置好 Azure CLI,该测试在 Windows Subsystem v2 Ubuntu 18.04 上运行,需要注意该实验需要在一个 Session 内运行,因为要继承所有设置的自定义变量。


3. AIB 构建自定义 CentOS 7.7 镜像

3.1 AIB / VM / Storage Feature 注册

1
2
3
4
5
6
7
8
9
10
11
12
13
14
15
16
# Feature Registration
az feature register --namespace Microsoft.VirtualMachineImages --name VirtualMachineTemplatePreview
az provider register -n Microsoft.VirtualMachineImages

az feature show --namespace Microsoft.VirtualMachineImages --name VirtualMachineTemplatePreview | grep state

az feature show --namespace Microsoft.KeyVault --name VirtualMachineTemplatePreview | grep state

# wait until it says registered

# check you are registered for the providers

az provider show -n Microsoft.VirtualMachineImages | grep registrationState
az provider show -n Microsoft.Storage | grep registrationState
az provider show -n Microsoft.Compute | grep registrationState
az provider show -n Microsoft.KeyVault | grep registrationState

如果命令输出结果显示相关 feature 没注册,则运行以下命令:

1
2
3
4
az provider register -n Microsoft.VirtualMachineImages
az provider register -n Microsoft.Storage
az provider register -n Microsoft.Compute
az provider register -n Microsoft.KeyVault

创建 RG 并设置相关环境变量:

1
2
3
4
5
6
7
8
9
10
11
12
13
14
15
16
17
18
# destination image resource group
imageResourceGroup=aibrg

# location (see possible locations in main docs)
location=southeastasia

# your subscription
# get the current subID : 'az account show | grep id'
subscriptionID=$(az account show | grep id | tr -d '",' | cut -c7-)

# name of the image to be created
imageName=centos77image01

# image distribution metadata reference name
runOutputName=centos77image01ro

# create resource group
az group create -n $imageResourceGroup -l $location

创建 User-Assigned Managed Identity 并赋权:

1
2
3
4
5
6
7
8
9
10
11
12
13
14
15
16
17
18
19
20
21
22
23
24
25
26
27
28
# create user assigned identity for image builder to access the storage account where the script is located
idenityName=aibuami01
az identity create -g $imageResourceGroup -n $idenityName

# get identity id
aibuami01id=$(az identity show -g $imageResourceGroup -n $idenityName | grep "clientId" | cut -c16- | tr -d '",')

# get the user identity URI, needed for the template
aibuami01uri=/subscriptions/$subscriptionID/resourcegroups/$imageResourceGroup/providers/Microsoft.ManagedIdentity/userAssignedIdentities/$idenityName

# download preconfigured role definition example
curl https://raw.githubusercontent.com/TheoDoreW/wxsblog.github.io/master/2021/07/25/2021-07-25-AzureImageBuilderCLMI/template/AIBRoleImageCreation.json -o AIBRoleImageCreation.json

imageRoleDefName="Azure Image Builder Image Def01"

# update the definition
sed -i -e "s/<subscriptionID>/$subscriptionID/g" AIBRoleImageCreation.json
sed -i -e "s/<rgName>/$imageResourceGroup/g" AIBRoleImageCreation.json
sed -i -e "s/Azure Image Builder Service Image Creation Role/$imageRoleDefName/g" AIBRoleImageCreation.json

# create role definitions
az role definition create --role-definition ./AIBRoleImageCreation.json

# grant role definition to the user assigned identity
az role assignment create \
--assignee $aibuami01id \
--role "$imageRoleDefName" \
--scope /subscriptions/$subscriptionID/resourceGroups/$imageResourceGroup

3.2 修改 CentOS 7.7 模板定义文件

1
2
3
4
5
6
7
8
9
10
11
# download the example and configure it with your vars

curl https://raw.githubusercontent.com/TheoDoreW/wxsblog.github.io/master/2021/07/25/2021-07-25-AzureImageBuilderCLMI/template/CentOS77AIBTemplate.json -o CentOS77AIBTemplate.json

sed -i -e "s/<subscriptionID>/$subscriptionID/g" CentOS77AIBTemplate.json
sed -i -e "s/<rgName>/$imageResourceGroup/g" CentOS77AIBTemplate.json
sed -i -e "s/<region>/$location/g" CentOS77AIBTemplate.json
sed -i -e "s/<imageName>/$imageName/g" CentOS77AIBTemplate.json
sed -i -e "s/<runOutputName>/$runOutputName/g" CentOS77AIBTemplate.json

sed -i -e "s%<imgBuilderId>%$aibuami01uri%g" CentOS77AIBTemplate.json

3.3 创建 CentOS 7.7 镜像

该过程会创建一些中间资源,比如 “IT_DestinationResourceGroup_TemplateName” 的 RG 以及 D1v2 大小的 Staging VM,这些资源都是 AIB 自动化创建

1
2
3
4
5
6
7
8
9
10
11
12
13
14
15
16
17
18
19
20
# submit the image confiuration to the VM Image Builder Service

az resource create \
--resource-group $imageResourceGroup \
--properties @CentOS77AIBTemplate.json \
--is-full-object \
--resource-type Microsoft.VirtualMachineImages/imageTemplates \
-n CentOS77AIB01

# wait approx 1-3mins, depending on external links

# start the image build

az resource invoke-action \
--resource-group $imageResourceGroup \
--resource-type Microsoft.VirtualMachineImages/imageTemplates \
-n CentOS77AIB01 \
--action Run

# wait approx 15mins

3.4 创建 CentOS 7.7 VM 并登陆验证

1
2
3
4
5
6
7
8
9
10
11
12
13
14
15
16
17
18
19
az vm create \
--resource-group $imageResourceGroup \
--name centos01 \
--image $imageName \
--location $location \
--admin-username centos \
--ssh-key-value @id_rsa.pub

# and login...

ssh centos@<pubIp>

You should see the image was customized with a Message of the Day as soon as your SSH connection is established!

******************************************************************
** This VM was built from the: **
** !! AZURE VM IMAGE BUILDER Custom CentOS 7.7 Image !! **
** You have just been Customized :-) **
******************************************************************

4. 总结

至此,通过 AIB 自动化构建 CentOS 7.7 镜像的示例就完成了,希望能够给大家一些参考,把这个服务有机的集成利用起来。